All blogs

Content Delivery of Tomorrow, Created by Drupal Today.
We recently wrapped up DrupalCon Global 2020. And we’d like to give you a sneak peek into our session. Our session Content Delivery of Tomorrow, Created by Drupal Today revolved around why content should be considered a part user experience and how Drupal enables content writers to reduce content roll-out time. With real-life examples and success stories where organizations that have adopted Drupal and empowered their Marketing teams to create a sustainable competitive advantage.
Over recent years, new features and roll-outs have evolved Drupal to become more than a CMS platform. Today, it is a Digital Experience Platform! As marketers, we are in a constant rush to bring forth contextual and targeted content for users. Drupal makes this content delivery seamless, effective, and faster.
Let’s take a look at Digital Around the World 2020

Digital platforms have experienced a surge in 2020 and Digital Marketing is getting more competitive. COVID-19 has uncovered different stress points for Marketing and IT.
Marketing acknowledges the need to connect with people - quickly and authentically. And we can’t emphasize enough on the need to deliver content at an elastic capacity and accelerated pace
Marketing matters now more than ever!

The world is full of innovative products, services, technologies, and solutions today. Innovation alone cannot sustain a business; it must be paired with marketing. The pandemic is pushing marketers to re-evaluate their digital marketing roadmap. For this:
- We Need to Elevate the human experience
Customers are more connected and empowered than ever before, it’s essential to deliver tailor-made and memorable experiences. We need to connect design, technology, and content to unlock the power of the human experience
- Qualify and quantify brand resilience
You need to ensure that your brand is capable of meeting disruptive behaviours and trends. This helps your brand anticipate and respond in moments of uncertainty.
Marketing’s forte is consumer connection, and the pandemic has taught marketers to do it quickly and authentically. And to thrive in a disrupted world we need to Adapt, Innovate, and Integrate.
Viral vs Long tail marketing
Brands usually adopt either a viral marketing approach or a long tail marketing approach
Viral marketing is more like producing content that catches fire. The concept of viral marketing definitely deserves some revisiting as we enter a new decade/year.
- Viral is cool, but difficult to predict
- Long-tail marketing is more viable and can be built into practice. And we stand by Longtail marketing :)
Challenges marketers face

Marketers are facing trouble with collaboration across teams, which also acts as a hurdle for them to execute marketing experiments at a faster pace. Managing change is also becoming difficult for marketers and they struggle with agility. These challenges are preventing the alignment of goals when it comes to marketing and IT functions.
For example, if we have to create a landing page for a webinar that we are hosting. Once the content is ready, we will have to be dependent on the dev team to help me build a page and place the content, maybe integrate it with analytics, redirect the audience, add a contact form, etc.
Content Marketing

Content marketing lies at the core of every marketing team and the more content you put out there – the better for you! But when you have websites, social pages, and blogs, to work with, it can feel impossible to deliver everything with quality and speed. This results in a ‘The Content Crisis.’ One cannot solve the Content Crisis by just working harder. Instead, you need a plan and a platform that will help you deliver the volume and quality of content your audience demands.
A good editorial experience

While we have been emphasizing on the challenges of marketers and stats around content marketing, we’d like to shed some light on why a good editorial experience is important. Content editors/managers are likely the ones who use/visit your website the most. If they don’t like it, your CMS implementation is a failure!
Marketing Automation

Marketing automation tools help automate repetitive processes, provide personalization, improves efficiency, performance and also drives more leads and revenue!
Automation Offers:
- More Efficient and Effective Marketing Campaigns
- Conserve Resources and Be More Creative
- Create a Better Customer Experience
With the endless benefits of Marketing automation, a considerable chunk of marketers thinks creating quality automation is their number 1 challenge. Marketers still struggle with data management, optimization, and segmentation or finding the right marketing automation tool.
Adapt your technology - overcome disruption
With the explosion of content, and the influx of digital users you need to adapt your technology to overcome the disruption. And this is where Drupal and Digital Experience Platforms come in!
Digital Experience Platforms - Drupal
Brands need to provide content experiences outside a website, justifying the shift from web content management to DXPs.

Today brands need to provide content experiences outside a website. CMSs like Drupal that go beyond the web, are the backbone of a Digital Experience Platform! Drupal can bring together marketing information systems, SEO, advertising, analytics, tracking, and content to create robust digital marketing campaigns.
Drupal empowers marketing individuals and teams to:
- make decisions
- integrate their chosen tools
- manage content better
- and make the most out of their Drupal websites
They can drive team success with easy content authoring tools that put their goals within reach - faster.
Why does Drupal have an edge?

Drupal is a powerful tool for agile marketing and content management, and it doesn’t require any prior tech knowledge! Drupal’s content-first, commerce-first, and community-first marketing solutions help achieve the most ambitious business goals. With Drupal, it’s about giving your team the tools to move smart and agile. To make the biggest impact whether you’re seeking lead generation, conversion, or online sales. Drupal plays well with others, offering endless automation and integration opportunities
Making content admins contextual with

The first level is creating the content, but then managing it afterwards, being able to edit it, and interact with it also becomes very critical. Drupal puts many controls in the Admin experience, it allows site builders and editors to create content types, configure the fields that they use, and even configure some of how that data will be displayed to users.
Drupal delivers:
- Smart Content
- Allows for flexible content delivery
- Offers translation and localization opportunities
- Seamless third-party integrations
- And omnichannel personalizations
Content Admin UI

Drupal’s Admin UI offers Intuitive tools that facilitate ease in content creation, workflow and publishing. Content admins can go and sort through the content in the content view. With filters for Publishing status, the Type of content, Title, Language.
Workflows - With all the tools in place Drupal offers a controlled content editing workflow. Content starts as a Draft - Gets Reviewed - Goes through a Revision Cycle - Is then Archived - Published.
Content moderation - displays who changed what, when, and can also revert to an older version of that content
New Editor

And aren’t we all excited about The New Editor? This out of the box Drupal 8 and now Drupal 9 brand new editor is built on CK editor and empowers content admins to create their own content, allowing the tech team to focus on development rather than tweaking content. Along with the usual formatting, this editor is now customizable!
- You can now embed content from external sources like Youtube or Spotify
- Custom styles can be applied directly to your text
- Offers better previews
- And a Mobile-friendly interface for content editors to edit content on-the-go!
In-place editing

Drupal’s In-place editing allows content editors to edit the content on the screen itself and doesn’t require editors to go to the edit page, making the content even more flexible
Media Library
Drupal 8 and now Drupal 9 comes with a Media Library! This media library is Built into the editor and it acts as a repository to manage and upload/bulk upload your media
Layout Builder
And how can we not talk about the Layout Builder! The layout builder basically transforms the whole experience of creating web pages. Our marketing team can create beautiful case studies, service landing pages with the layout builder in no time! And with zero dev dependency!

Layout builder offers:
- Template Control - it puts the creation and “design” of content types in the admin experience. Layout builder enables site builders to create visual templates and lets authors just fill in fields
- Convenient Interface - featured with the drag-and-drop option and not just for the blocks but to the fields of a content type. This gives content editors complete control while building their layouts.
- Customization - You can customize all the individual entities.
- It offers Layouts ranging from one column to two columns bricks to 3 rows 3 columns in 2nd row by simply creating or updating a few template files.
A few Advantages of Layout builder includes:
- The ability to Review your changes whilst building
- Easy user experience
- Spin up landing pages for campaigns or promotions in no time!
Flexible Designs

Flexible pieces of media that can be moved around at will and not weaved in one way to use them together, you can use the components in different ways. Flexibility and scalability, structural variations and options that are smart, flexible layouts, etc. The author shouldn’t have to think about responsive design, as it provides a really good mobile experience.
Third-party integrations

Customer experience is not solely defined by your CMS, your system must be able to integrate seamlessly with other technologies, CRM’s, channels, and other marketing tools. Enabling marketers to deliver a cohesive customer experience. Drupal integrates seamlessly with a wide ecosystem of digital marketing technology and other business applications. Drupal’s API-first approach connects content to other sites and applications, making content more powerful.
Acquia Site Studio

While the Drupal community is continuously striving to improve the content editing experience, we’d like to talk about a couple of no-code/low-code platforms that make content marketers lives easy! Acquia Site Studio is not only a low-code technology for Drupal developers but it is also a no-code tool for marketers.
Acquia Site Studio offers features like:
- Site-Building - this enables building new components effortlessly with an intuitive component builder tool in the UI. This can be achieved without writing a single line of code, enabling the development teams to focus on high-value features, while your marketing team can create beautiful experiences with Site Studio’s admin interface.
- Styling - Site Studio not only equips marketers with creating/building but also allows them to style components - such as colour, background image, font. This means marketers can tweak components without making design revisions or assigning a developer to implement them.
- DIY Components - provides the freedom and flexibility to respond to varying marketing demands by creating new components in no time.
- Reuse - allows features and content to be reused across pageshttps://www.qed42.com/sites/. This is especially beneficial to marketing teams that have numerous sites they need to get up and running quickly.
Read more about Acquia Site Studio here.
Faster, easier personalization for Marketers - Acquia Personalization
Another no-code application is Acquia Personalization also known as Acquia Lift:
- It helps marketers quickly and easily optimize customer experiences.
- Enables you to segment your audiences and deliver personalized experiences across any channel or device
- Acquia Personalization is optimized for Drupal and it allows you to take customer data and customize your content distribution
- It also enables marketers to create complex personalized campaigns
- Its Enhanced scheduling helps marketing teams align personalizations to promotions and events
- It also comes along with real-time dashboard and analytics to review activities and metrics for both optimizing and validating your marketing investment
Digital Experience Platforms that Deliver

"DXP is an integrated software framework for engaging a broad array of audiences across a broad array of digital touchpoints".
– Gartner
Brands like Nestle, Pfizer, Novartis, Bayer, Grofers, and many more are thinking beyond websites and creating robust digital experience platforms. Enterprises are standardizing their marketing stack on Drupal -- funded by Marketing, driven by the knowledge of the customer journey, and powered by the explosion of non-browser channels and the new ecosystems of SaaS, Martech, and Microservices. This new landscape brings with it the ability to monitor, analyze and control the customer journey which the Marketing department expects.
Drupal's flexibility allows for standardisation of branding, Design systems, Authoring Experience, Content efficacy across hundreds and thousands of sites.
- This leads to saving costs and improving efficiency.
- Launch of a new micro or regional site doesn’t take months but weeks or even days (for instance Pfizer, was launching one website per day at a point).
Use Cases
Multi-site Rollouts for a Fortune 500 Swiss FMCG Company

Leading brands are navigating disruption with Drupal. We delivered Multi-site Rollouts for a Fortune 500 swiss FMCG company with Acquia Site Factory. We Built and designed 70+ websites using the same design philosophy and a single codebase using Acquia Cloud Site Factory architecture. Looking at the stats we can’t deny that Drupal has empowered their teams! Rolling out 75 sites in 3 months.
HCP Engagement & Onboarding portal for a Leading Global Medicines Company

We built an accurate, relevant, and easily accessible healthcare provider portal.
Landing page - choice of sections provided to create various landing pages with various options to apply different type of layout blocks on a single page.
We Enabled the client to create landing pages effortlessly by applying different types of layout blocks on a single page. And Eliminated the need to redirect to other platforms by enabling the client to build microsites for various product pages. We also integrated their platform with Salesforce and enabled Personalized Content - Sites now behave differently based on the area of expertise or the role of the current user.
Marketing CMS for Grofers Native Mobile App

We worked with Grofers on their CMS strategy for their Mobile App intending to reduce dependencies between marketing and engineering teams, easy and quick content publishing, run marketing experiments, and improve the overall throughput and velocity.
Enabling Ashoka.org's Presence Across 90+ Geographies with Localisation

Ashoka’s website is served in 90+ countries, every page on the site has the potential of having a localized version for all the countries.
What does the future look of Content look like?
- We see more organizations adopting Digital Experience Platforms
- Omnichannel publishing
- Brands opting for Decoupled architecture and Centralized Content Management
- We see more low code platforms like Site Studio
- Of course tons of automation

Acquia Site Studio - A new friend of Content Marketers in Drupal!
Today, we are responsible for owning our digital experience. Site builders, developers, and marketers must be empowered to build and improve websites without being stuck in lengthy development cycles and slow processes. As one of the early-adopting agencies of Acquia Site Studio and with Acquia Site Studio certified developers, we have covered Acquia Site Studio’s basics and its advanced features in our previous blogs. In this blog, we will talk about how Acquia empowers Content Marketers in Drupal.
Acquia Site Studio is not only a low-code technology for Drupal developers but it is also a no-code tool for marketers.
There are plenty of site building tools in the market like Wix, Elemento, and Squarespace where you can have your own customizations easily. There was a time when the Site Studio tool was being considered as an abstract concept in Drupal. But, now, all configurable features are available under Drupal’s hood as a site builder tool and that too with Dynamic content mapping.
Many of you must be thinking that how could it be helpful for the marketers?
Expediting Site-Building
Ever wondered how many times the marketing team is unsatisfied with site-building and are dependent on developers, despite possessing the required skills to create the promotional pages with different types of layout using CSS?
Acquia Site Studio is essentially slicing the frontend layer and presenting it as a user interface, where the frontend code can be directly applied along with the User Interface. It essentially serves as an accelerator for building your site with tools to create your own components and templates independently.
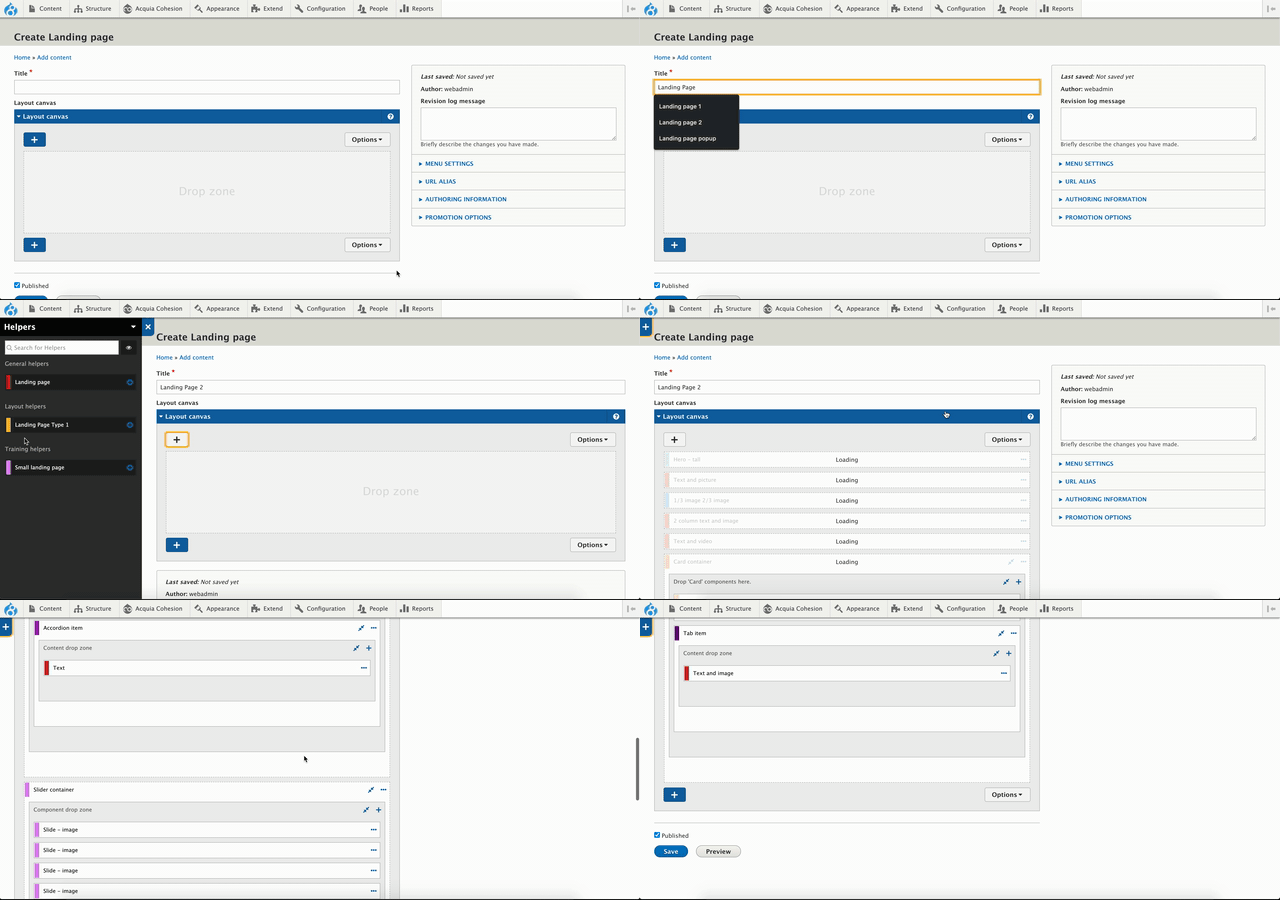
Having a component-based frontend layer available as a UI, it is really simple to create different layouts in no time by a mere drag-and-drop. Building new components is made effortless with an intuitive component builder tool in the UI. All these can be achieved without writing a single line of code.
This enables the development teams to focus on high-value features, while your marketing team can create beautiful experiences with Site Studio’s admin interface. Content editors can create pages and content rapidly by simply dragging components into the canvas editor without writing any code.
Styling Components and Elements
Site Studio not only empowers marketers with creating/building but also allows them to style components - such as colour, background image, font, and responsive breakpoint settings. This means marketers can tweak components without making design revisions or assigning a developer to implement them. These modifications can be previewed and changed in real-time, without deployments or site updates.
Components and styles are managed in Drupal and can have baselines set according to the branding guidelines of the organization, maintaining design and brand integrity. The style guide editor allows site managers to change the site-wide presentation of allowed elements in just a few clicks to go-live.
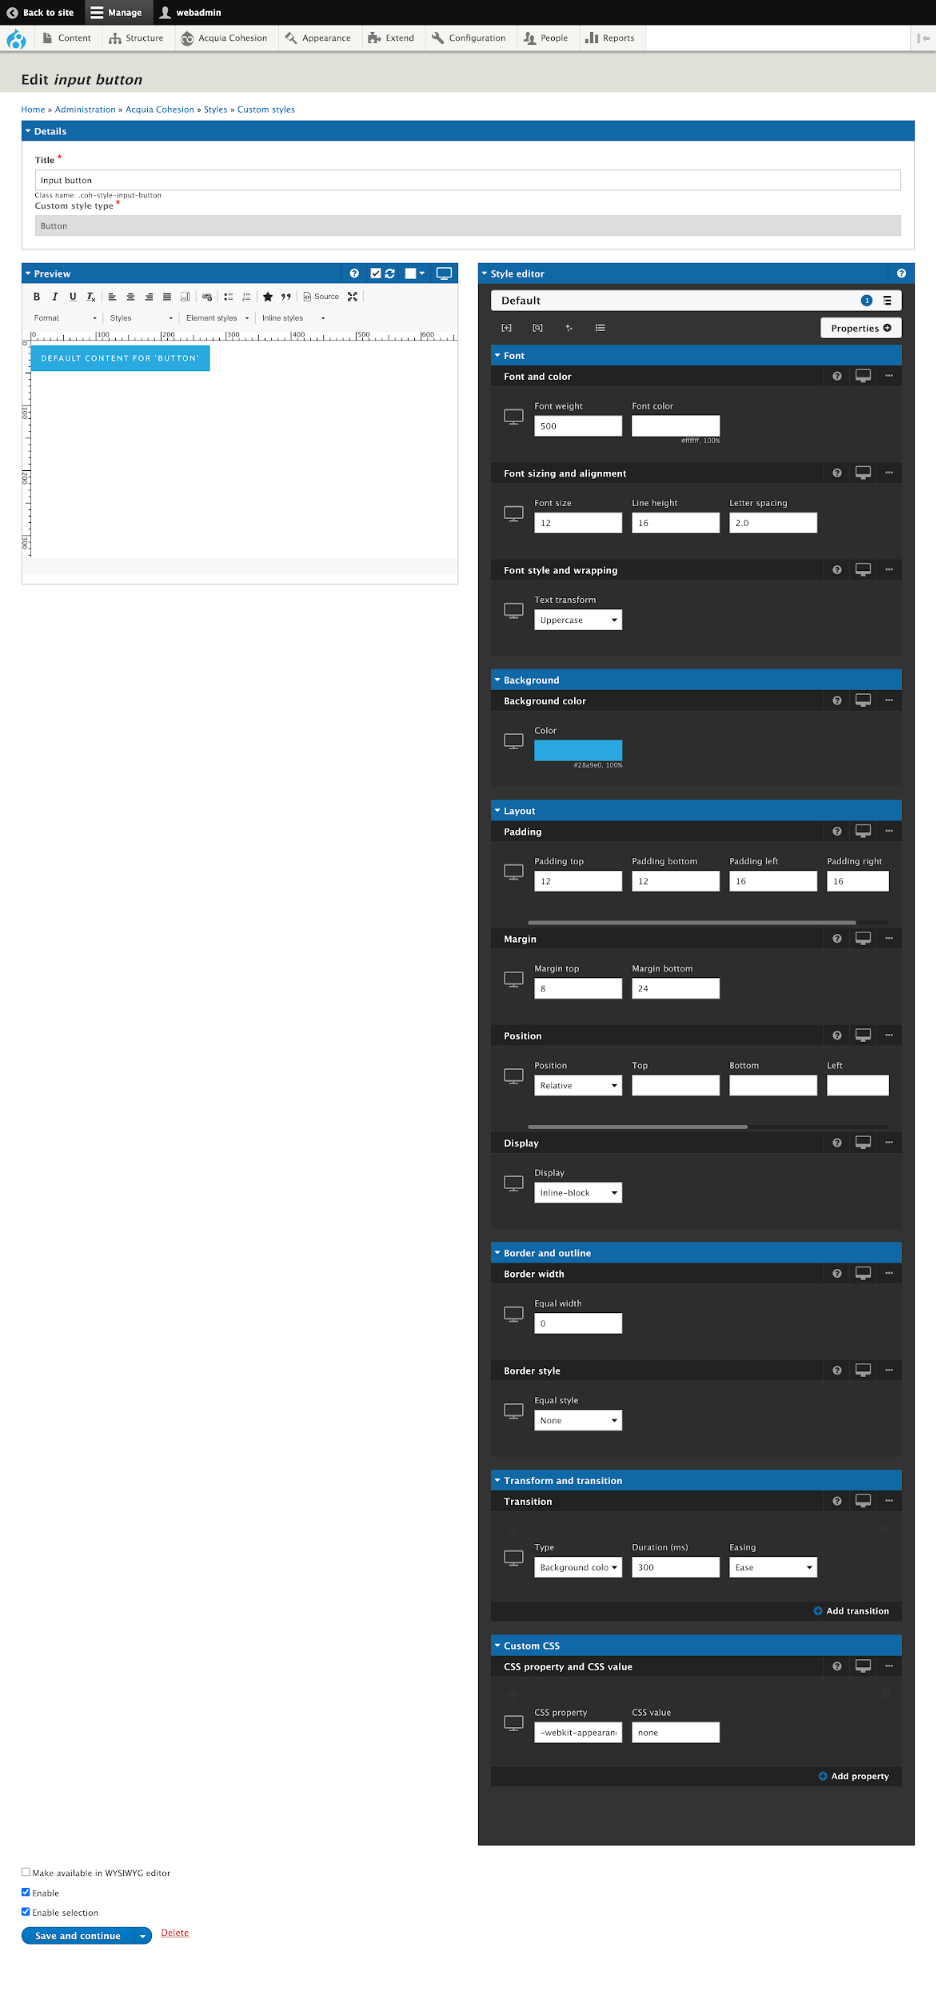
After creating the above Input button style it can be used like below screenshot on Dx8 Elements or Components through Style dropdown.
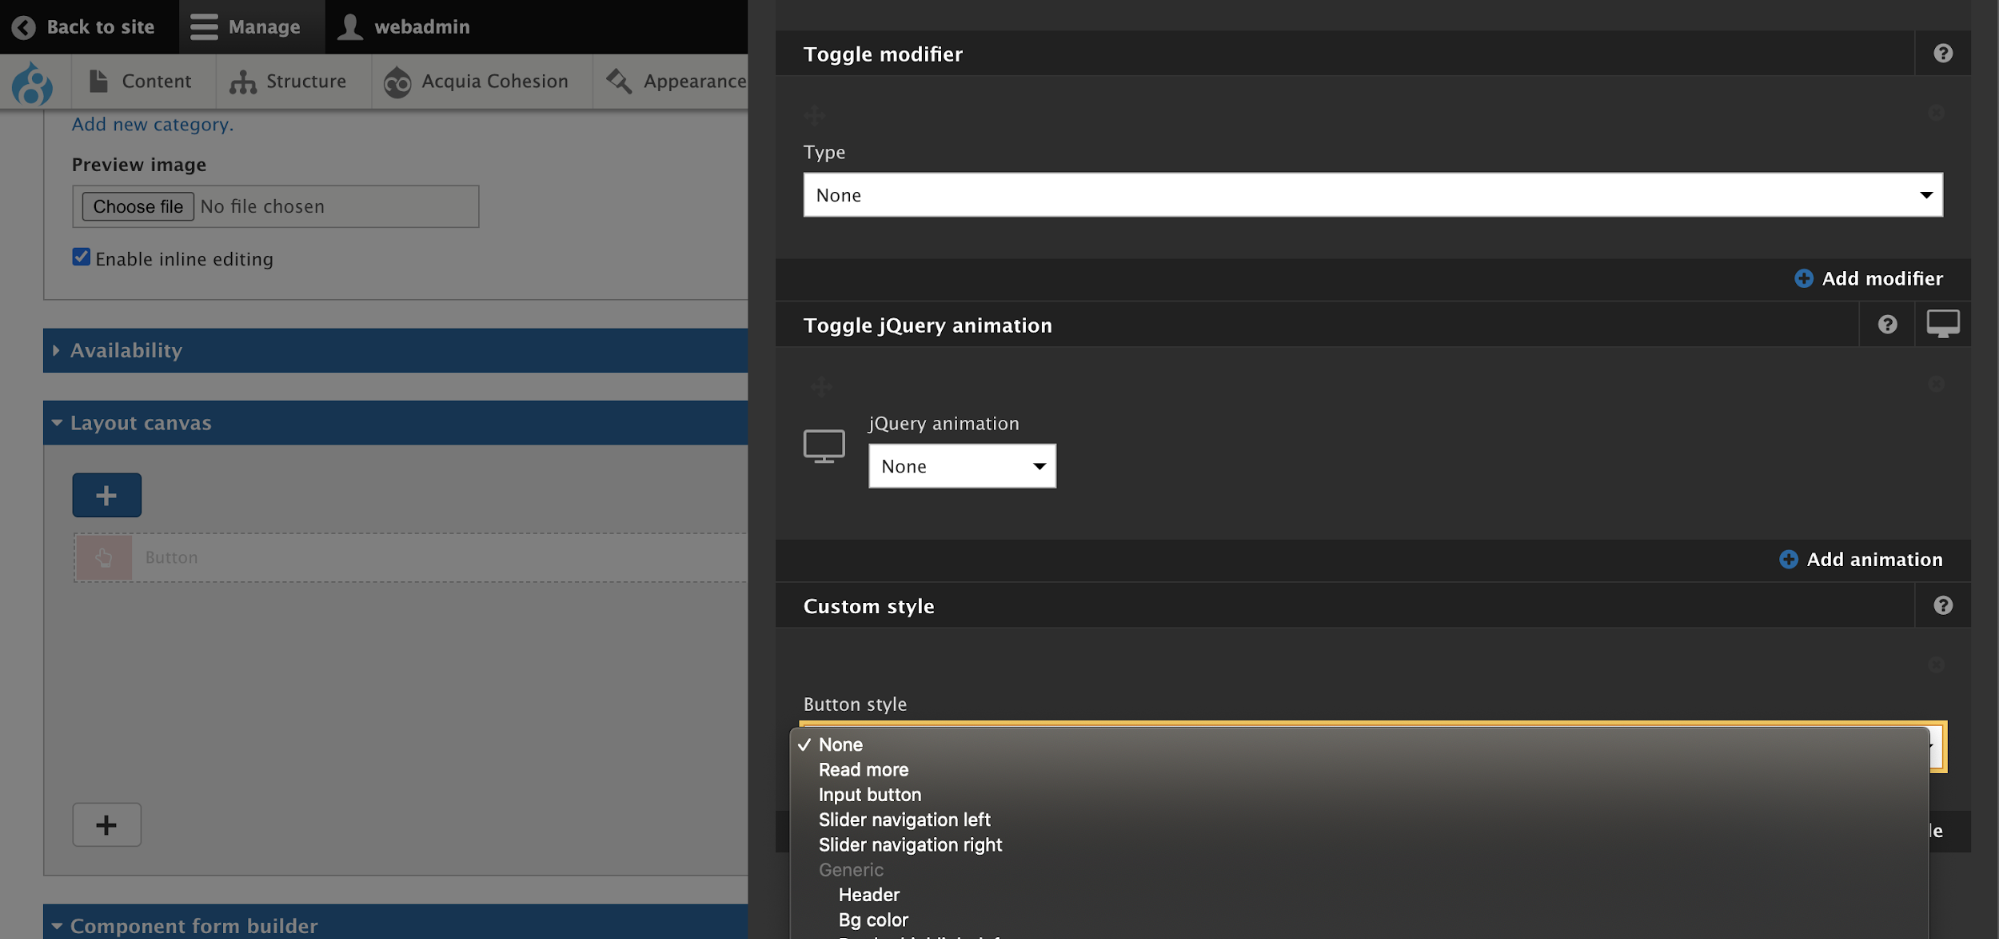
OR
Styles can be applied directly to the component as stated in below image

DIY Components
Site Studio provides the freedom and flexibility to respond to varying marketing demands by creating new components in no time. Since it leverages the established styles and design, developers do not need to update CSS styles or add HTML markup to enable the presentation of the new components.
Build once, use everywhere
Acquia Site Studio allows features and content to be reused across pageshttps://www.qed42.com/sites/. Editors can export their components, templates, styles, views, and site configuration and import them to other sites using Site Studio. This is especially beneficial to marketing teams that have numerous sites they need to get up and running quickly. The reuse provides tremendous value for companies building sites at scale.
Now, let’s look at an example.
Marketing teams often need to create landing pages for a promotion or campaign, with brand new layouts and components. However, they are dependent on the development team and are compelled to follow the process of creating new features or components for the landing page. This hampers the quick turnaround time that the Marketing team requires to execute any campaign.
Marketing teams need a design system, developed by following the style guide consistency, containing scalable, granular, reusable components which can be assembled to create ‘n’ number of pages.
Acquia Site Studio (Cohesion DX8) allows marketing teams to use the existing crafted components quickly and effectively from an existing component library. Allowing them to create multiple page layouts making sure they function perfectly in tandem, following the brand guidelines.
Once the design pattern is ready and available as components, it is very easy for the marketing team to use those components in the layout canvas field to create the desired layout, that too, without worrying if brand standard guidelines have been followed or not.
Acquia Site Studio also builds the design patterns device friendly using the breakpoints which have been set as per the brand guidelines. One example could be of Heading font size for different breakpoints or stacking of inline items in smaller breakpoints. Design systems and patterns show how much we think ahead in this digital age and Site Studio provides the platform to achieve our required page presentation effortlessly.
Start Today
Currently designing and deploying 3+ Acquia Site Studio projects, our team of experts can help you plan, execute and deliver the digital ROI. If you wish to significantly reduce your time to market and explore Acquia Site Studio with Drupal, please reach out to us at business@qed42.com.
Interested to read more about Site Studio? Here are some articles for you:

Enhance Drupal’s Layout Builder
The Layout Builder provides the ability to drag and drop site-wide blocks and content fields into regions within a given layout. While working with default views of a layout we believe there is considerable scope for improvement, giving a cool configurable layout to the content editor and site builders.
We started to look for enhancement modules and we found a lot of useful modules from https://www.drupal.org/docs/8/core/modules/layout-builder/additional-modules.
We implemented a few modules and improved the look and feel, significantly!
While working with these modules we came across certain issues or improvements needed from the content editors perspective:
Content editing experience: default off-canvas dialog box
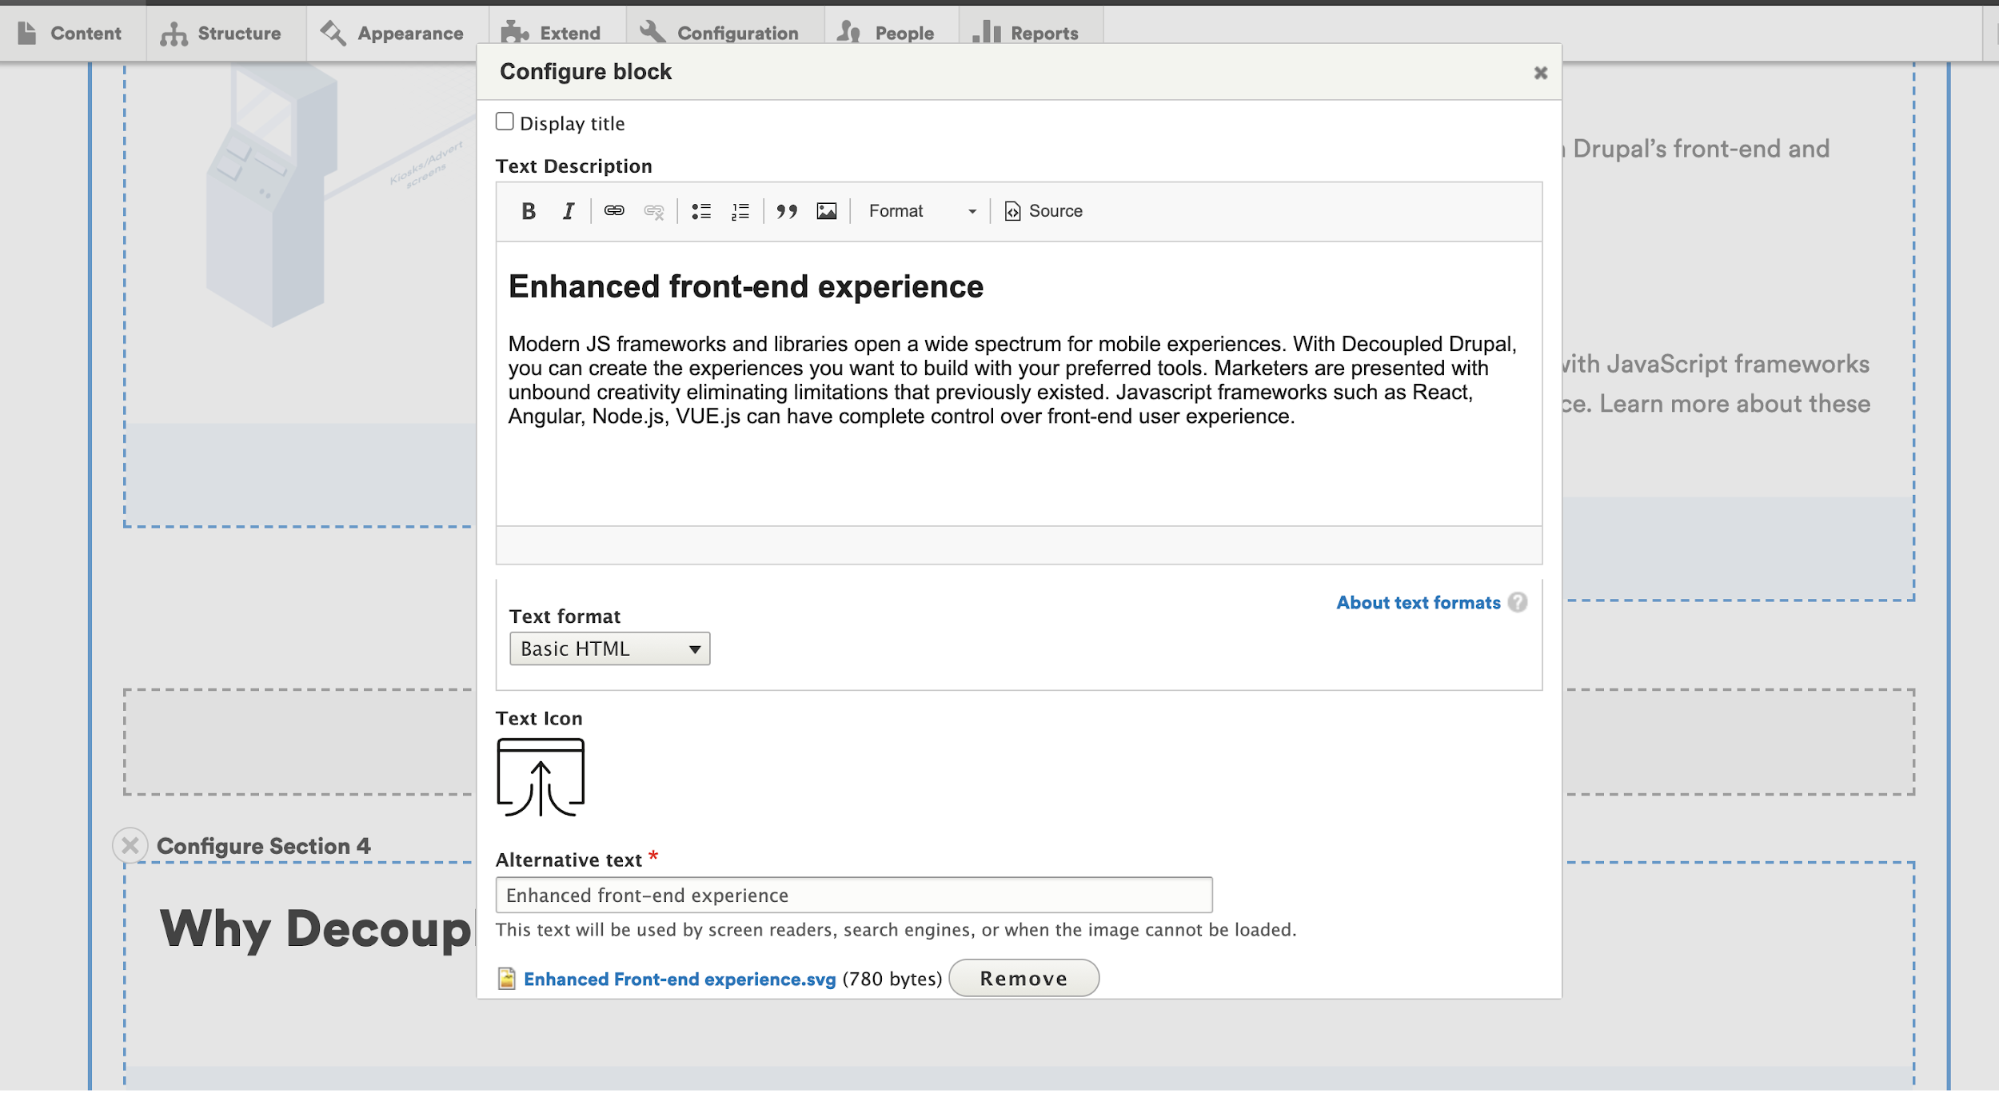
The interface for the user to write content within this custom block would be through the off-canvas dialog which is a standard solution chosen by the Layout Builder developers. The off-canvas dialog is very narrow and not an optimal user experience for this scenario.
An alternative to this is the Layout Builder Modal
- This module lets you add and configure existing blocks in a modal in the Layout Builder UI. Delivering a better interface to the content editors.
- This module lets you use a modal dialog instead. This modal opens when trying to add a new block.
Here’s the link to download the Layout Builder Modal: https://www.drupal.org/project/layout_builder_modal
Content editing experience: Default UI for adding blocks and section
The default Layout Builder’s ‘Manage Display’ interface shows all blocks (including all entity-specific fields), and all layouts that are registered in the system. For all sites, this poses a usability problem, as the list of blocks quickly becomes very large. Additionally, for many sites, the ability to curate which blocks and layouts are available on a given entity is an information architecture necessity.
An alternative for this is the Layout Builder Restrictions
- This enables you to set which blocks and which layouts should be available for placement in the Layout Builder.
- This module provides a configurable UI to allow-listing/deny-listing blocks and layouts.
- Sites can allow all options from a certain provider, or restrict all options by the provider, or specify individual allowed blocks and layouts.
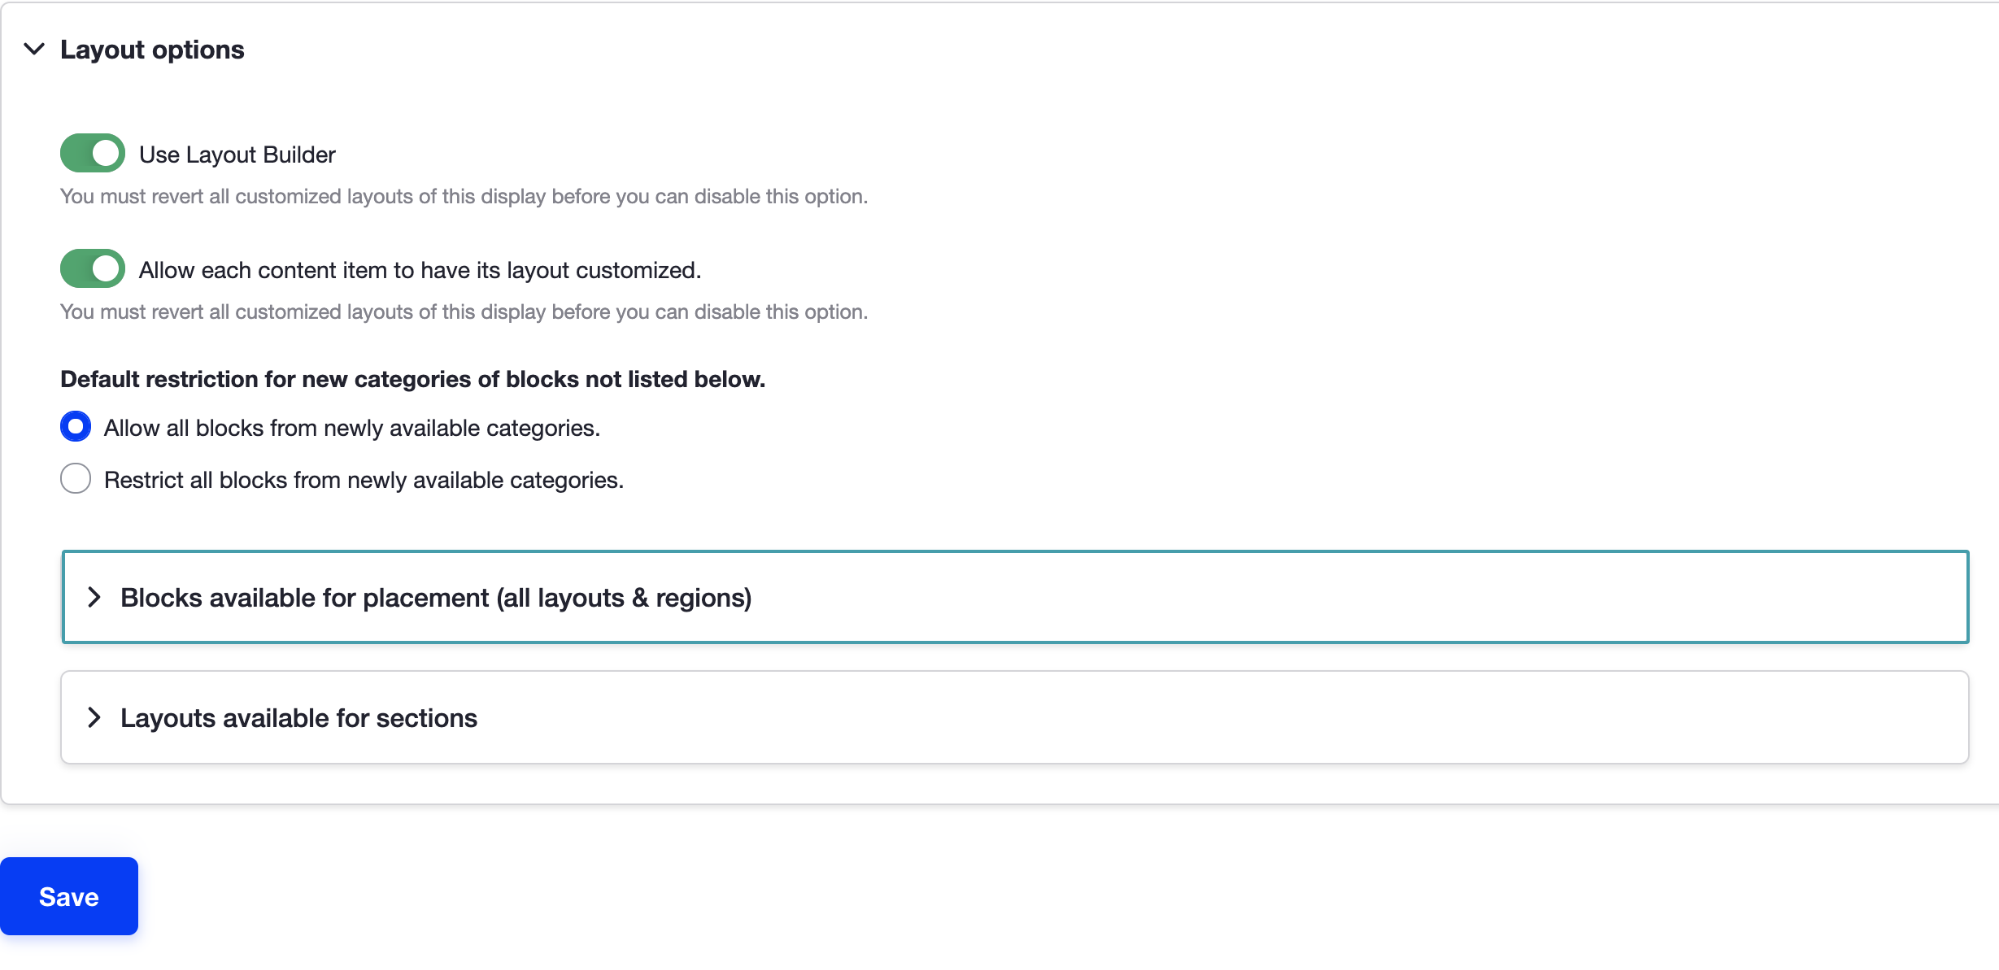
Here’s the link to download the Layout Builder Restrictions module: https://www.drupal.org/project/layout_builder_restrictions
Content editing experience: Page Layout edit link
To edit the content by using the Layout Builder; a content editor needs to visit the page and click on layout link to edit the page.
An alternative to this is the Layout Builder Operation Link
- The Layout Builder Operation Link module adds a 'Layout' operation link to the Layout Builder-enabled content on Drupal administrative pages.
- This link saves content editors a click/page load when they want to access an entity's layout page directly without loading its edit page first.

Here’s the link to download the Layout Builder Operation Link module: https://www.drupal.org/project/layout_builder_operation_link
Content editing experience: Attributes for block
At times the content editor’s need to deal with different attributes for example class, id, Data-* attributes, etc. to achieve specific features., for this Layout Builder Component Attributes will be helpful.
The Layout Builder Component Attributes module is helpful in these scenarios
- The Layout Builder Component Attributes module allows editors to add HTML attributes to Layout Builder components (blocks).
- Attributes can be added to:
- the block (outer) element
- the block title
- the block content (inner) element.
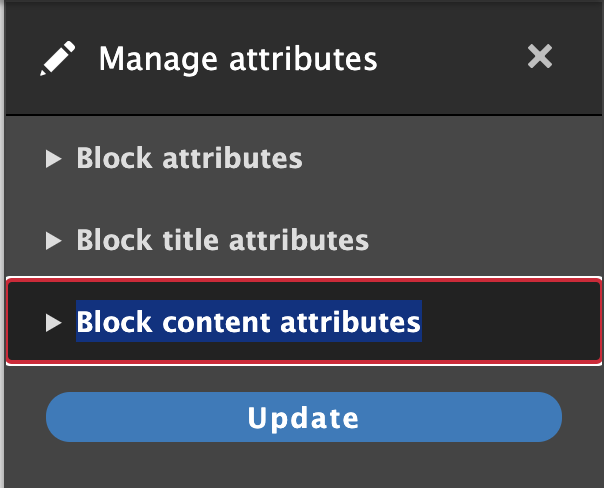
Here’s the link to download the Layout Builder Component Attributes module:https://www.drupal.org/project/layout_builder_component_attributes
Layout Builder is a game-changer for content editors and marketers. The modules that we looked at really help make it easier to use!
If you would like to create your dream website with the Drupal Layout Builder, feel free to reach out to us at business@qed42.com.

How to create Hamburger menu with Acquia Site Studio
This blog is a tutorial for setting the mobile menu (Hamburger menu) in Acquia Site Studio which was earlier known as Cohesion DX8. Converting the desktop horizontal dropdown menu to a Hamburger menu in mobile delivers the best UX for mobile users.
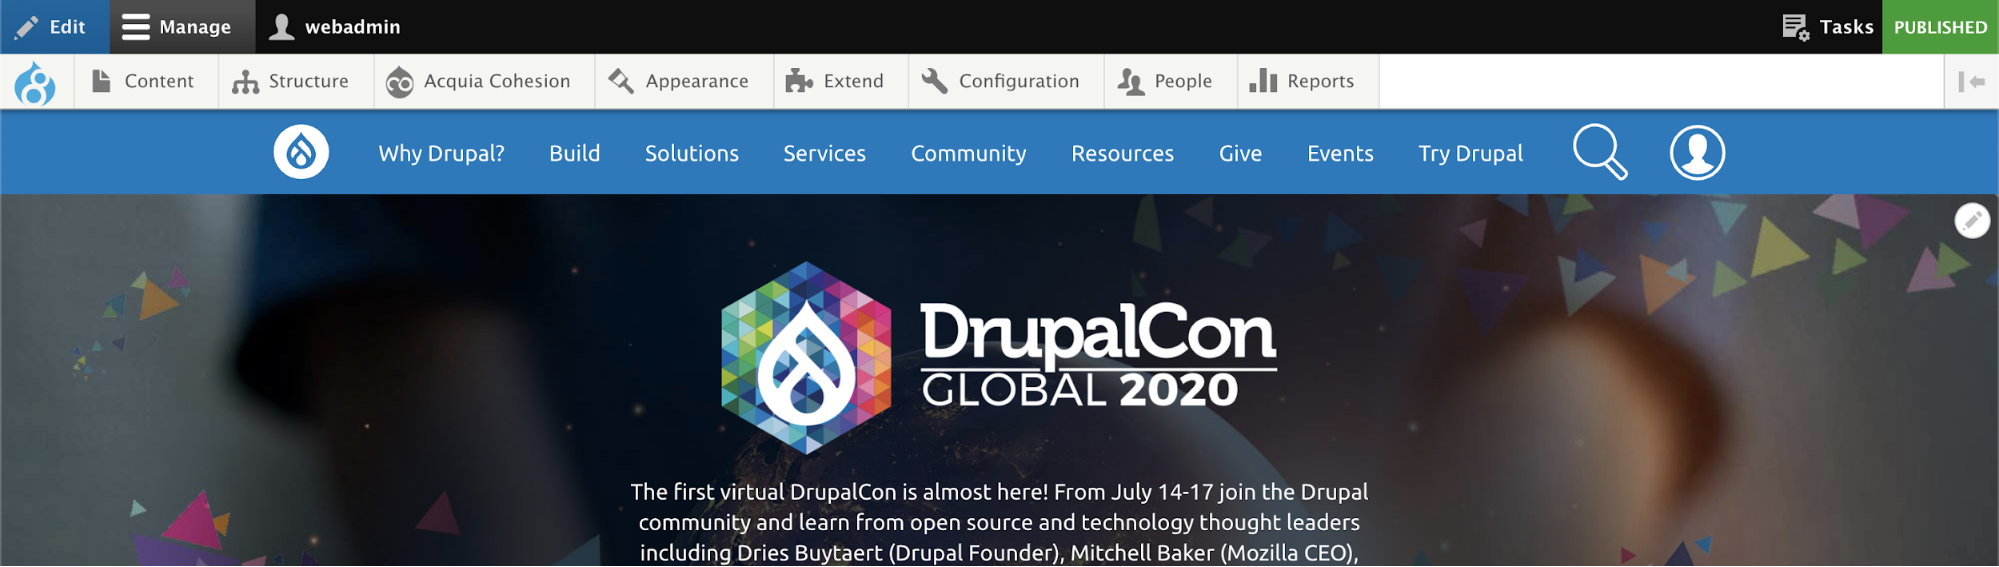
Here is a screenshot of the desktop and mobile menu which we now implement with Acquia Site Studio.
Desktop Menu
Mobile Menu (Hamburger Menu)
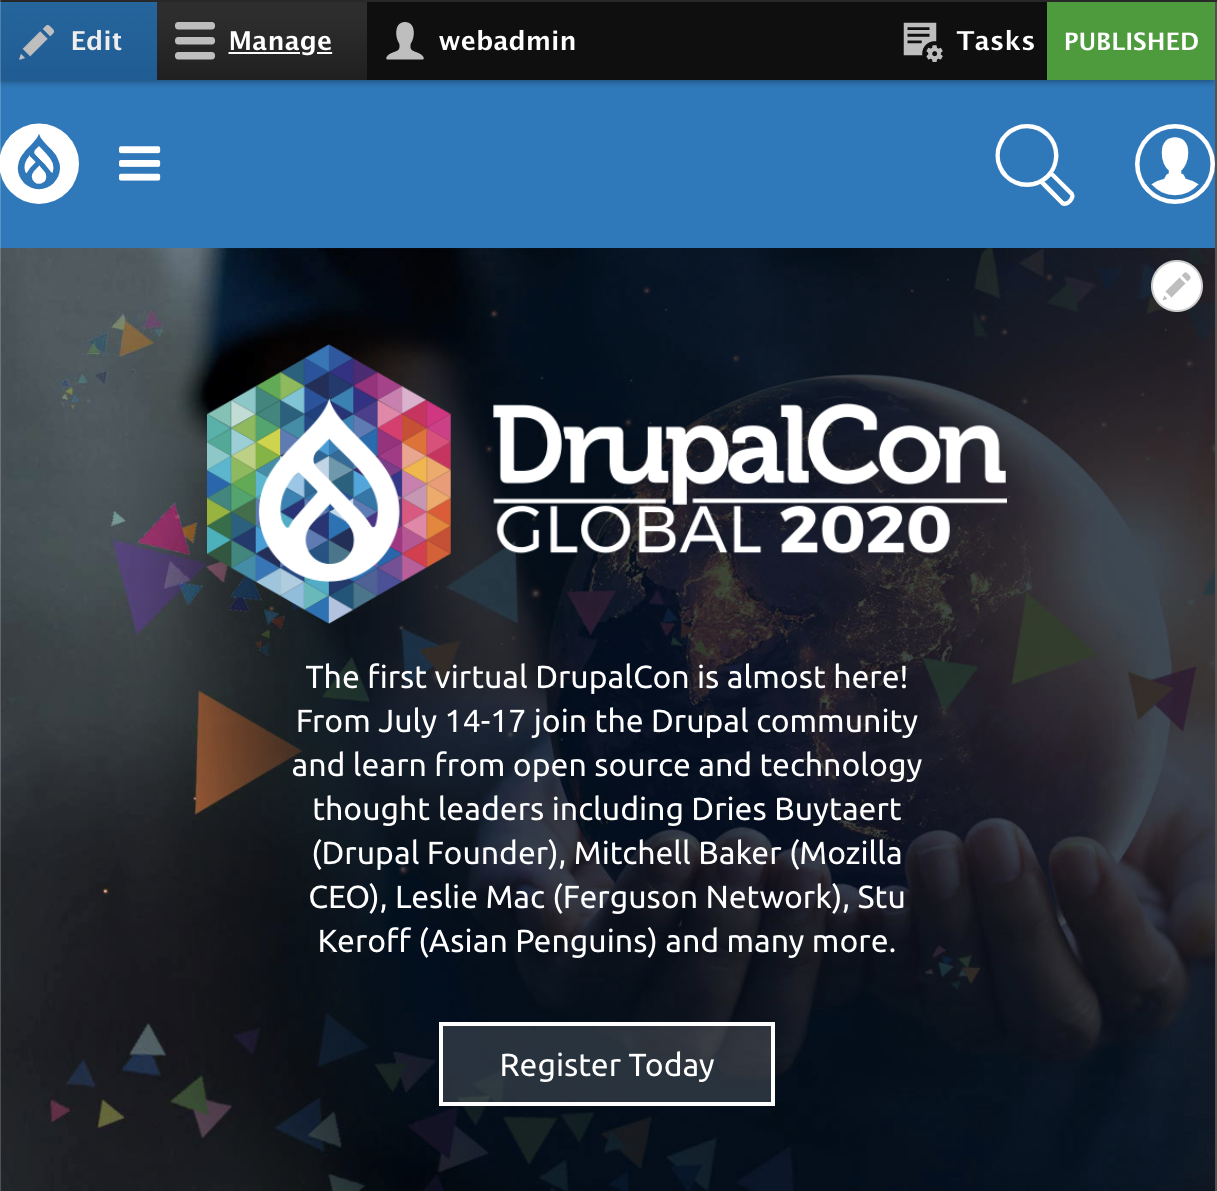
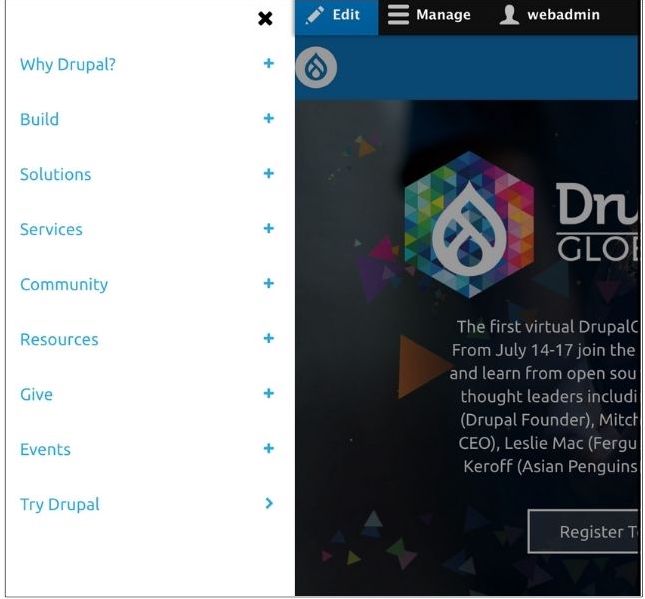
There are many ways to achieve the hamburger menu.
- We can use the core library and implement it as it has been implemented for admin toolbar or modules like Responsive menu, Hamburger menu, or any external libraries.
- Custom JS can also be used to achieve this.
But here in this tutorial, we will see how to implement the hamburger menu with Acquia Site Studio without writing a single line of code and without using any external library or module. Everything is achievable through Site Studio’s core elements.
Here, I would like to take a reference to one of our previous Cohesion blogs, where the menu template has been explained. For quick reference, adding a below screenshot of Menu Template, using which we could easily implement above mentioned Desktop Menu with dropdown level.
After creating this template and applying a few styles, the Desktop menu with dropdown would work flawlessly. But when viewed on mobile devices, it won’t appear perfect.
Now, let's look at all the things which should be taken care of while converting a desktop menu to a mobile hamburger menu.

- The dropdown should not open on hover as mobile devices won’t support the hover gesture or won’t give good UX.
- There should be one icon beside each menu link where the dropdown is available so that the user can understand that a particular menu has dropdown links.
- And, in the end, on page load, the menu and hamburger menu icon which depicts the menu dropdown should collapse by default.
- A close button, which will allow the menu to close after opening the hamburger menu.
To cover the whole structure, we need to convert the above-mentioned Menu template and add a few Site studio core elements as shown in the screenshot below.
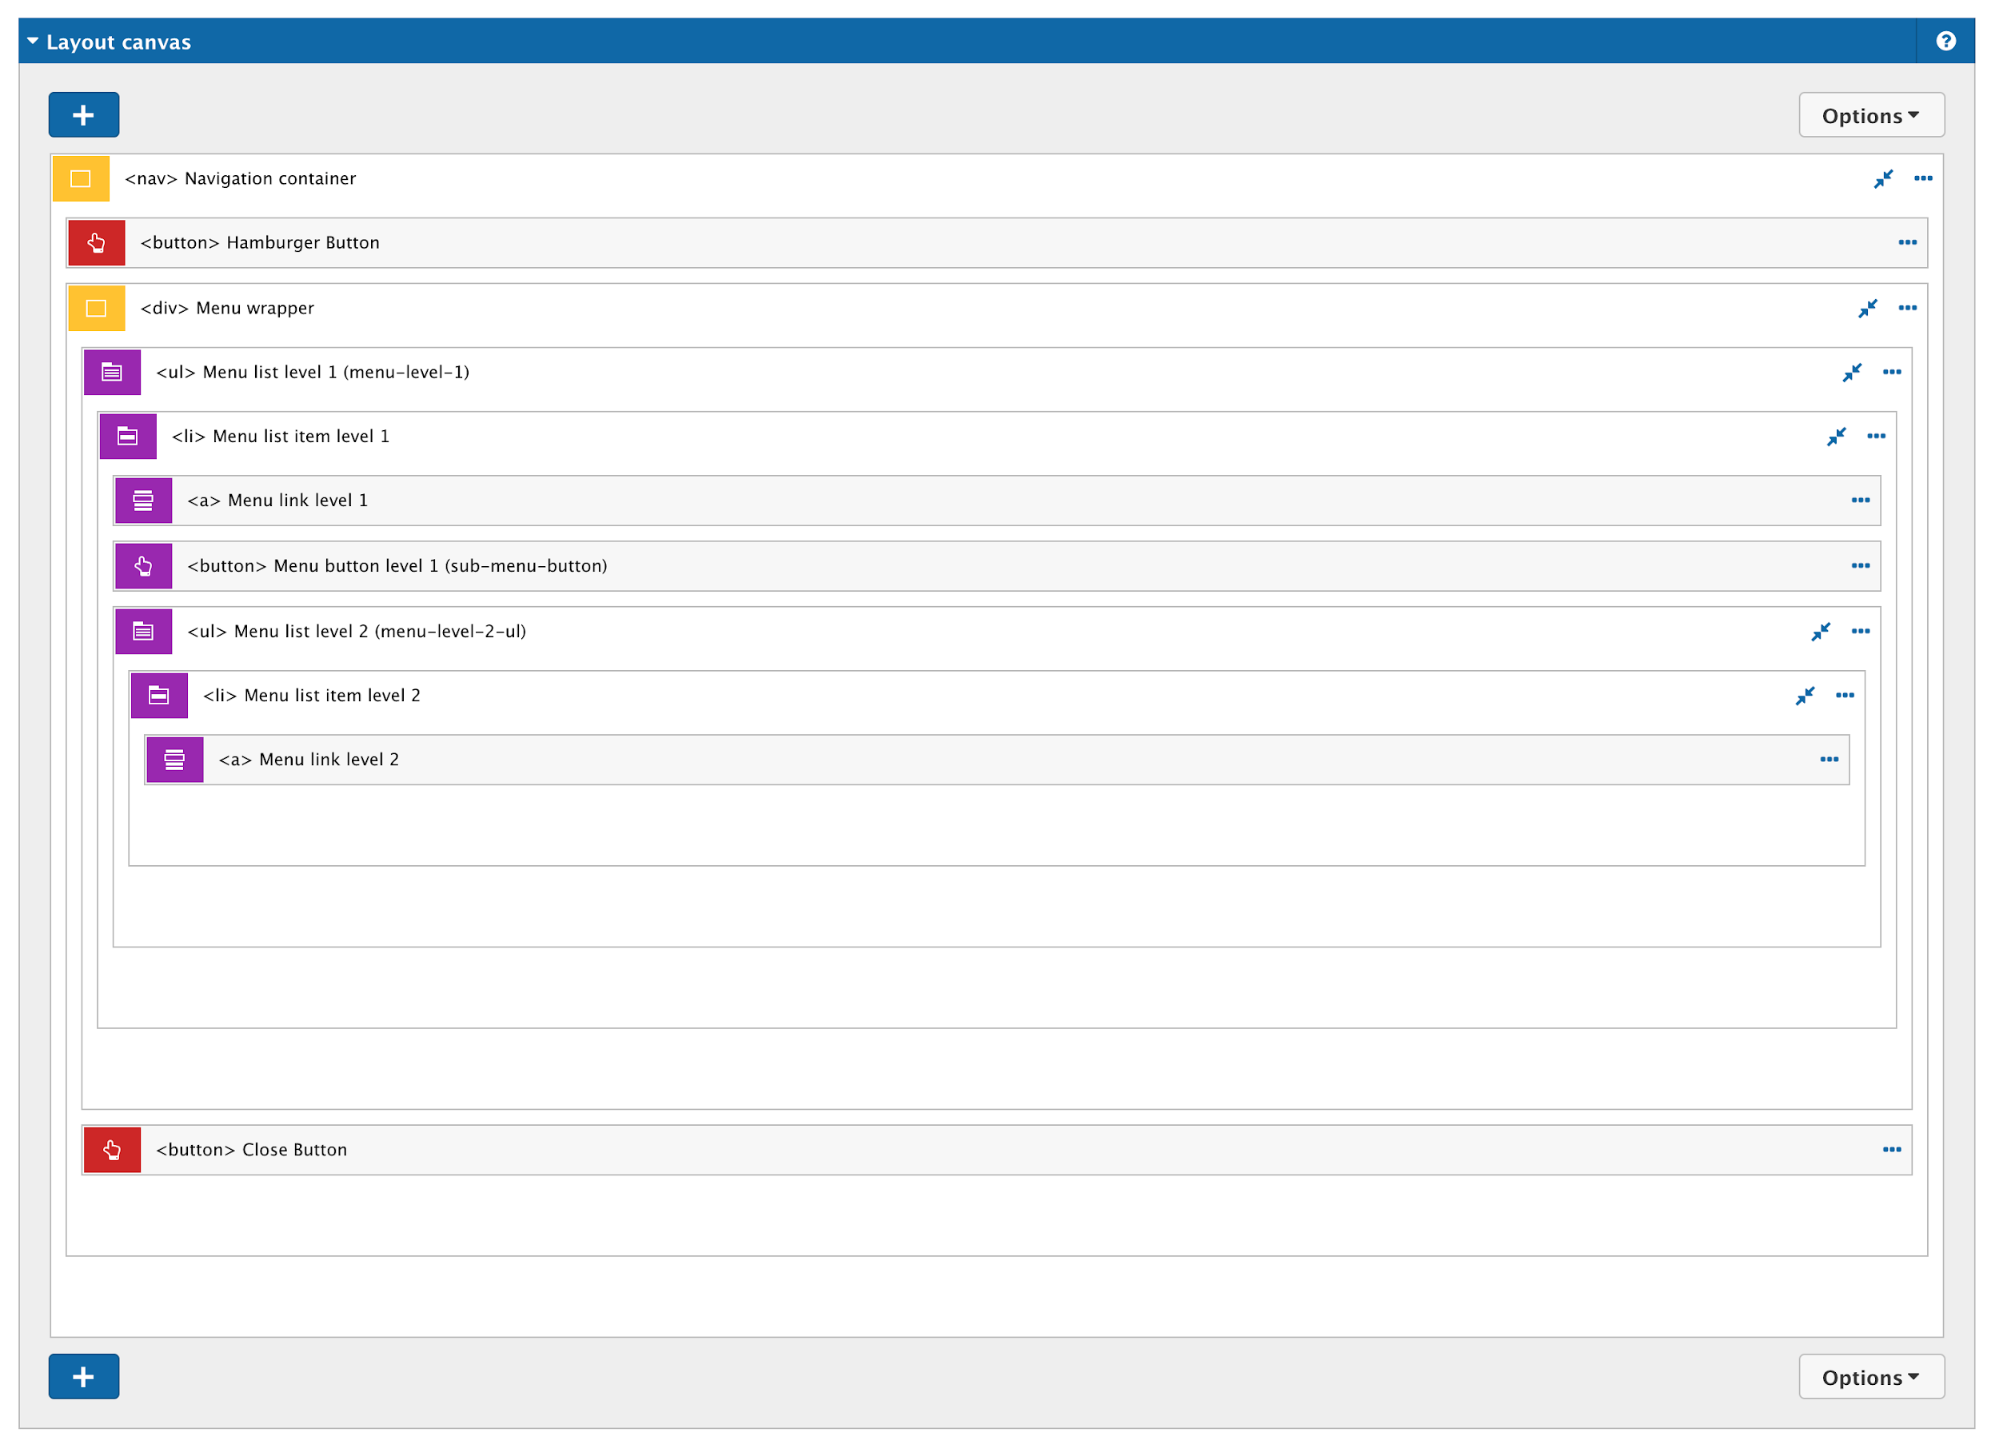
Now, let’s compare and look at the new elements added in the Menu template.
List of elements added:
- Navigation Container
- Hamburger Button
- Menu Button Level
- Close Button
Navigation Container
This container is for holding the whole structure of the menu and also to apply a few of the styles and add some modifiers through button elements.
Hamburger Button
As mentioned in the above point, the button is helpful to add/remove/toggle modifiers to the menu structure and also to toggle the view of the whole menu.
Adding a screenshot of the hamburger button configuration which will help you understand the modifiers added and how the menu toggling has been achieved.
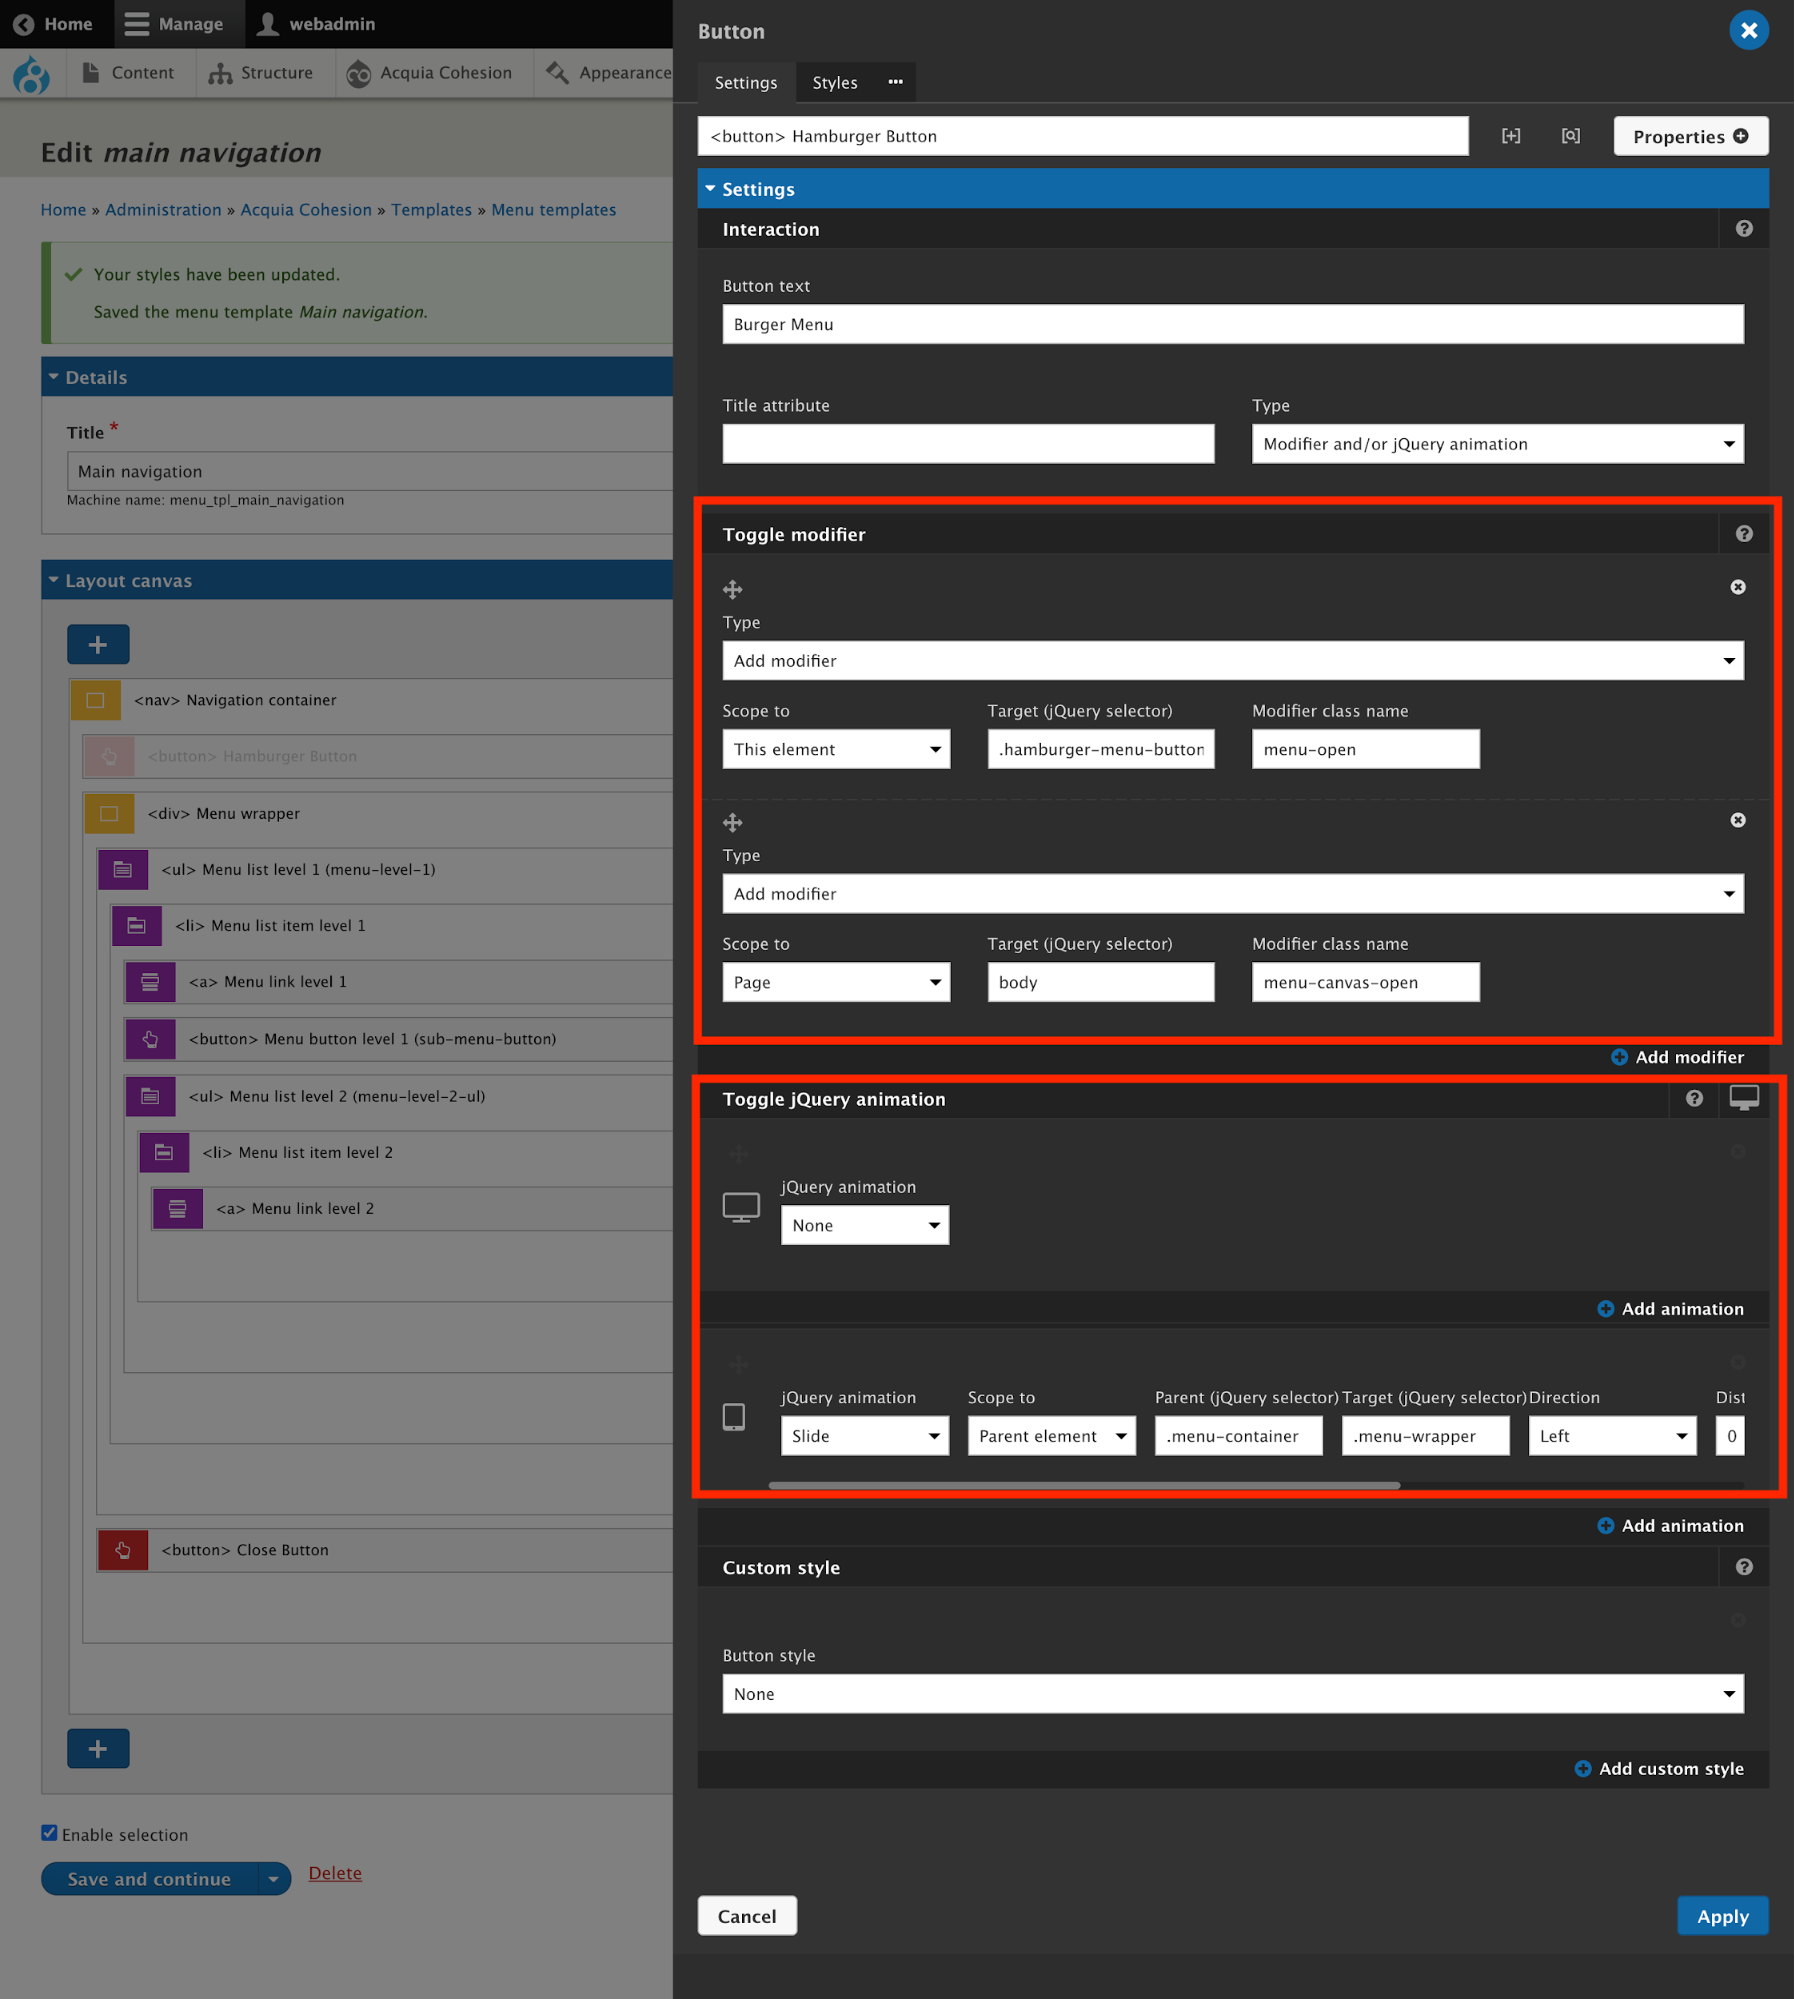
Here we need to take care of two sets of configurations:
- To add modifiers
- To toggling jQuery animations
As displayed in the above image, we need to add modifiers for elements of the page:
- For the hamburger button itself, so that it can be hidden after clicking on it.
- For the body tag to move the body canvas and place the menu to the shifted side. If off-canvas isn’t required, then this configuration can be skipped.
Moreover, Toggle jQuery animation needs to be configured.
- No jQuery animation is required for the desktop breakpoint as no animation is required for that specific element
- For tablet breakpoint below are the options which need to be set:
- jQuery animation - which animation you would like to implement, scope to,
- Parent - this would be a jQuery selector
- Target(jQuery selector), from which direction the animation should be applied
- Distance, select easing type and Duration in milliseconds.
- Here, as per the screenshot, .menu-container is for <nav> Navigation Container element and menu-wrapper class is for targeting inner <div> Menu wrapper Container element.
Menu Button Level
Now, let’s move to the next element i.e. <button> Menu level 1 (Sub menu visibility toggle) and refer to the screenshot below:
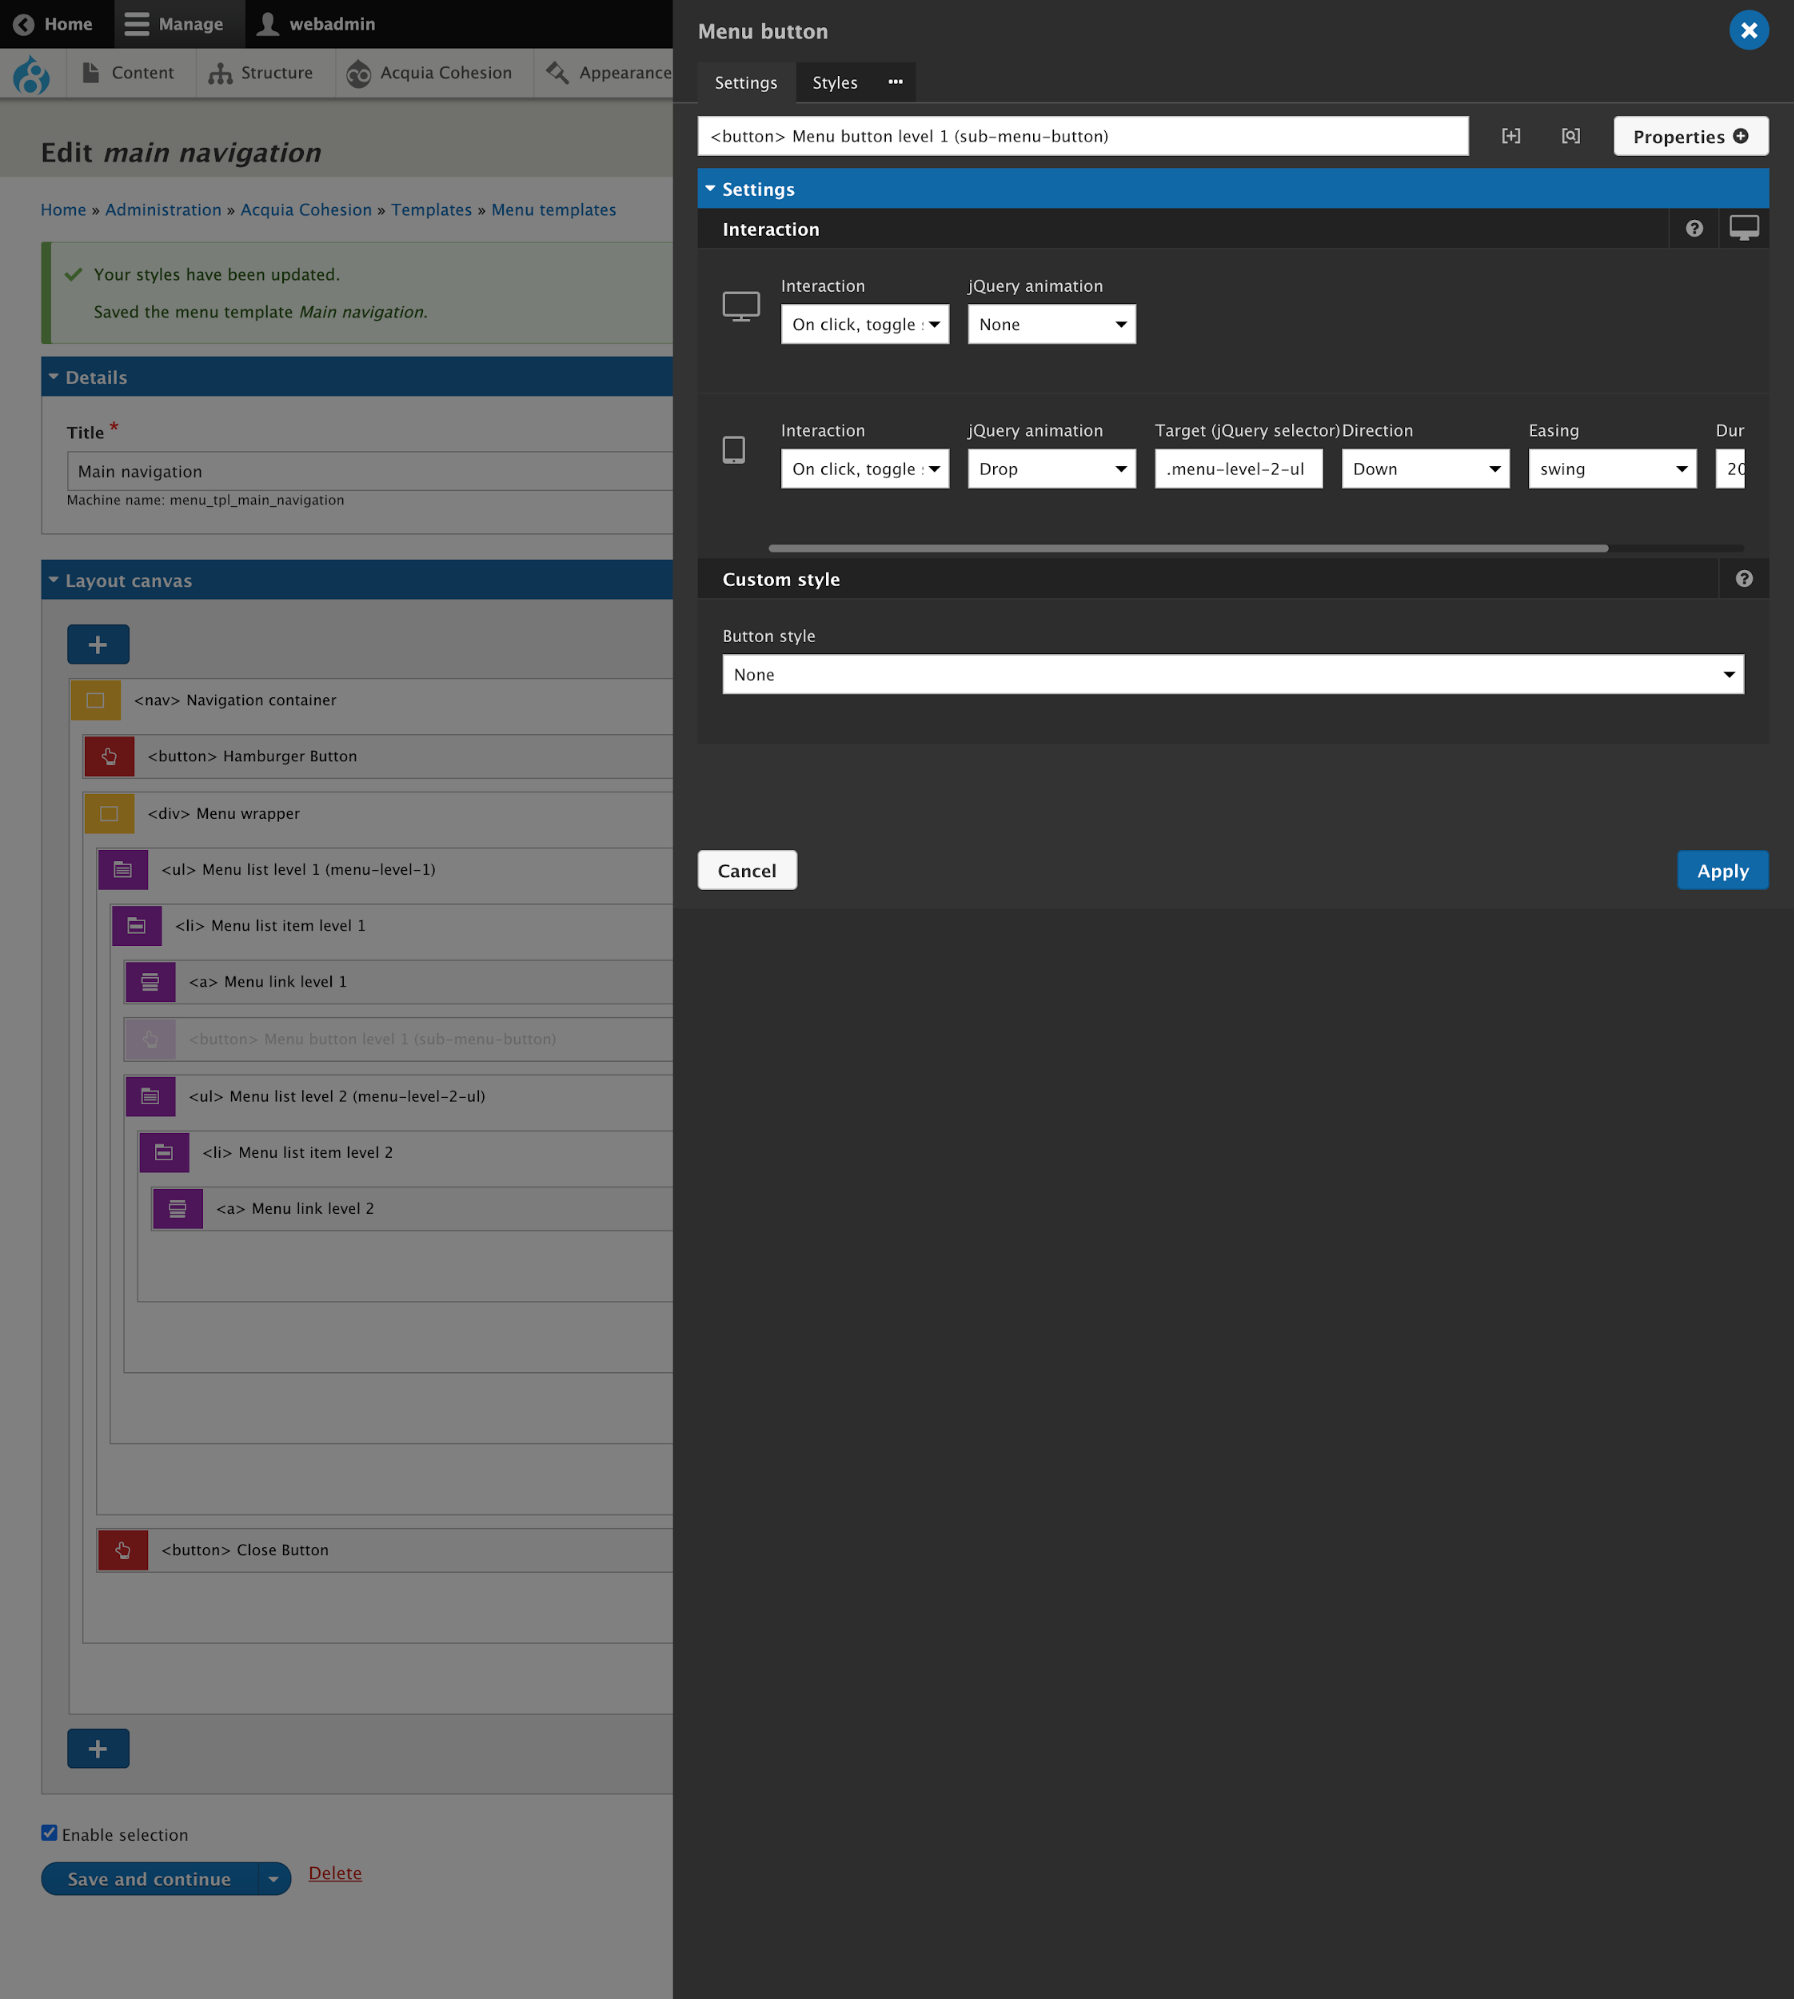
As per the screenshot, it can be seen that for desktop breakpoint no interaction is required and for the tablet breakpoint, we need to set the interaction for toggling the dropdown.
- Menu wrapper container for holding the menu container and menu links.
Close Button
This button will be to remove a few modifiers and also the Menu Drawer will be closed. Below is the screenshot for Close button configuration.
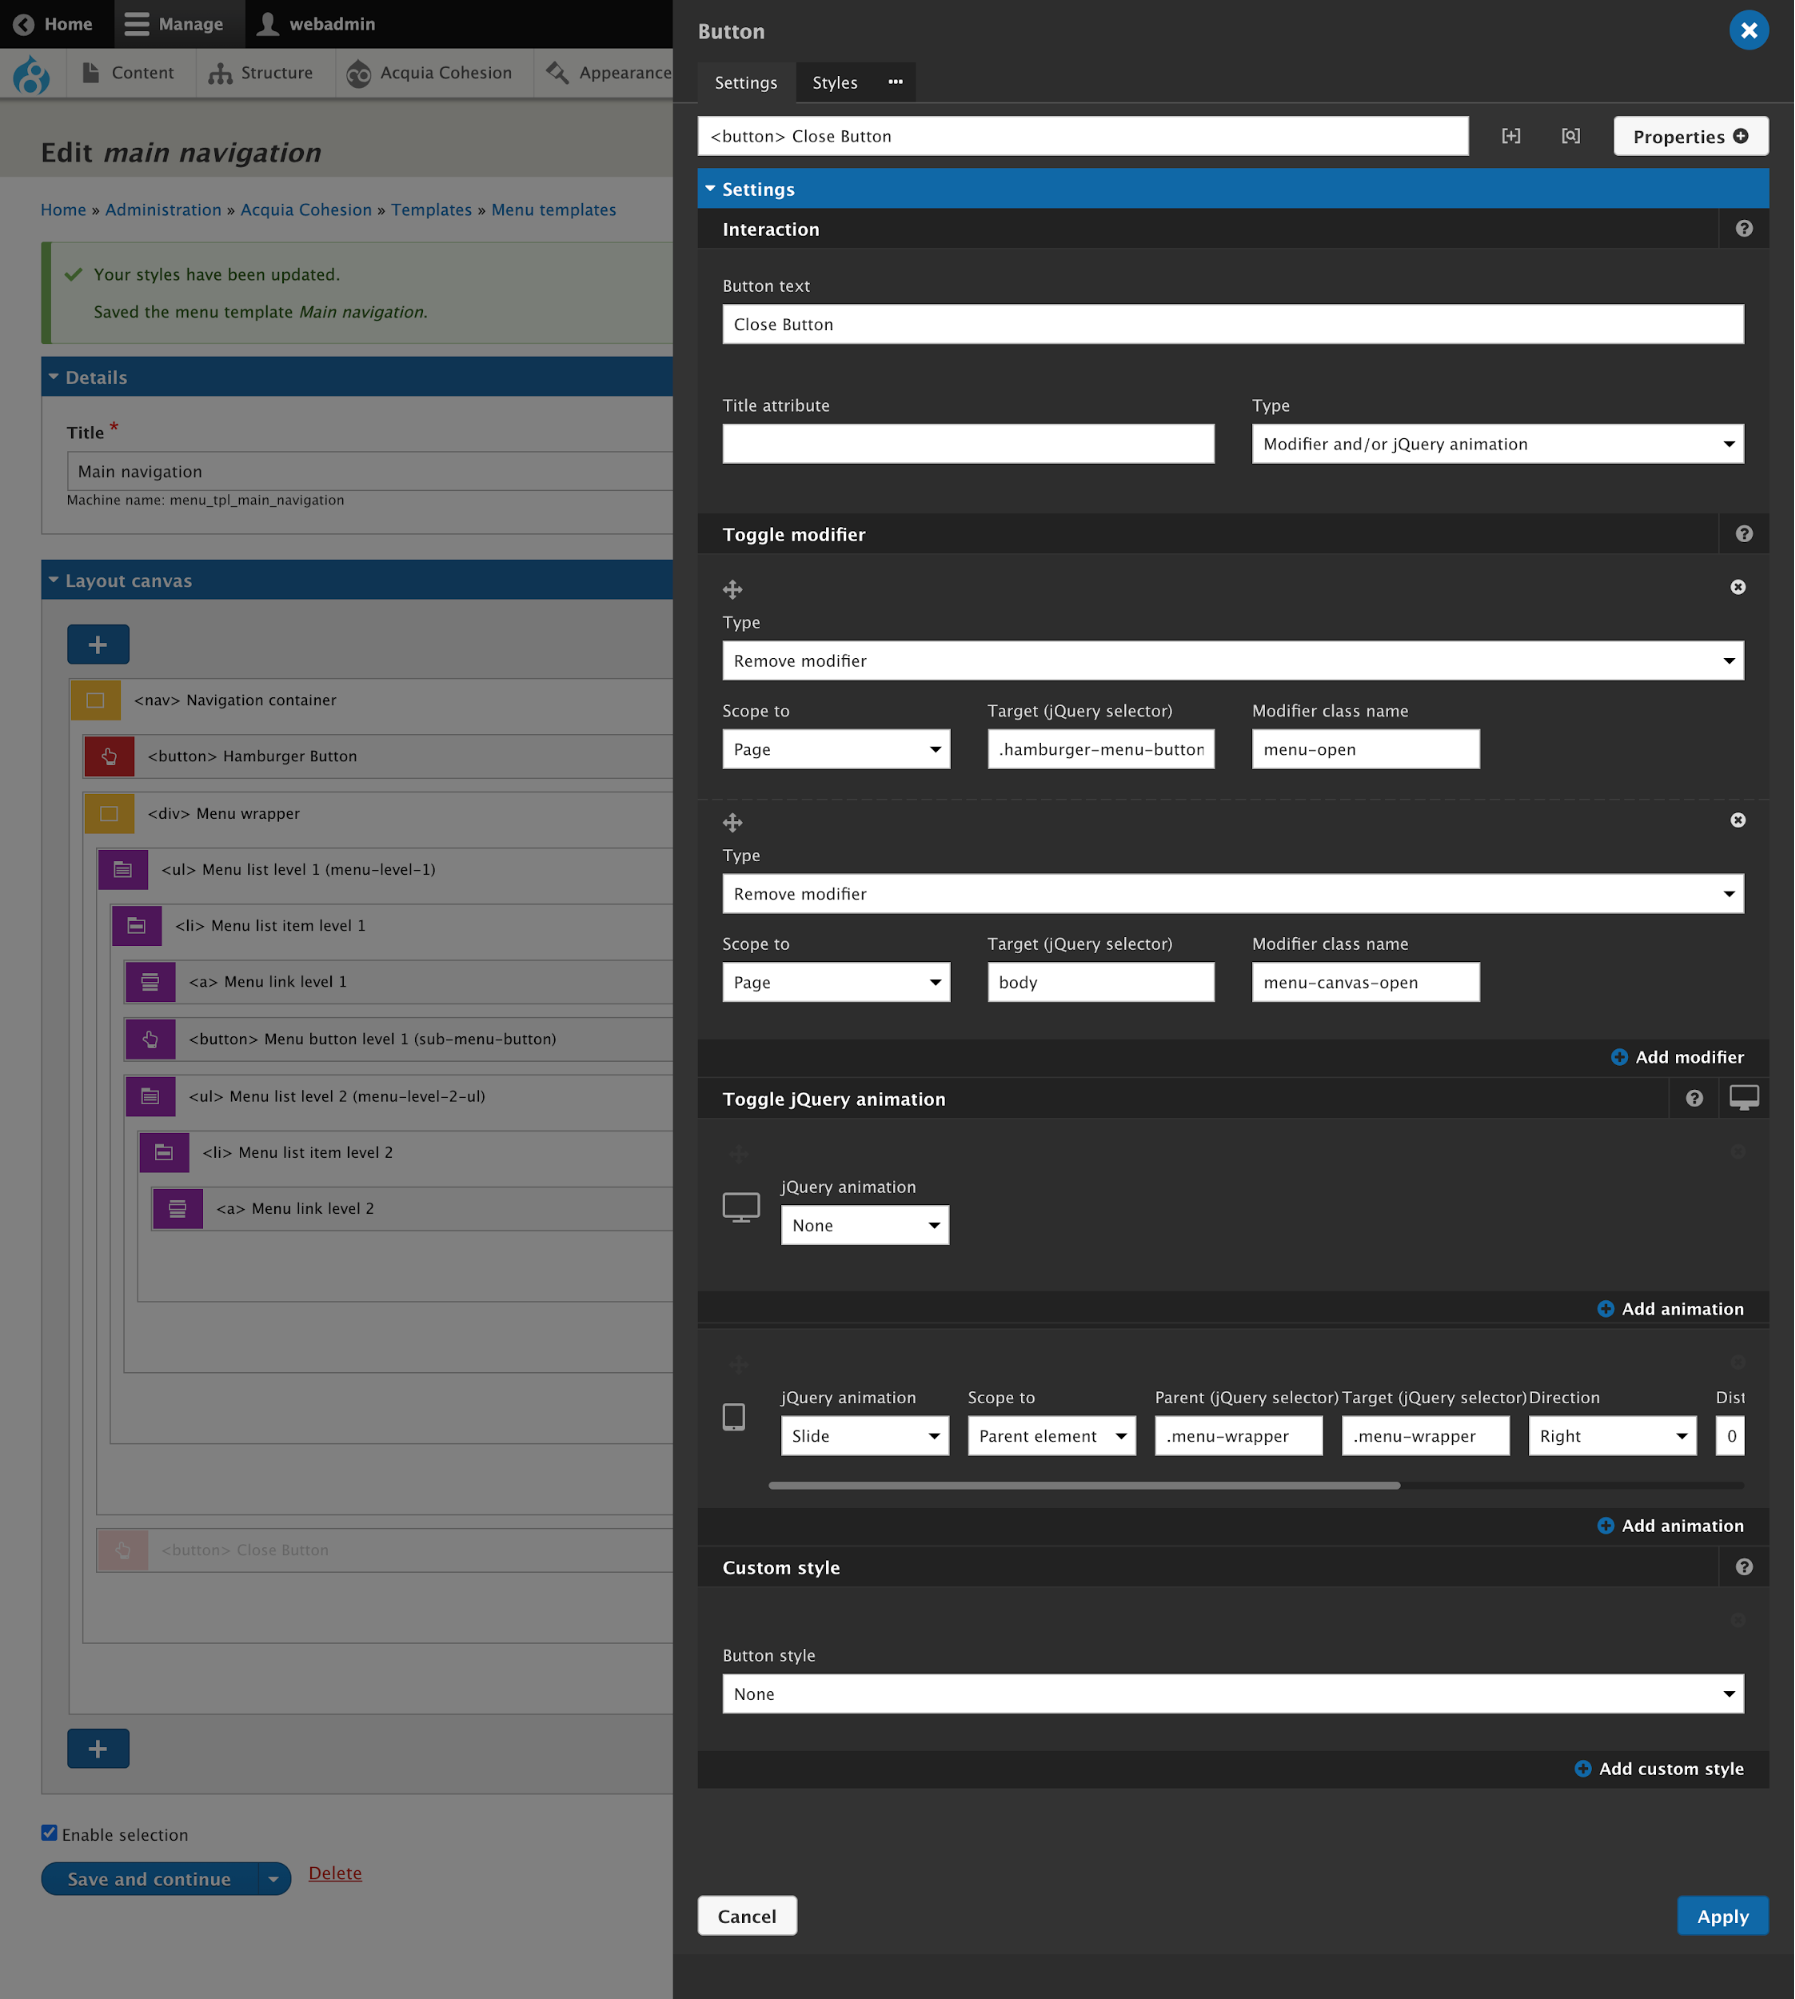
Basically, we need to exactly reverse what we have implemented for the Hamburger menu button. So, it means, we need to remove the modifiers and jQuery toggling animation which have been added through the hamburger menu button.
By following the above steps, you would be able to create the mobile hamburger menu. Few CSS needs to be implemented for a couple of basic things which can be implemented through the Menu container styles’ properties.
For any queries, you can drop your questions in the chat below or you can catch me on Twitter @qed42.
Interested to read more about Site Studio? Here are some articles for you:

Unravelling Acquia Site Studio’s features.
After a basic outline about Acquia Cohesion DX8 now renamed as Site Studio in our previous blog, Cohesion - Low Code Enterprise-grade, Drupal website building platform, let’s dive into a few advanced features of Site Studio.
In our previous blog, we have seen the basic setup of cohesion where we have covered the implementation of the base style, custom style, how to create components and how to use the cohesion elements in it. Now that our basics are covered, let us explore what makes Site Studio a low-code solution for building Drupal sites?
In this blog we will talk about:
- Style helpers
- Component helpers
- Templates
- Master template
- Content templates
- Menu Templates
- View templates
Let’s start with Style helpers.
Style helpers
Style helper is a set of CSS properties which are used once while creating base/custom style and stored for future use.
Let’s look at an example - In the images below it can be seen that a custom style has been created for a large button and certain CSS properties are being used for it. Even the hover pseudo-selector has a few CSS properties. After adding CSS properties, we can save these properties for future use by clicking on the Style helper menu icon (as highlighted in the image) and save it as Style helpers without saving/loading it into the CSS file till we use it.

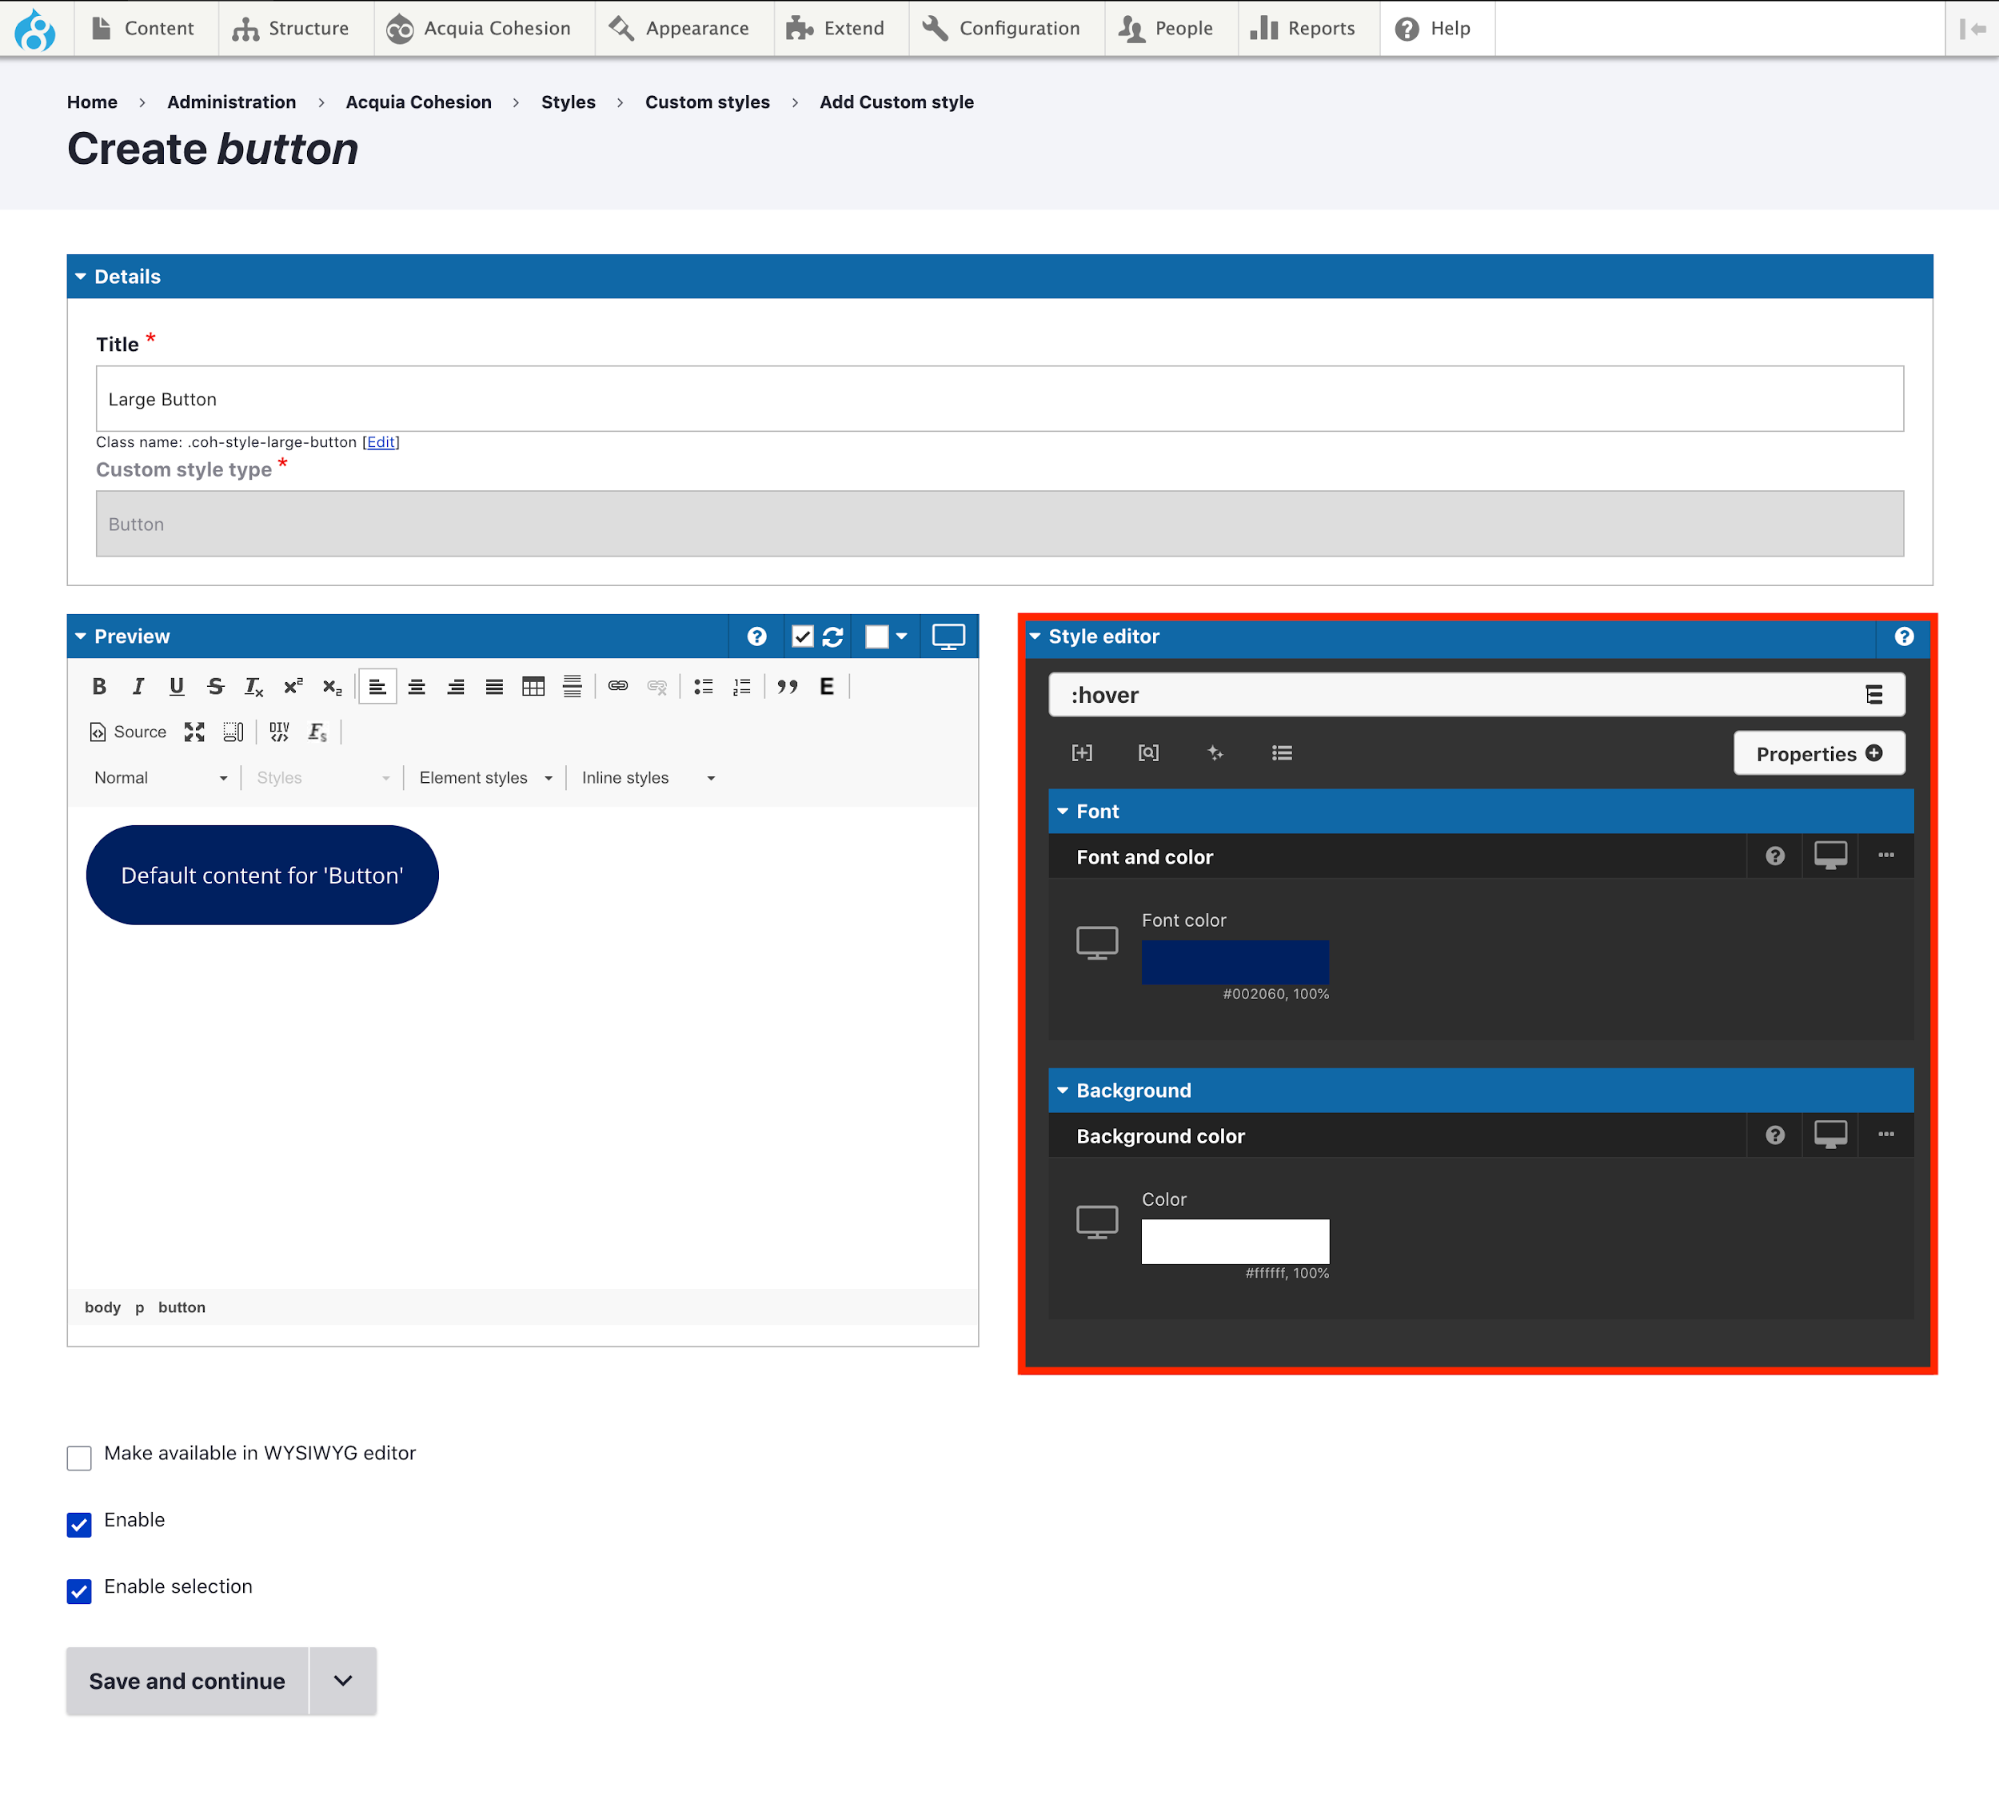
Now, let’s look at the real beauty of Style helpers.
Let’s try to create one more custom style - a small button, where similar properties are required. Here, instead of writing/adding these CSS properties all over again, the Style helper can be used.
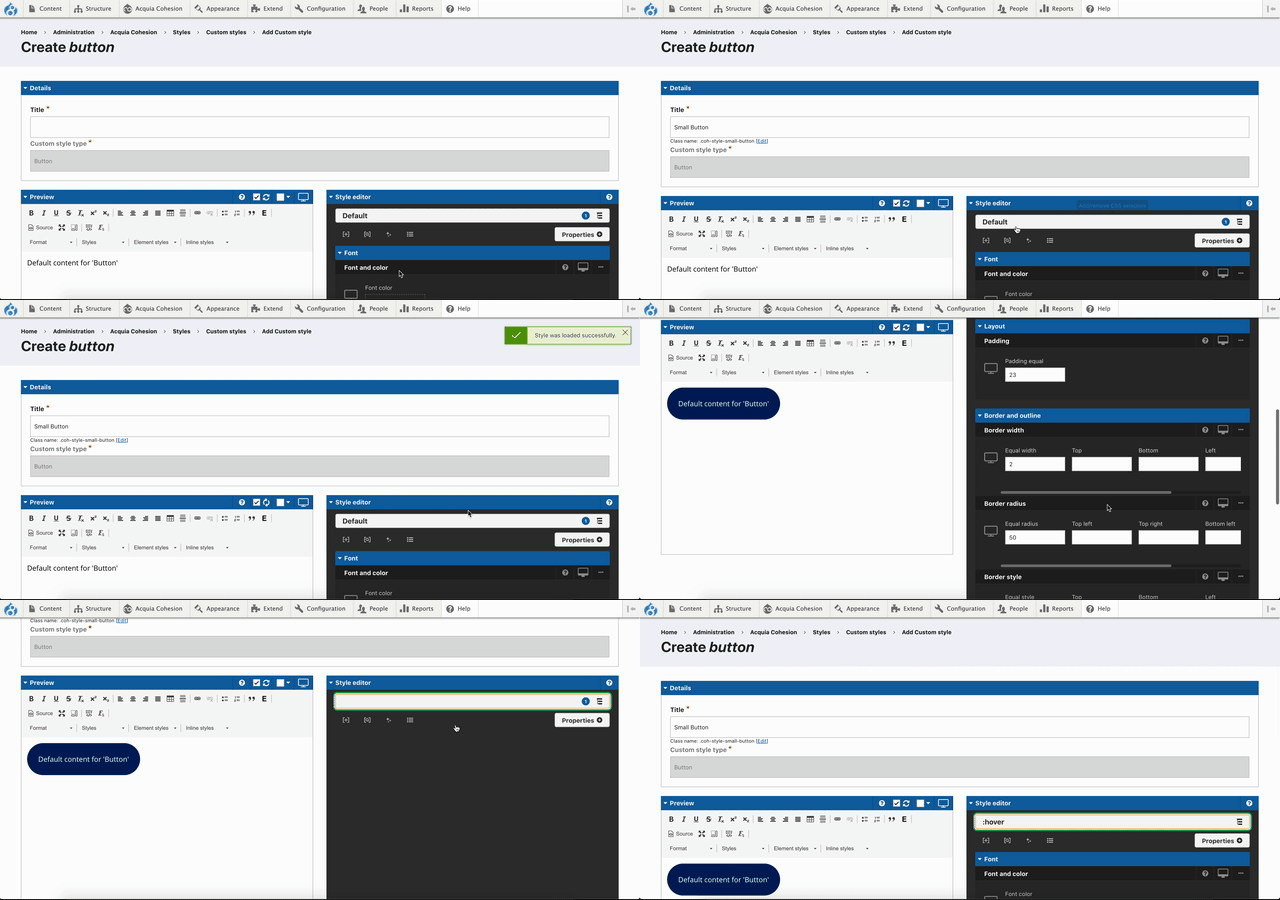
Component Helper
Like the Style helper stores the CSS properties, similarly, Component helper stores the list of components which are commonly being used while creating pages.
Let’s look at the example below.
Let’s say there are a few pages which require similar components to be used and the page which has been created earlier has a long list of components and is complex. Now, creating similar pages with similar components would be a tedious task. Instead, we can create a page and whatever components we have used will be saved for future use.
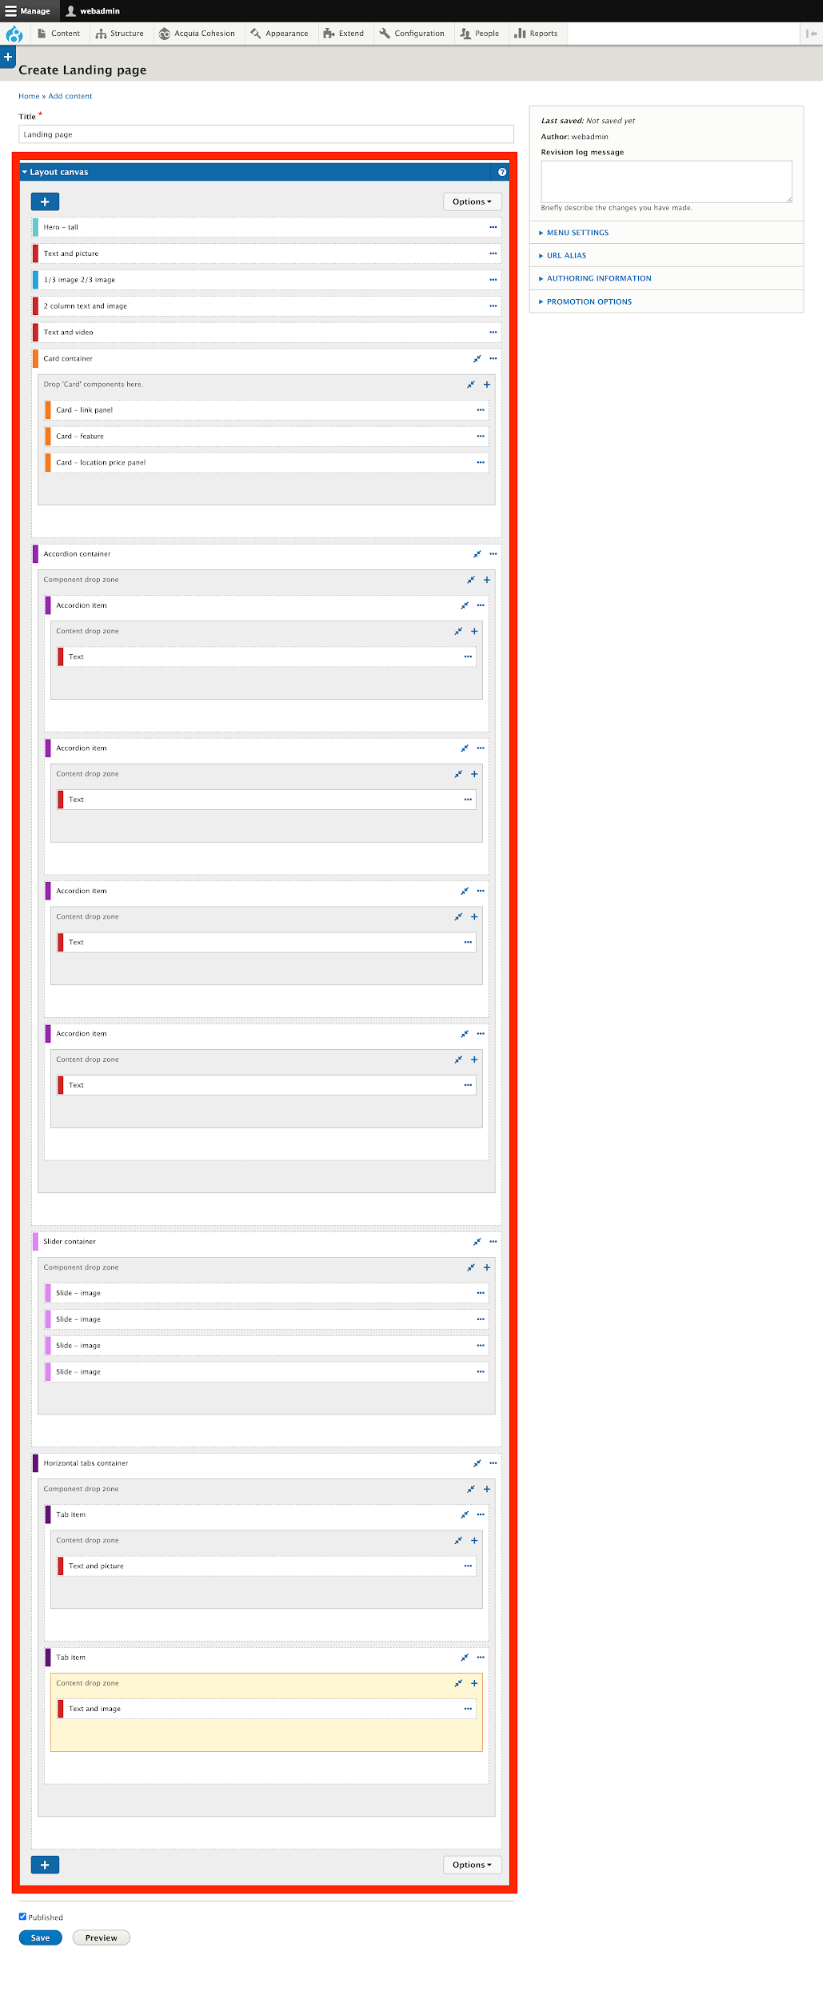
Here in the above image, you can see that once the landing page has been created it has a long list of components added on the page. So now think, how tedious it would be to create multiple similar pages?
By clicking on the options menu of the Layout Canvas field, you can save this list of components and this is known as a helper. Follow the below images for better understanding.
Templates
This feature makes Site Studio a low-code framework in the true sense. All templates can be handled and are configurable from Admin menu -> Acquia Site Studio -> Templates option.
Master template
This template basically serves the purpose of page.html.twig which means this template should be used only to render the regions like header, content, and footer. The master template looks like this:

As per our requirement, if we want a different header and footer on some of the pages, that also can be done by creating multiple master templates. While creating a content template, we can select which master template to use.
Moreover, the master template that has been set as default will be applied throughout the site unless we select the specific master template to be used while creating a content template.
Use Case:
Here we can consider the new concept of a microsite, where the whole site is containing a similar structure. But to change a few pages, it is required to change the whole structure of the template including header and footer. The best example could be https://www.drupal.org/ and https://events.drupal.org/global2020.
Content Template
There are plenty of sub-categories of content templates. Let’s look into the Content-type’s view mode templates.
Each content type can have multiple view modes and those view modes can have their own customized layouts. To achieve this we can create multiple view mode templates which would have a Layout canvas field which will be useful for creating different layouts.
For example:
A full view mode is basically used to display the entire content of a node page whereas the teaser view mode can have fewer number fields’ data to be displayed. Based on this we can distinguish the usage of templates.
Menu Template
There are plenty of menus we usually have on the site and each menu has its own structure and relevance.
Usually, we have the main menu, sidebar menu for quick content reference (with or without dropdown), and the user account menu.
The main menu has up to 2 levels, where 1st level will be visible and the second level will be visible on hover and the Sidebar menu and user menu have only 1 level menu links.
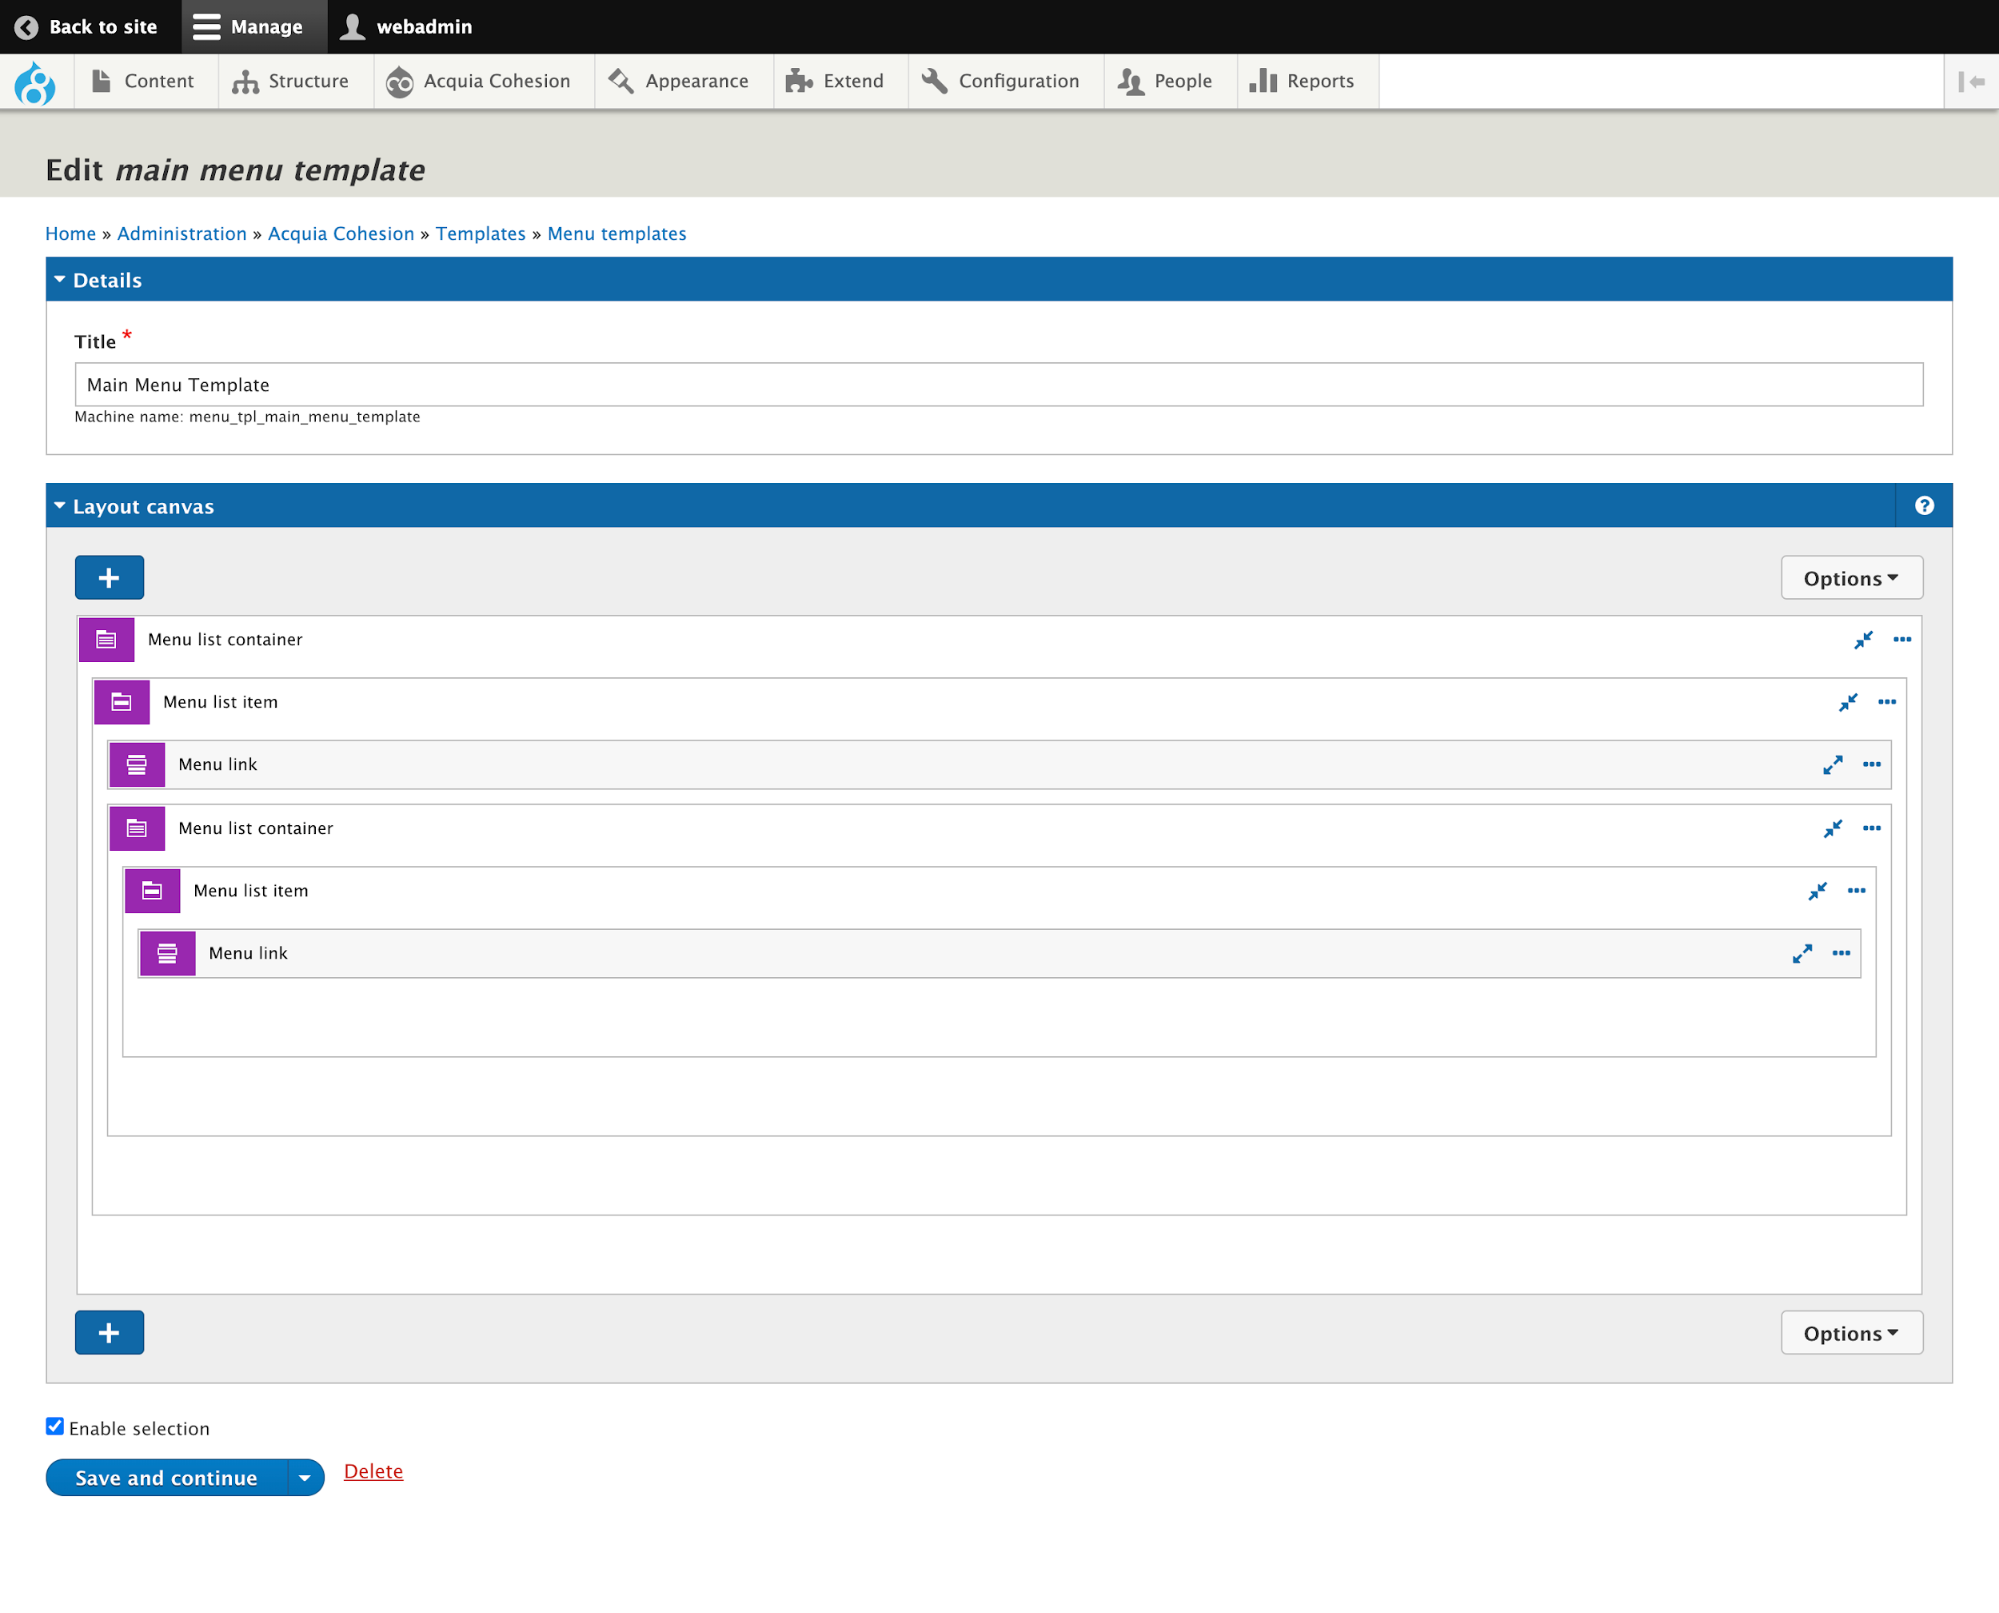
Site Studio provides menu templates to define the structure of the menu which will look similar as shown in the image below. Adding an image as an example of the main menu structure.
As per the image, we can see that to create the main menu with up to 2 levels, it is required to have a nesting level of menus like menu container(ul), menu item(li) and menu link(a)
One of the features of this Template menu’s element can determine how the next level of the menu can be expanded with/without animation and also different behaviour of menus opening can be set based on the breakpoints.
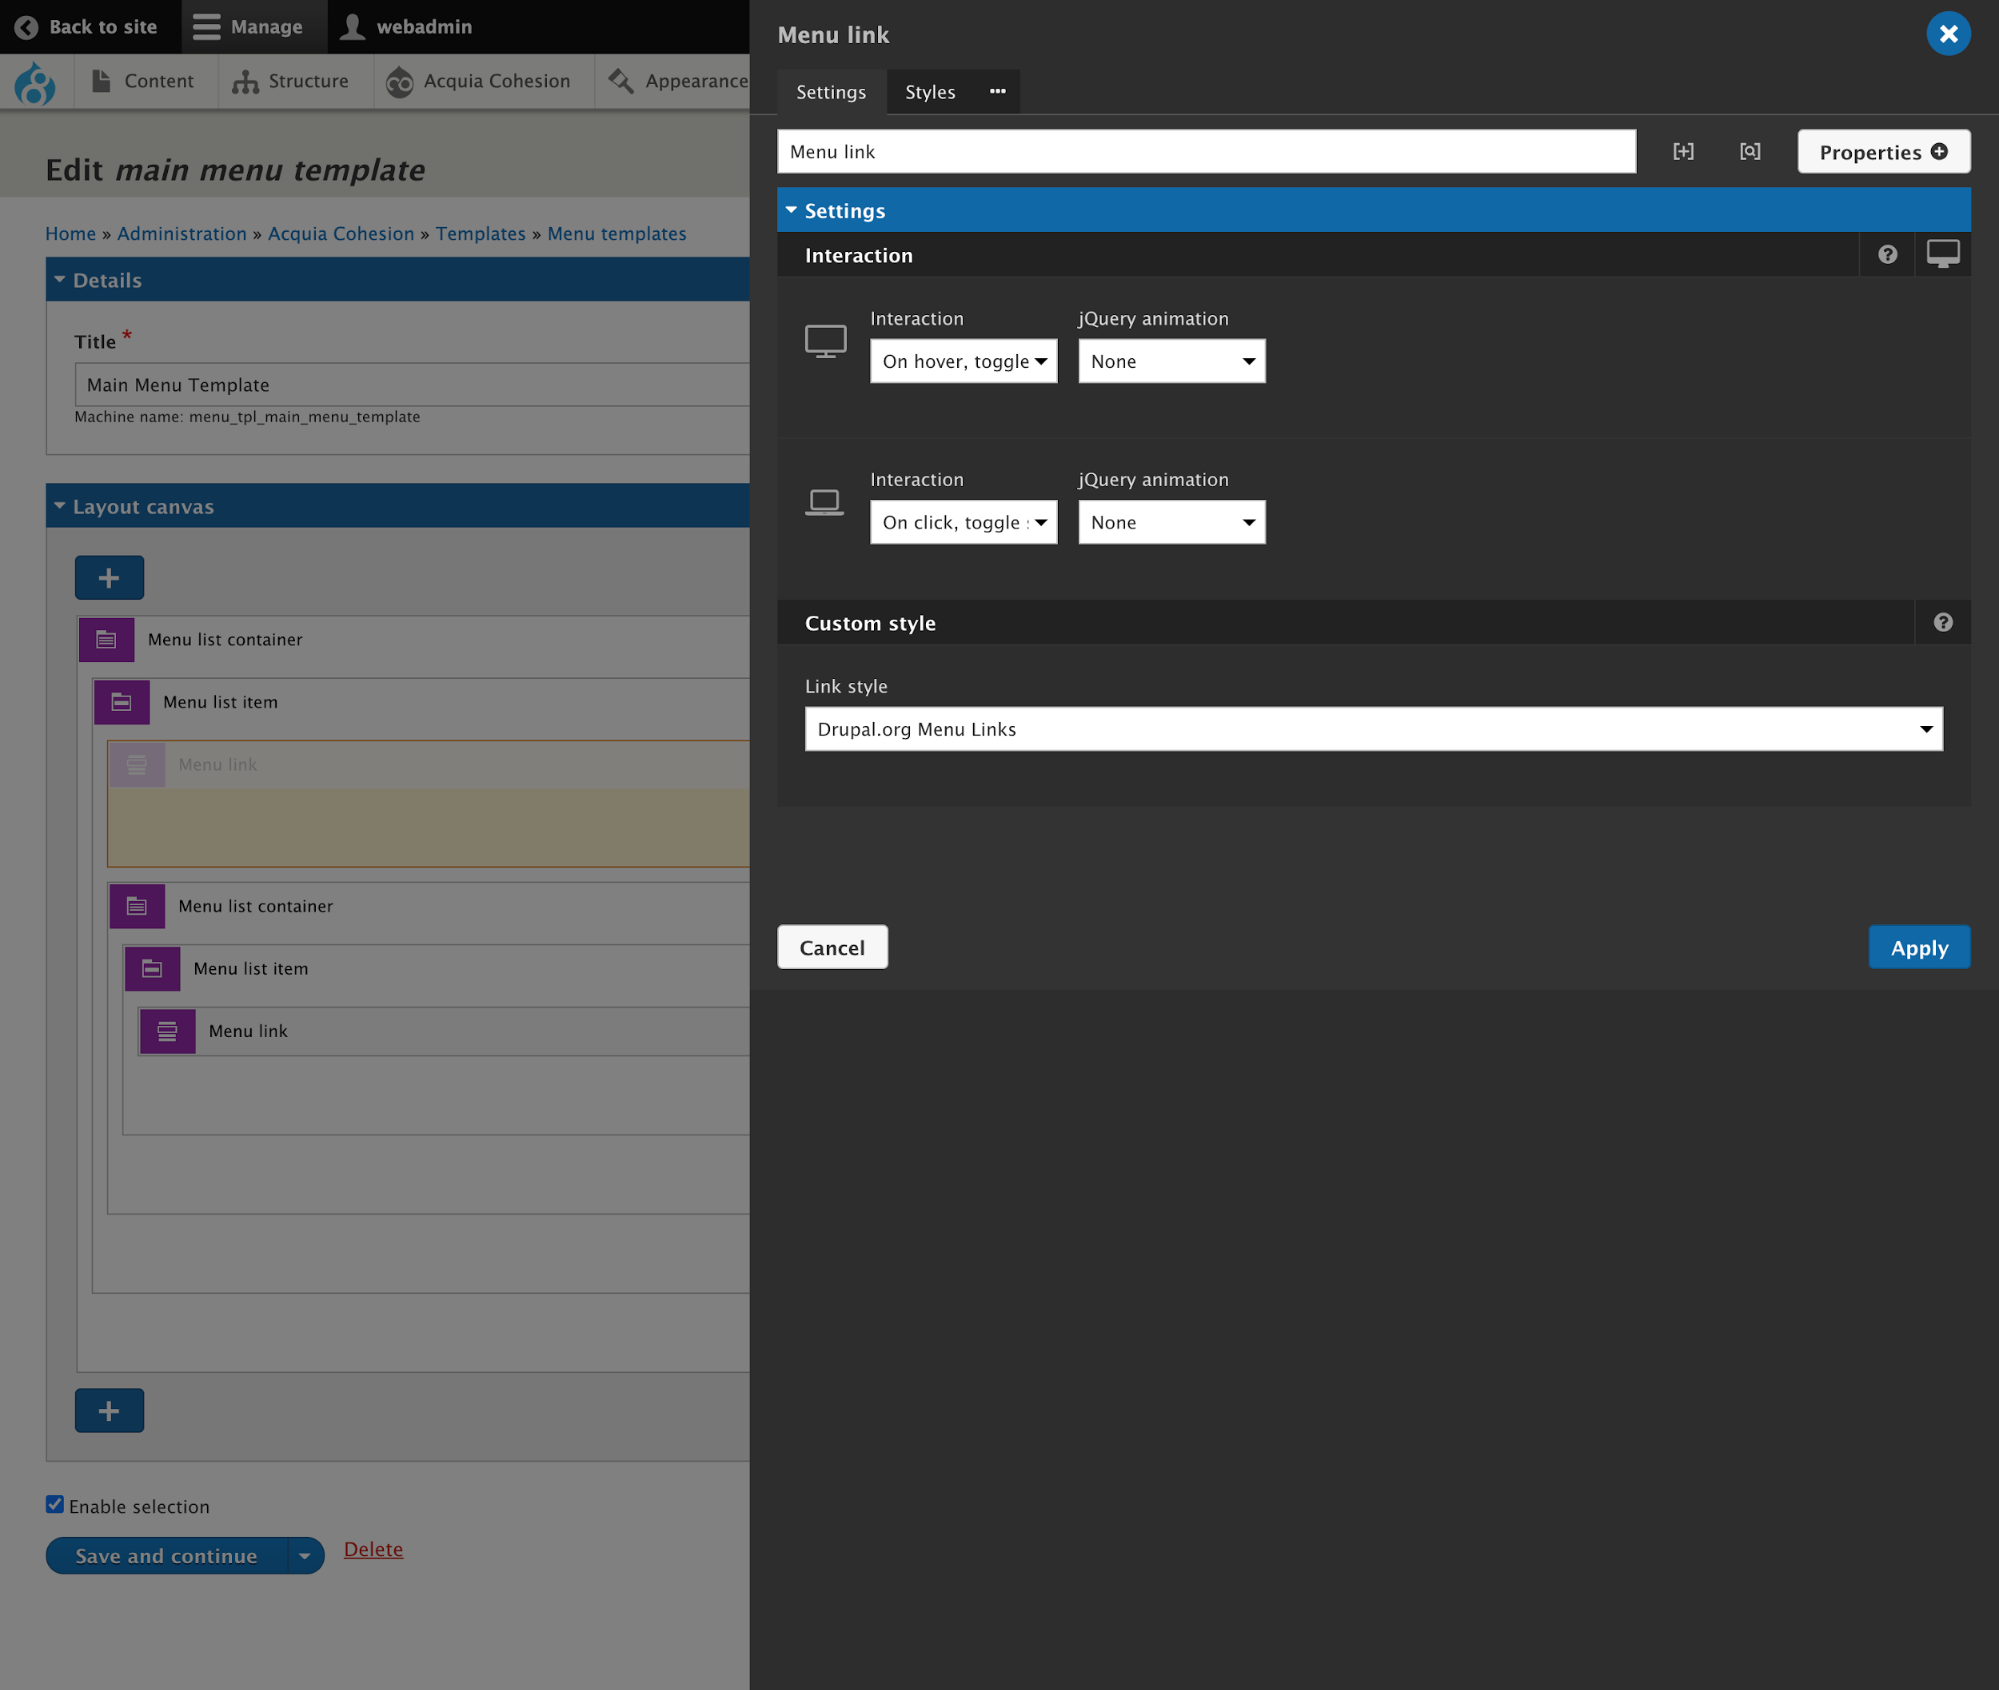
As per the image above, it can be seen that the opening and closing behaviour of the dropdown can be decided by the menu link element of the first level.
Moreover, with the menu template, we can map the custom styles we have created for the menu container, menu item, or menu link.
This menu template will be used while mapping it with the menu element which has been defined in the header template that is the part of the master template as displayed in the screenshot below.
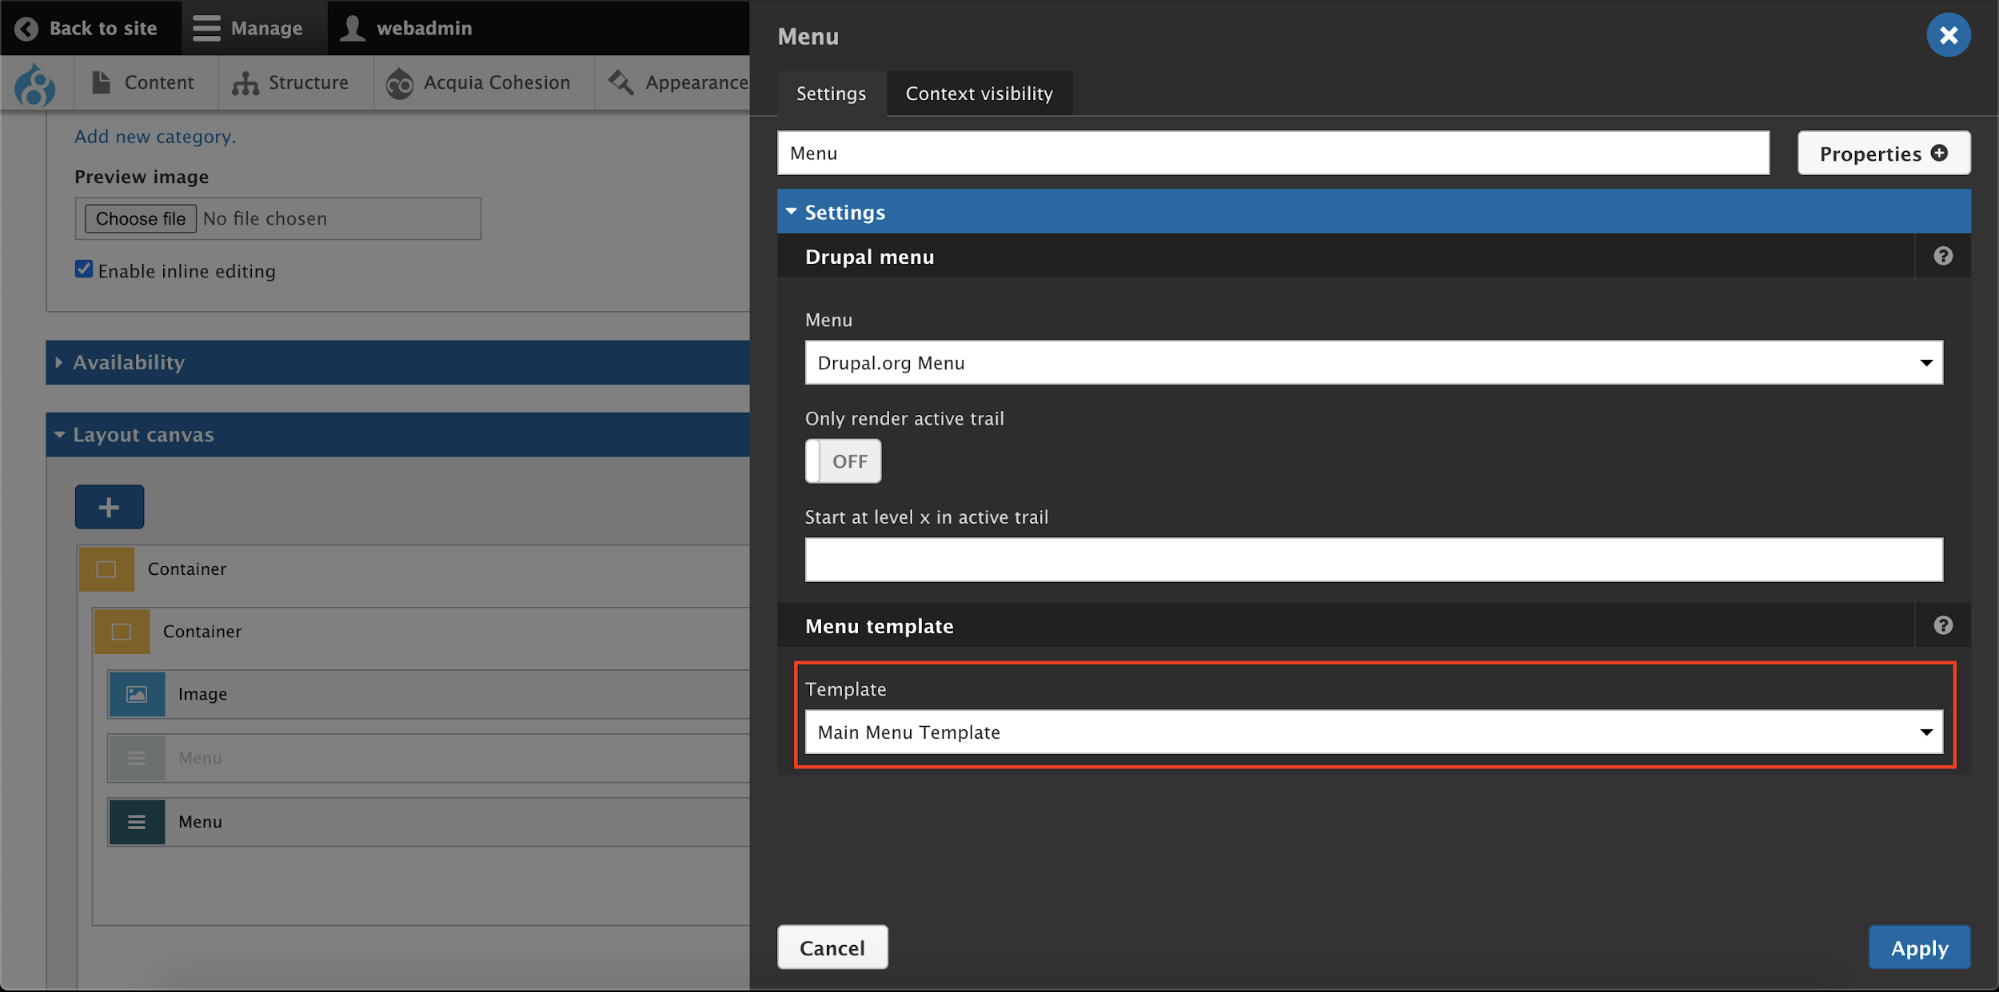
Similarly, it is required to create menu templates for a sidebar menu or user menu which may not require nesting levels.
Views template
Now, let’s move to the last category of the templates i.e. the Views template. As we all know that Views is a query builder and is useful in creating a diverse list of contents based on the condition and/or contextual filter. The way we get the template for view in a normal Drupal installation, similarly we get the option to create a custom layout of views in Site Studio using Views template.
Views template provides the structure to your View page or Block and uses different view modes to display the results. But before creating a Views template it is required to have a views page or block.
Here is an example of how to display the teaser list of content using the teaser view mode.
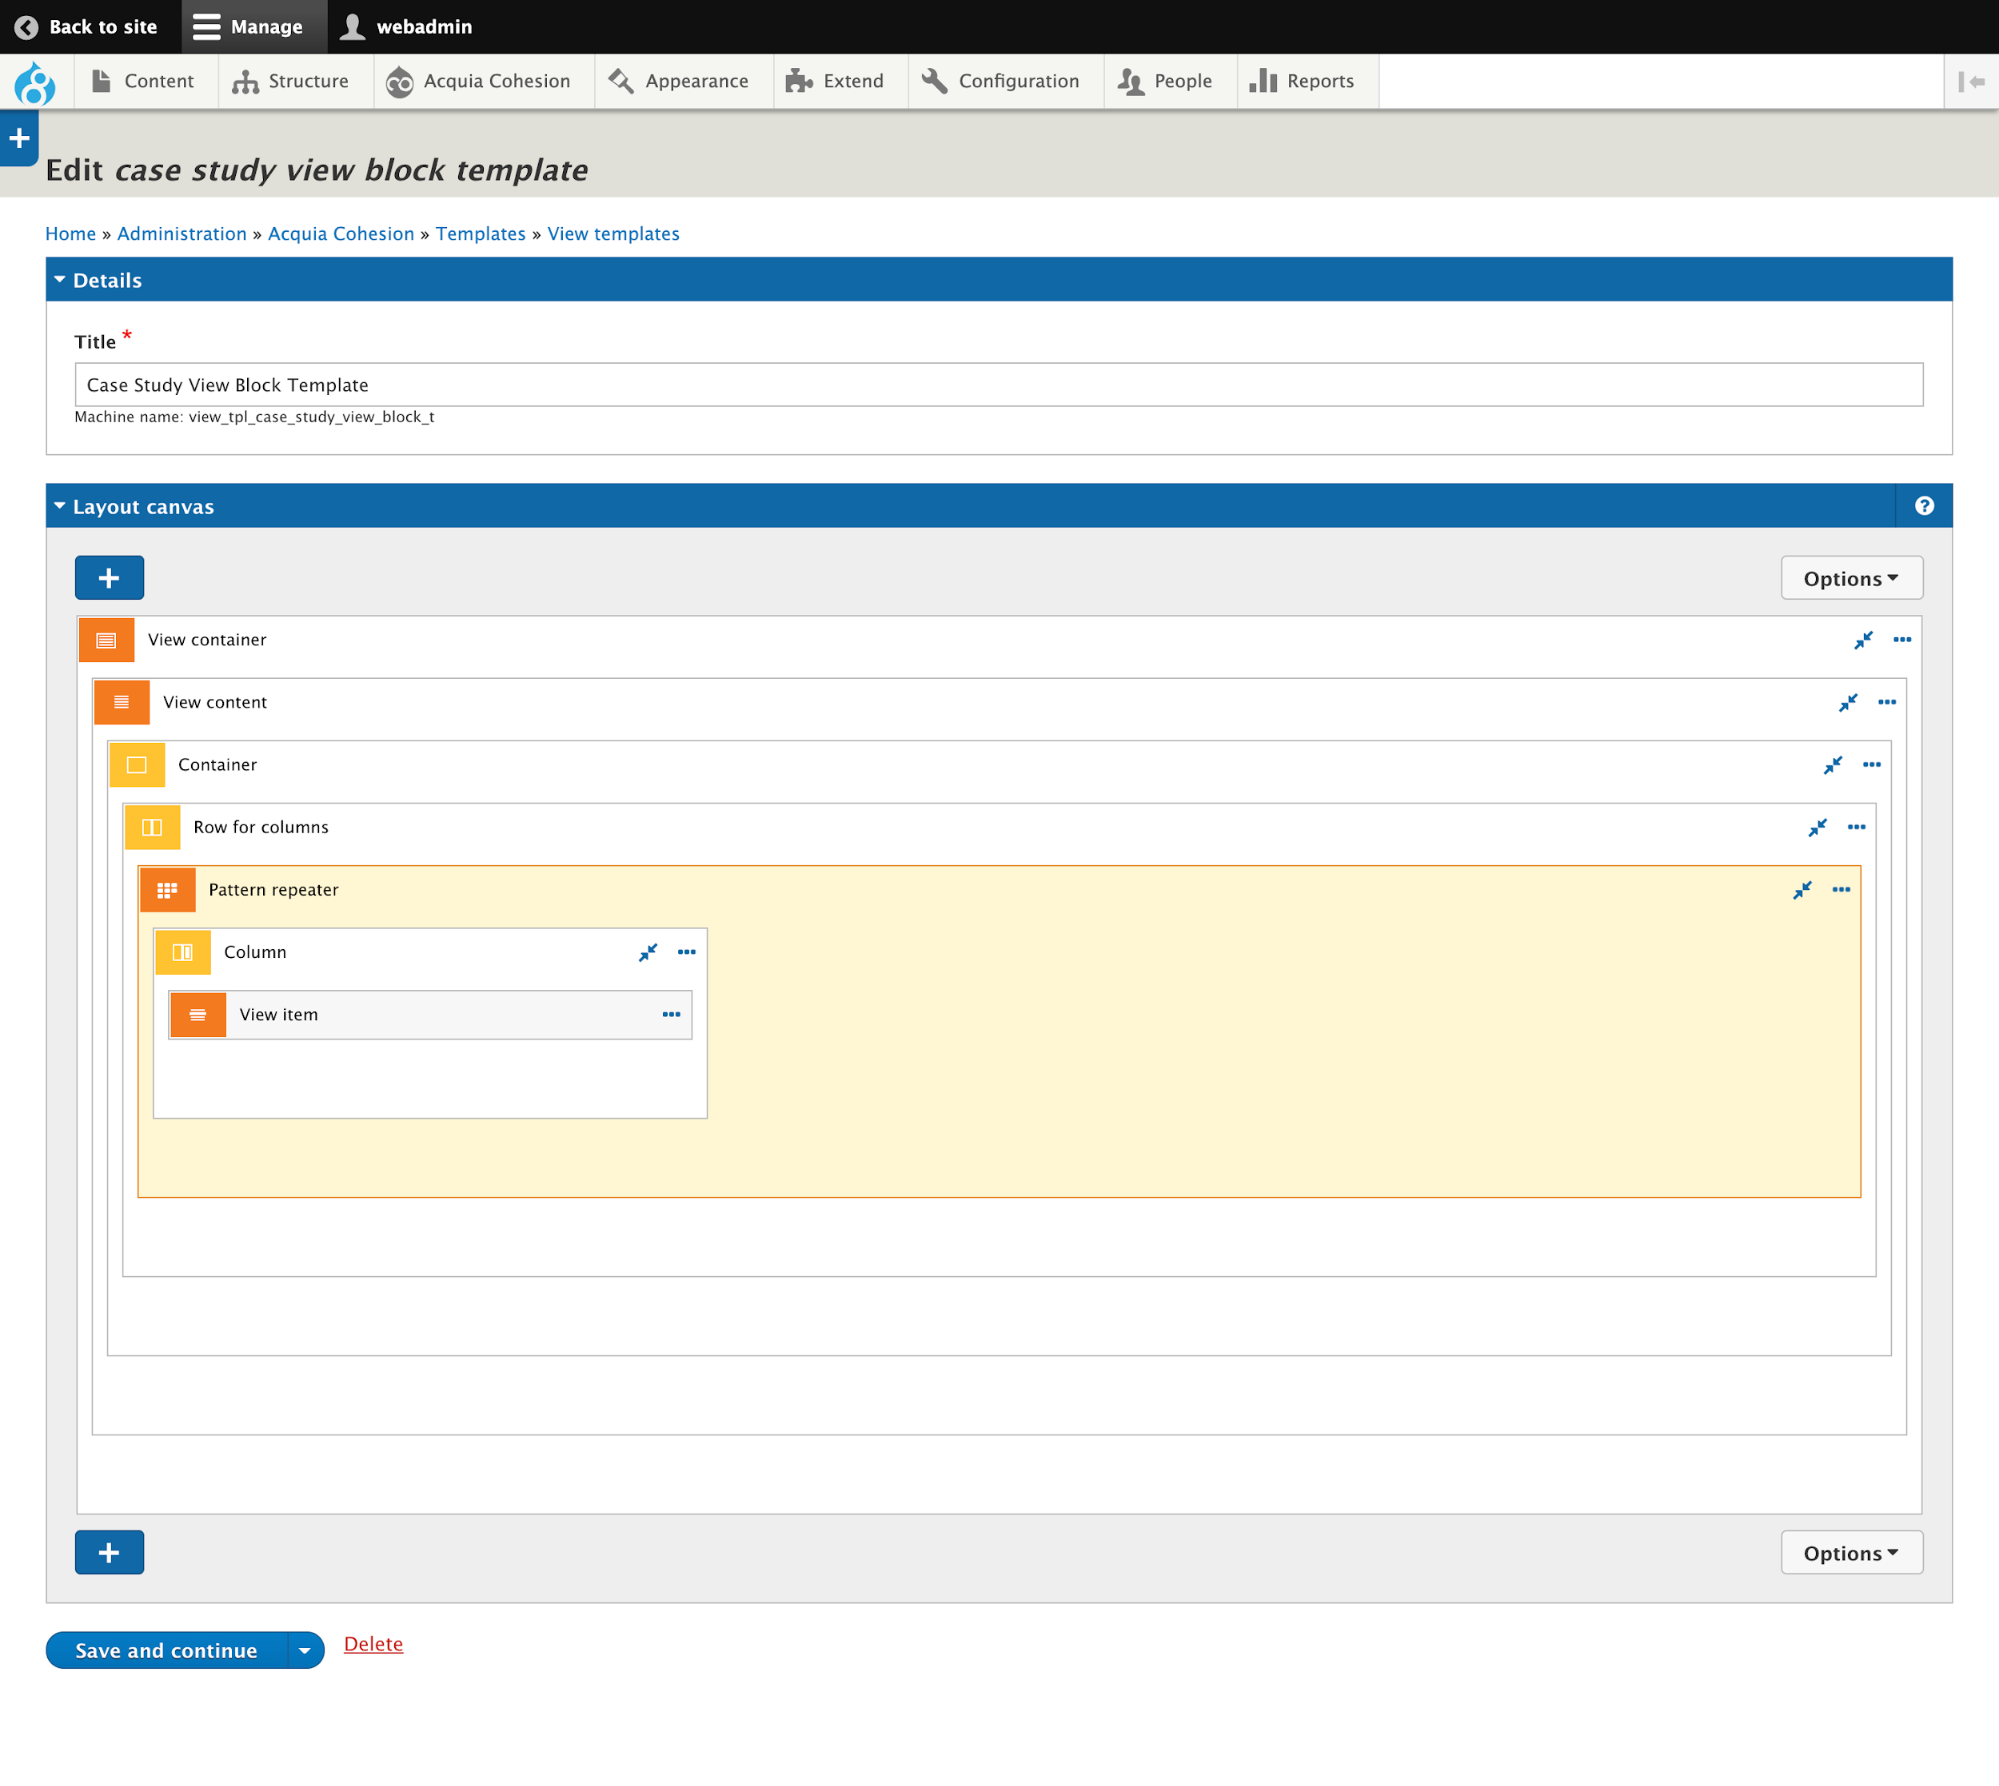
To create a view template there are certain views elements required. Below is the list of views elements which can be used:
- Views Container - this is a mandatory element for creating views template. We can consider this container as a wrapper of the whole view. This element won’t have any configuration.
- Views Content - this is the container or views row data and this container differentiates the filter and pagination of the view.
- Pattern repeater - Using this element we can repeat the pattern to obtain the desired layout.
- View item - The element under which we can define the entity type, bundle, and view mode.
Moreover, we would be able to use cohesion elements like row for columns and columns to create the desired layout. Here’s a screenshot for reference.
Acquia Site Studio Demo
Explore how Site Studio enables you to apply design systems on your Digital Experience built on Drupal!
I hope this blog was helpful in understanding Acquia’s Site Studio better. If you are looking to harness the benefits of Acquia Site Studio for your projects, do reach out to us for business consultation by emailing business@qed42.com.
Interested to read more about Site Studio? Here are some articles for you:
.avif "Our Drupal 9 Upgrade Story")
Our Drupal 9 Upgrade Story
The Drupal community is super excited for the Drupal 9 release, and so are we!
In the spirit of our tradition of keeping the QED42 website up to date with the latest Drupal releases, we decided to celebrate the Drupal 9 release day by porting our website to Drupal 9. And we’d love to share our learnings with the Drupal community.
In the DrupalCon Amsterdam Driesnote presentation, Dries stated that
Drupal 9 will be the easiest major update
And we decided to experience it first hand! Thus our journey of upgrading the QED42 website began.
The current state of our Drupal site
Before we share our Drupal 9 porting experience, it is important to understand our website’s current stack.
- PHP: 7.1
- MySQL: 5.6
- Drupal Core: 8.8.5
- Number of contributed modules: 52
- Number of custom modules/themes: 5
It is a composer based project setup using drupal-composer/drupal-project as a starter-kit template.
Our Drupal 9 Upgrade Strategy and Solution
We followed these simple steps to upgrade our site to Drupal 9:
- Install the upgrade status module
- Update your contributed modules
- Update your custom module code
- Update Drupal core to Drupal 9
Lets being with the upgrade
Step 1 - Install the upgrade status module
Upgrade status module provides comprehensive support for preparing your upgrade to Drupal 9. This helps identify deprecation in contributed/custom modules and themes and suggested an update to the available version, validate the system requirements and much more. Read more about it on Drupal.org. If you are using composer based setup then use
Step 2 - Update your contributed and custom modules
We identified the current state of our contributed modules - out of 52 contributed modules, only 18 were ready with Drupal 9 release.

Step 3 - Update your custom module code and theme
Next, you need to review the new dependencies and some of the most commonly used APIs that are removed in 9.0.0. Read our blog to know more about identifying deprecation /insights/coe/drupal/preview-breaking-changes-drupal-9
Step 4 - Step by Step guide for Updating Drupal core to 9
We are now at our final step to update the Drupal core, but wait we have a roadblock. Our composer setup is based on drupal-composer/drupal-project.
This project template made use of some packages that are no longer connected to the upstream and now deprecated and are in favour of new ones (drupal/recommended-project or drupal/legacy-project) that are provided by Drupal core
So, you'll need to make the following changes:
- When installing Drupal core with Composer you should require drupal/core-recommended instead of drupal/core.
- You have to update the drupal-composer/drupal-scaffold plugin and use the Drupal recommended drupal/core-composer-scaffold
Note: Follow the blog by Drupalize.me to know more.
- We are now using the drupal/core-recommended template and the next step is to upgrade our Drupal core.
- Next, you'll need to pull in the Drupal 9 version of both the core-recommended and dev-dependencies packages as dependencies. We used --no-update to avoid a chicken-and-egg problem with mutual dependencies.
Now we are ready to update our Drupal website. However if any of your packages don’t have a release explicitly declared as D9-compatible (i.e. you are relying on a patch to make it ready), you will likely run into a dependency error when trying to update your codebase.
To get around this, you can simply add an alias to drupal/core:
(Make sure you replace 9.0.0 and 8.9.0 to whatever versions you are using in your installation)
We are now ready to run composer update and visit our Drupal 9 website.
Really? Yes, modules with stable release might have a few corner case scenarios which the upgrade status module did not report.
Here are a few issues we ran into while skimming through upgraded Drupal 9 website.
- Few contributed modules come with a stable release but still require couple of additional patches to remove deprecated code.
Eg: config_split 8.x-1.5-rc1 stable version for Drupal 9.
https://www.drupal.org/files/issues/2020-05-05/3133805-2.patch
- Multiple D9 readiness issues for a single module
For those modules which don’t have a stable release for Drupal 9 might have multiple issues on Drupal.org. You will have to collect all the issue queues.
Eg:
Hurray! Finally, our site is upgraded to Drupal 9! Go ahead and check it out!

We would also love to hear about your Drupal 9 upgrade experience, do share your comments below.
We agree with Dries and do believe that Drupal 9 is the easiest upgrade ever!
Happy Drupal 9 !!!

Decoupling Drupal Commerce with Gatsby
Welcome to yet another blog post! In this article, we will learn how to decouple Drupal Commerce with Gatsby to build an e-commerce site that includes product detail pages, product listing pages, and much more.
Let’s get started!
Decoupling Drupal Commerce with Gatsby
- Setup our Drupal commerce site
- Setup our Gatsby Site and fetch data from the Drupal site
- Work with our data (Create pages dynamically, Add to cart functionality).
We will be covering the checkout functionality our next blog post.
Prerequisite
You should have some prior knowledge of Drupal Commerce and Gatsby.
Step 1: Setup Your Drupal Commerce Site
We can install our Drupal demo site with the below-mentioned command. This provides us with a starter project and all the required products we need to get started with. If you are not familiar with how to set up the commerce site from scratch, visit the Commerce documentation(https://docs.drupalcommerce.org/commerce2) to know more about it.
Once you are done installing the site. You need to do a few more things:
- Enable JSON API, JSON:API Resources, JSON API Hypermedia, and Commerce API module. For authentication, you can add the Simple OAuth module.
- Allow read and write permissions for JSON API.
- Edit your services.yml file to allow cross-origin headers.
Step 2: Setup Your Gatsby Site
Here is a link to the starter project. Go through the readme file to check how to set up your Gatsby site.
Let me walk you through the code and the flow:
- Gatsby-config.js: We have just added two plugins that are not shipped by default with the Gatsby starter project.
- gatsby-source-drupal: That fetches data from drupal end.
- gatsby-plugin-styled-components: To style our components.

2. Gatsby-node.js:

By default, the gatsby-drupal-source plugin does not create product listing resources. If you visit your GraphQL endpoint you won’t find it. We are using OnCreateNode hook with some custom logic to create the allCommerceProduct listing resource at our GraphQL endpoint.

Here we are querying allProducts to create product pages dynamically by, passing the product id to our ProductDetail.js template. Then by using the context id in our template file we can query the product data for each product.
If you go to ProductDetail.js template file you can see how we are using the context id to query our product data.
The rest of the code is self-explanatory if you have worked with React before.
Essentially these are the components that require your attention:
- ProductDetail.js template - This is where we fetch the data for each product and pass it below the component tree as props to display it.
- products.js page - This creates a Product listing page. We are fetching all the products here and passing the data below the component tree as props to display it.
- cart.js page - This displays the Cart Component that fetches our cart data from Drupal end. Checkout the CartService.js file to see how the cart data is being fetched from a JSON endpoint.

Then we use it in our cart Component like this:
You can similarly modify your cart. Checkout Commerce API to learn more. You can integrate the user authentication functionality similarly. I have already written a blog post regarding this. Here is the link.
This is all for now. Will come back with another blog post that will cover the payment integration. Till then see ya!
P.S - Please mention your queries in the comments section. Happy to answer.

Acquia Site Studio - Low Code Enterprise-grade, Drupal website building platform
Low-code platforms have been slowly gaining popularity in the Marketing stack of organisations. Low-code essentially means being able to assemble UI of your Digital experience visually and often without the need for a dedicated Development team. Webflow for Websites and Shopify for e-commerce are among the list of rising low-code platforms. These platforms help organisations become more agile and help enable various functions like Design, Marketing to come on board as Makers on the Digital experience. Today we will talk about Cohesion now renamed as Site Studio, a low code offering for Drupal websites by Acquia, we will discuss benefits and some of the paradigms that make it an effective low code option in Drupal stack.
Drupal has witnessed a healthy growth over these years as a pillar for Enterprise Digital stack, Acquia's Site Studio brings the DIY spirit to this stack. What more and more Marketers are looking for is quicker and cheaper ways to assemble landing pages and work out of a component library of Digital elements that are performant and consistent to the Design systems of the organisation. A low code approach to Drupal will only work if its aware of its capabilities & flexibility, that is what Cohesion brings on the table. Ability to apply Design systems on your Digital Experience built on Drupal, DIY!
Benefits of Acquia's Site Studio
- Low code
- Highly configurable
- Easy maintainable
- Easily modifiable
- Highly scalable
- Component-based driven
- Less developer dependent
Acquia Site Studio
Acquia's Site Studio provides a contributed module and theme which needs to be installed in Drupal, quite similar to the way we install other modules and themes. However, to use this service, it is required to purchase a cohesion package that provides us with an API Key, Agency Key, Site ID, and an API Server URL which needs to be inserted in the Account Settings form.
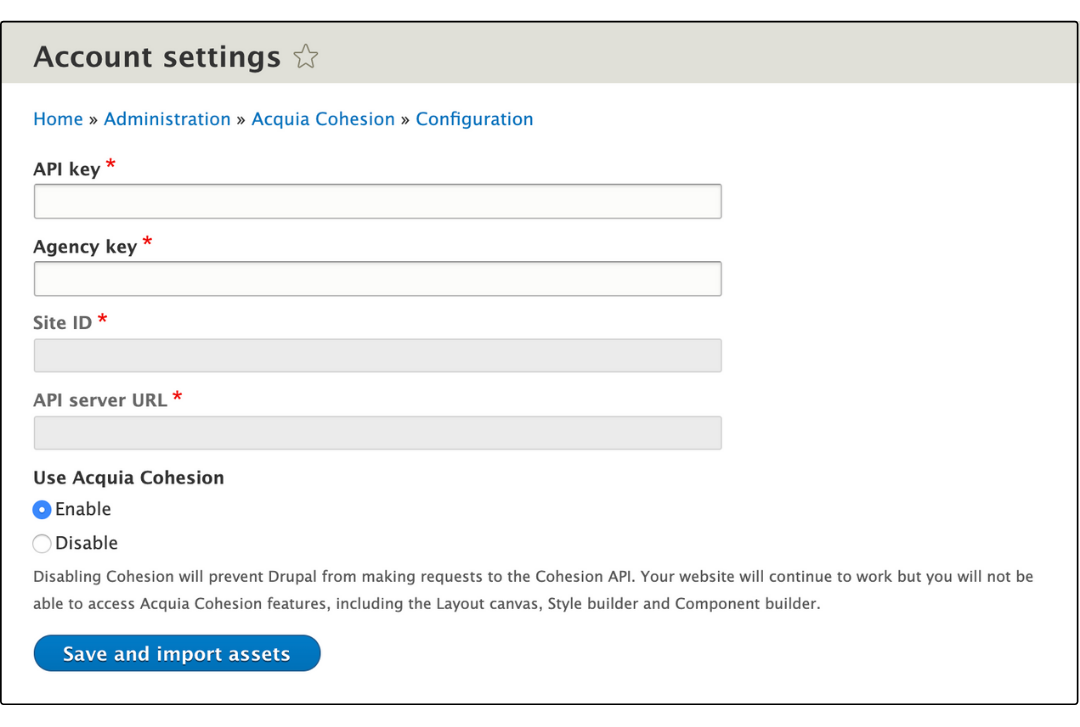
Here are the settings and key features of Acquia's Site Studio:
- Website Settings
- Style Settings
- Components
- Templates
Site Studio provides an in-site configuration form which takes care of your branding requirements. You can add your own branding elements like fonts, colours, icons, grid settings, SCSS variables, etc. directly onto the site. And there is absolutely no need to make any changes in the theme folder as well as the theme settings. Doesn’t this sound cool! Your basic frontend settings would be handy to you and you can modify it directly from the site without asking for help from a developer.
Website Settings
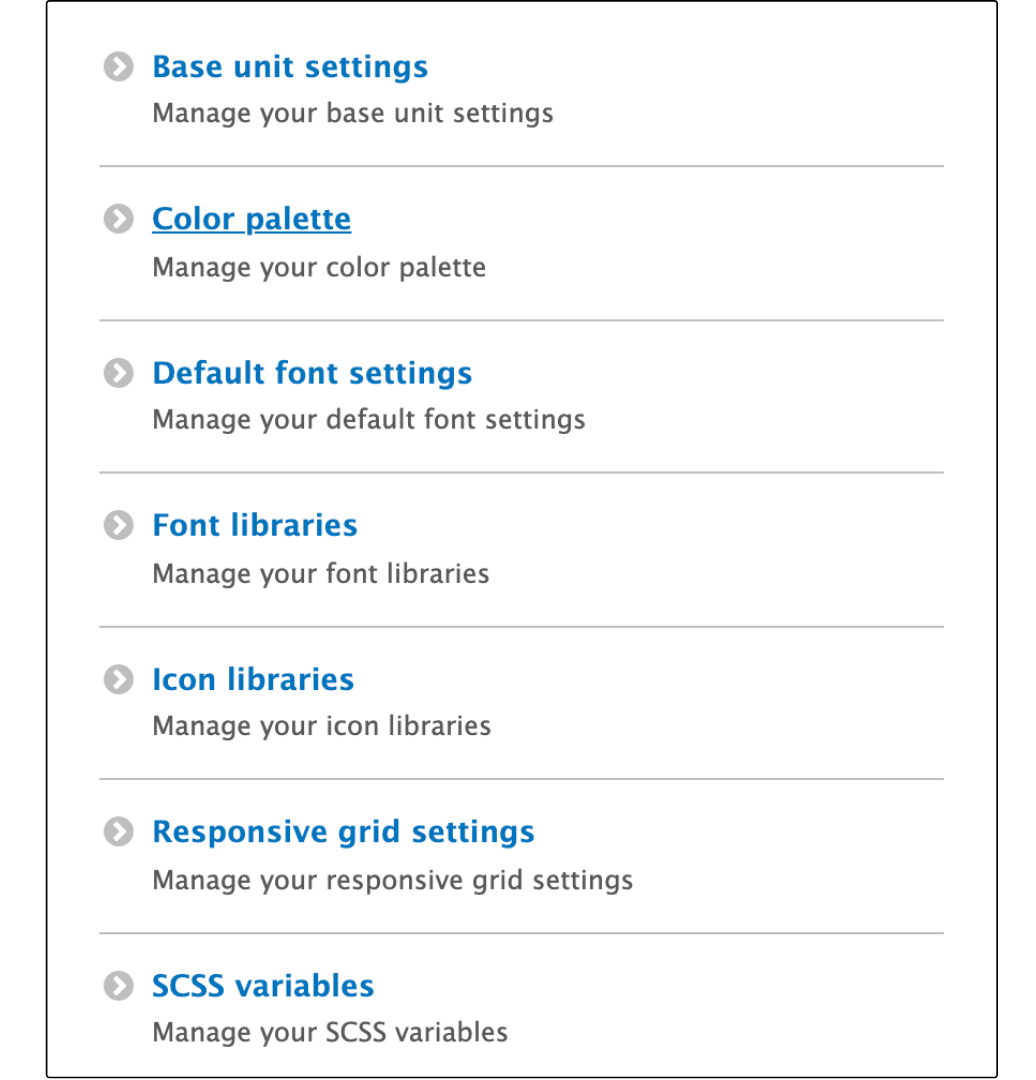
Style Settings
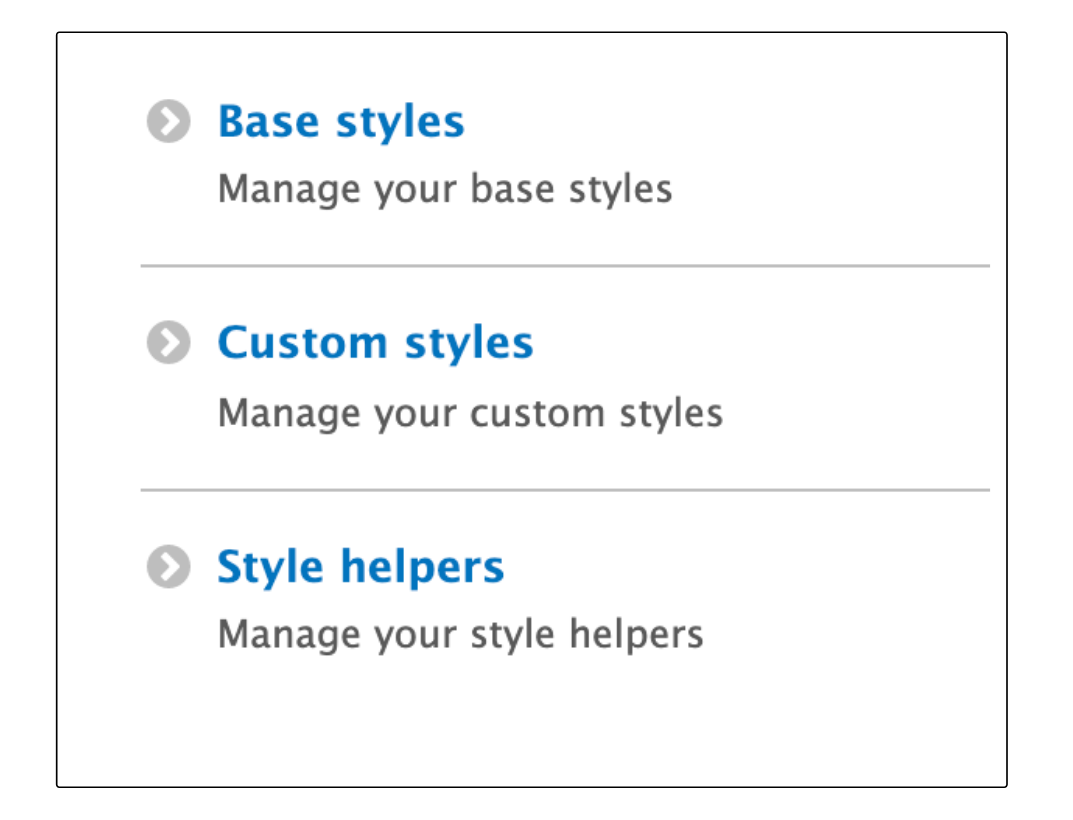
It’s not over yet, with Acquia Site Studio you can create/modify styles of a site. Acquia Site Studio provides settings to update the base style or to create custom styles.
And this is how the default preview and configuration pane looks like.
Now let’s understand what comes under Base styling and Custom styling
Base styling - Styling which is going to be consistent throughout the site, e.g., font-size of body. Font formatting of Headings, Style of a button, style of link, etc.
Custom styling - Styling which will be different for each instance or as a variation of base style. E.g., Big button, Small button, Read More Link, Consistent layout related styles (Padding Top & Bottom Large, Padding Top & Bottom Small), Social icons theming, etc.
Let’s look at the example of CTA link styling.
- CTA style structure
- Link styling
- After pseudo-element styling
- On hover pseudo-element styling
- Style properties required for CTA link and those properties are added in the config form through properties button on the top right corner of the styling pane
- Styling properties required for pseudo-element styling
- Styling properties required for pseudo-element after hover
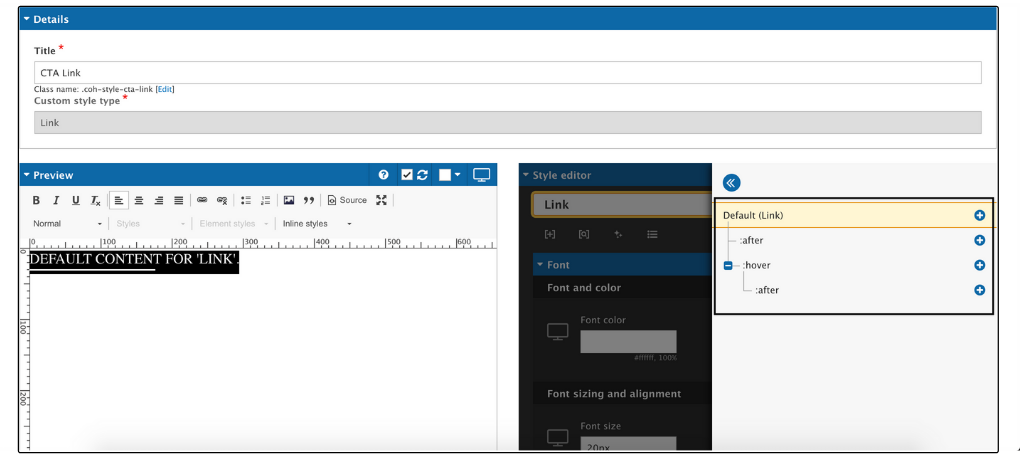
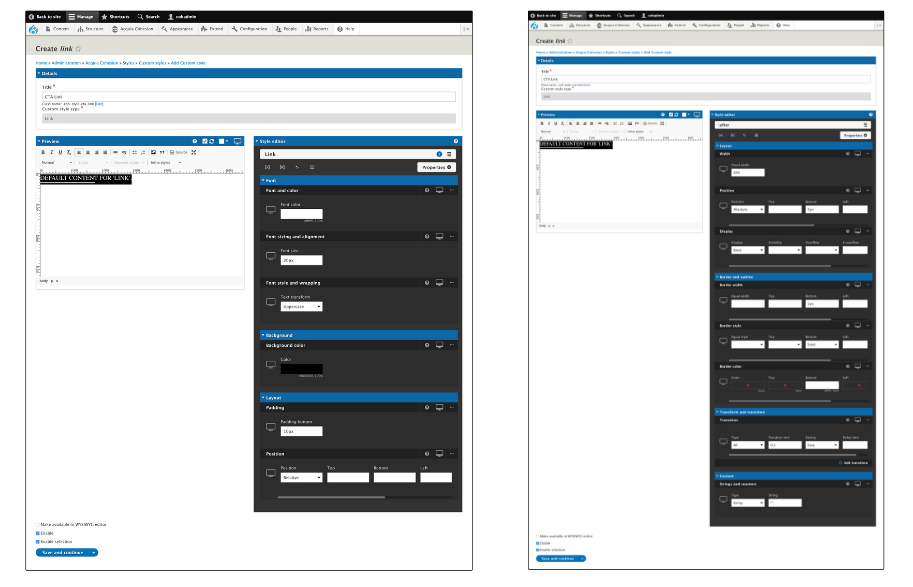

Component Builder
Now let’s introduce the coolest feature of the Acquia's Site Studio - a Component Builder. Acquia Site Studio follows a complete component-based development approach. So, what is the component-based development approach?
Acquia Site Studio provides a list of elements. By using these elements even simple and complex components can be created and be made configurable by creating a component form. The amazing part is that everything can be built by mere drag and drop. Doesn’t it sound super user friendly?
Let’s look at an example of a Hero Component and figure out which elements could be part of this component? Let’s create a list of elements(atoms).
- Hero Image
- Hero Title
- Hero Description
- CTA button
Let’s consider the below-displayed hero component that we are trying to achieve.
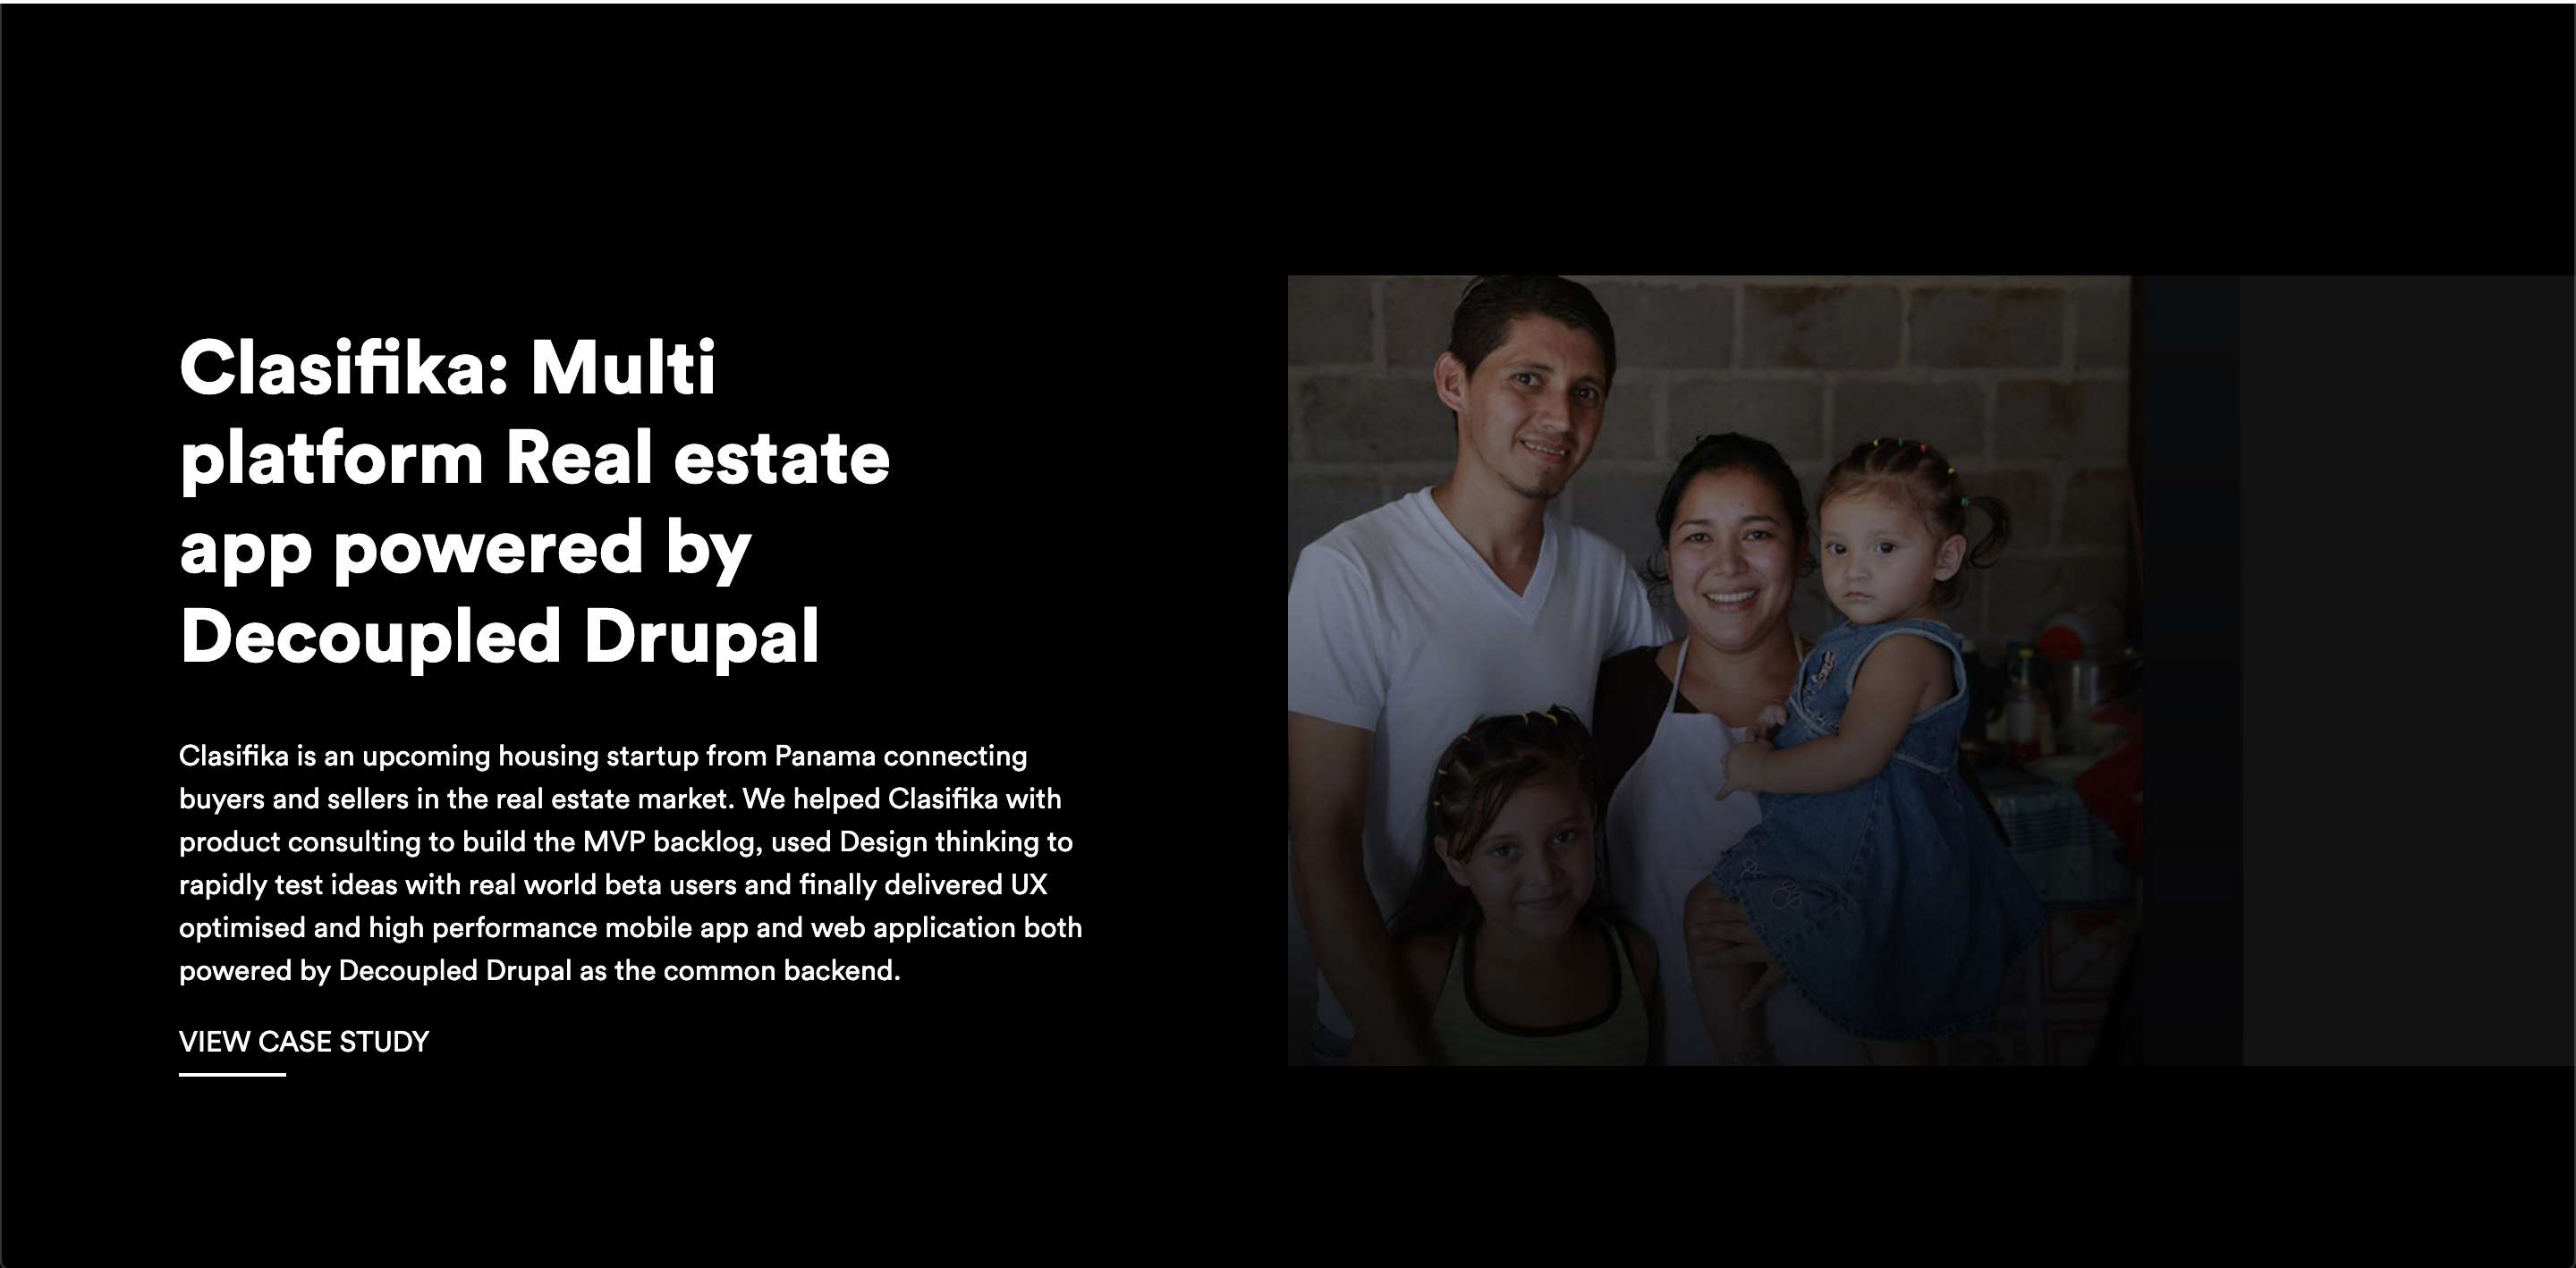
Based on the Hero component design, the hero component structure would look similar as described in the below image.

A component will be created which will have the above-mentioned elements. But what about styling? This is the real beauty of Acquia Site Studio. It allows us to create a base style as well as a custom style and those can be appended to the component. Doesn’t it sound fascinating?
Here would like to take you back to the styling part of the section where we have styled CTA link. Now, here in the above component CTA link element can directly assign the style which has been created under custom style. And as per image, styling can be appended to CTA Link element.
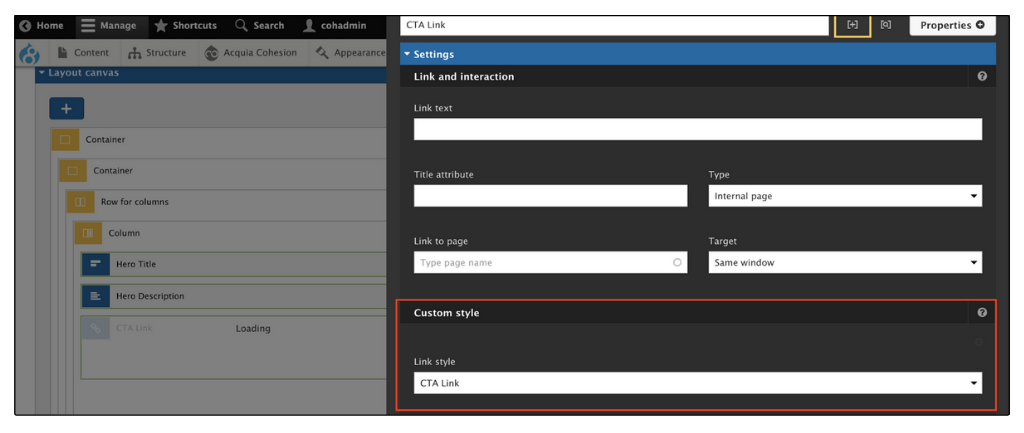
Layout
There are multiple ways to create different layouts. Here, with Acquia Site Studio, the layout can be defined by a Layout Category component and also component dropzone element can be provided to add other components.
Does it mean? Woah! Yes, it means nesting use of the component is also possible. I won’t provide the screenshot for this example right now.
Template
There are four main templates:
- Master Template
- Content Template
- Views Template
- Menu Template
The template names clearly state the use of each template, but, I am sure you must have some questions related to master templates.
What will it hold? The thumb rule is, this template should be least modifiable, means, it should not be updated frequently. We can ensure this by using only consistent section/components/regions added to it.
Acquia Site Studio Demo
Explore how Site Studio enables you to apply design systems on your Digital Experience built on Drupal!
I hope this blog was helpful to understand the basic outline of Acquia Site Studio. Stay tuned! We have an upcoming blog that will talk about the advanced usage of templates.
P.S - If you want to learn more about Site Studio, Acquia has a training and a full support guide - https://cohesiondocs.acquia.com/6.1 and get access to the free sandbox here - https://www.acquia.com/products-services/acquia-cohesion#create-sandbox.
Interested to read more about Site Studio? Here are some articles for you:

Implementing User Authentication for Gatsby and Drupal Decoupled site.
Authentication is one of the most important functions in any application. This authentication process has to be secure enough such that data being transmitted should not be compromised. Authentication dictates what users are able to see and do when they log in. Everyone knows how important it is to have a secure authentication method and how it works. I’ll skip that part! Let’s dive right into implementing authentication with Drupal and Gatsby.
On Drupal end will be using the simple OAuth module. Head over to my blog Alexa Account Linking and Custom Skill Model to find step by step instructions on how to configure this module.
Now that we have our OAuth setup ready let's make the required changes on the Gatsby site. I believe that you already have a setup ready to write some code as the blog proceeds.
Before starting to write code we should have in mind what our authentication functionality should be able to perform. Let’s break it down first in small parts:
- User should be able to log in
- User should be able to logout
- Store access token on client-side
- Accessing resource using the access token
- Use the refresh token to get valid access token when the previous access token expires
Let’s create a service which will help us check the following things throughout the project:
- Whether the user is authenticated or not
- If the user is authenticated but access token is expired, then automatically generate new access token so that user experience shouldn’t break.
Some developers prefer to place their helper functions under the ‘services’ folder while the others keep them under ‘utils’. Hence the location of the file doesn’t actually matter, it’s merely individual preference. I am going to create this file under src/services/auth.js
Adding a UI for users to log in
Let's create a new SignIn form component that displays a form users can fill out with a username and password to log in.
That’s all! We have our authentication functionality ready on the site. Now let’s take a look at each function and what it does.
SaveToken(): this function is used to store the token in local storage.
fetchOauthtoken(): This function takes a username and password as parameters, and uses them to make a request to the Drupal /oauth/token endpoint attempting to retrieve a new OAuth token.
fetchSaveOauthToken(): it generates new access token by making use on fetchOauthtoken function. Then stores this token in local storage to access various resources.
drupalLogin(): This function gets invoked when a user tries to log in into the site. It makes a request to /user/login REST resource with username and password. Which returns a user object if the passed credentials are correct else it will return an error message.
handleLogin(): It makes a call to the drupalLogin function to verify that the user exists and provided credentials are right. If a user exists, using fetchSaveOauthToken() generates new access token and stores it in local storage so it can be used for subsequent requests.
isLoggedIn(): This function verifies whether the user accessing the site is authenticated or not. Considering the various scenarios mentioned below it will consider that the user is logged in to the site which means that token is available in local storage.
drupalLogout(): Verifies if a user is logged in or not, if true then it makes a request to Drupal site using the access token to logout out from the site.
handleLogout(): This function makes use of drupalLogout() function and if it is successful then removes the token stored in local storage.
We have a login page and if we try to log in it works perfectly but do you think there is any problem? If yes, then you are right. If you open the Chrome developer console, go to the Network tab, and inspect your OAuth/token request you will be able to see the client ID and client secret in the request header which is not right this can cause a security issue within your site.
How do we resolve this?
Let’s take a look at the options we have in our hand.
- Netlify function
- Overriding OAuth controller
Netlify function
Write simple functions that automatically become APIs. Netlify deploys the functions you write as full API endpoints and will even run them automatically in response to events (like a form submission or a user login). Functions receive request context or event data and return data back to your frontend.
In our case, we get the necessary information i.e. username and password, pass it to the netlify function. This will pre-define our sensitive data in the netlify function which is client ID and client secret and make authentication requests from it to Drupal.
By doing this, only the response will be visible to the user but what is being sent inside the header of the request won’t be available.
One downside to this is that you have to pay as per your usage to use netlify functions.
Let us know if you would like to hear more about netlify dev setup and netlify function from us. We will get back to you with another post talking about it.
Overriding OAuth controller
When you hit a request to /oauth/token endpoint to get an access token this simple_oauth/src/Controller/Oauth2Token.php controller is being executed.
This controller is responsible for generating a token for you based on the headers you sent in the request.
So we thought, what if we override this controller in a custom module and define our client ID and client secret here and when a request comes in and attach these both to the request. The requirement of the Oauth controller to generate a token is being satisfied and our problem of client secret and ID being exposed gets resolved. In addition, we also save some money for our client.
To override the OAuth controller we will have to let Drupal know that when /oauth/token route is requested rather than using a controller provided by a simple OAuth module use the controller from our custom module.
We will have to alter the route so that we can inform Drupal.
Add a YAML file my_module.services.yml into the module's folder with the following content
Now we have to create a Routsubscriber class under my_module/src/Routing where we will notify Drupal to use our custom controller when oauth2_token.token route is requested.
The overridden controller will look like as below
After this, we can remove the following lines from IsLoggedIn and fetchOauthToken function from auth.js file.
Please do let us know if you have any questions or a better approach to achieve this in the comment section.
.avif "Gatsby incremental build for self-hosted Drupal environments")
Gatsby incremental build for self-hosted Drupal environments
Why is a Gatsby incremental build required?
Every time you run a Gatsby build, the following steps are processed internally:
- Delete CSS and HTML files at the very beginning
- Source data from an endpoint
- Create pages and queries
- Build JS/CSS production files
- Build HTML files
For sites with a large amount of content, this process can be quiet time-consuming. For instance, you make modifications to only 2 nodes in a Drupal site that has 20,000 nodes. However when you run the Gatsby build it will consider changes for all the 20,000 nodes and process the above the steps.
Solution
For sites that are hosted on the Gatsby Cloud, the solution to the problem is Gatbsy Cloud builds feature.
But for self-hosted Drupal environments, since this is cannot be the solution Gatsby provides us with environmental variables that helps us to reduce the build time by possessing the .cache and .public directories between the builds.
So every time you run a Gatsby build with the environment variable flag. It compares the page data from the previous build and creates a list of page directories that are finally passed to the build process. Which means it will only trigger build for the changed nodes.
The difference between the build time is quite visible. For our Drupal site that has no more than 100 nodes, there was a difference of 50 seconds in the consequent builds which I think is pretty huge.
The first build will trigger build for all the pages.

On the second build, only the pages with content change are updated.

How to implement a Gatsby incremental build?
1. Upgrade your Gatsby to the latest version
2. Add a flag to your build command in package.json
or you can simply use the environment variable in your terminal every time you run your build command.
To get this working with Netlify you need to add the netlify-plugin-gatsby-cache to your netlify.toml config file. You can follow this blog to see how it is implemented.
Things to remember
- GATSBY_EXPERIMENTAL_PAGE_BUILD_ON_DATA_CHANGES=true flag must be used every time you trigger a new build, otherwise, Gatsby will not be able to persist the cache between the builds and you will not get the desired outcome.
- Any code changes or change to a static query will trigger a new build. The environment variable only takes care of content changes.
- Also, if you add or delete any new content/node, a new build is triggered.
For more in-depth information about how this works, you can follow the pull request details here.
P.S - In case you have any queries, you may mention them in the comments section.Incremental build functionality is now a part of the Gatsby core. Although an experimental feature, it is pretty significant and a much-awaited one. Let's understand why the Gatsby incremental build is required for self-hosted Drupal environments and how to implement it.Note: This post is also applicable for other backends and environments.
.avif "Authenticated User Cart with Gatsby and Drupal commerce")
Authenticated User Cart with Gatsby and Drupal commerce
Goal
- Users should be able to register
- The user should be able to log in as an authenticated user
- Users should be able to add products to their cart as an authenticated user
Prerequisite
- Your Drupal commerce site should be up and going with all the commerce modules enabled that are provided by default.
- You should be able to fetch your Drupal data in your Gatsby site.
- Also, we will need the commerce cart API module which provides a RESTful interface to interact with our cart in Drupal.
Let’s Get started
- Go to the REST option under web services and enable all the cart and user resources with the below permissions.
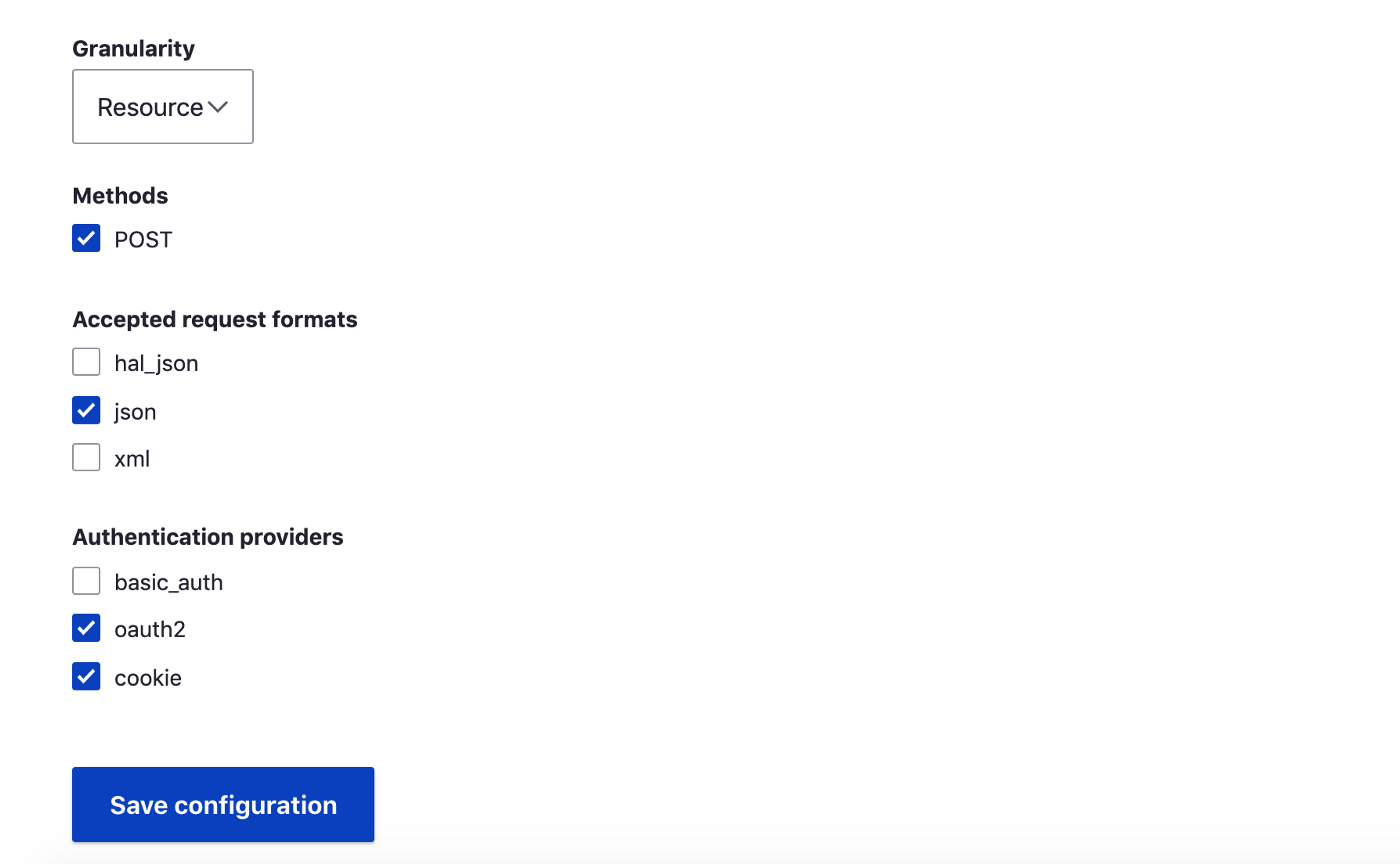
We are done from the Drupal end here. Let’s move to the Gatsby end now.
On Gatsby End
1. Register
The first thing we will do is add user registration functionality.
Create your UserRegistration form and pass all the valid arguments to the registerUser function. Now submit your form to see your user registered on the Drupal end under the People tab. In case you get any permission issues, check under config/people/accounts to see if visitors are allowed to register.
Now that our user is registered. Our next step is to log in.
2. Login
Our log-in functionality is based on the React Context API. So it is necessary you know how the Context API works.
Visit this link and copy four of the below-mentioned files:
- drupalOauth.js.
- drupalOauthContext.js
- withDrupalOauthConsumer.js
- withDrupalOauthProvider.js
Place all four files in a single directory named drupal-OAuth. Next, wrap your base component with DrupalOAuthConsumer to initialize the context provider. Your base component will look something like this:
Now to create your sign-in or login form take a look at the below code:
export default withDrupalOauthConsumer(SignIn);
When you submit the form Drupal will take care of generating the OAuth token and return it to you. To check this you can wrap your component with DrupalOAuthConsumer, and check via the props.userAuthenticated.
One thing to note here is that the above code does not take into account the user login on the Drupal end. So to be able to log in on the Drupal end add the drupalLogIn code to your drupalOauth.js file and call it inside the fetchOauthToken function. So that every time user tries to log in on the Gatsby end, the user session gets initiated on the Drupal end as well.
Remember we are only taking into account the login functionality here. If you are trying to implement the logout functionality as well, make the below piece of code work same as login.
Also, take into account that drupalOauth.js is a class service. So drupalLogin and drupalLogout functions should be an implementation of a class and need some modifications accordingly.
Authenticated Commerce Cart
Now that our user is logged in and registered, our next step is to post the data to our commerce cart.
If you go through the commerce cart API documentation. It explains how the commerce cart API module works. To post data to the cart as an authenticated user you must be logged in. Once you are logged in. We can POST, GET, and UPDATE our cart. Go through the below code. Which is fairly simple to understand. We are just taking the access token generated by simple OAuth from the Drupal end on login that we have already stored in our browser local storage and sending it as a bearer token as part of our request header to the Drupal end so it can recognize that the user is Authenticated.
This will allow you to post the cart data as an anonymous user when you are not logged in as well as authenticated user once you are logged in. (Add uuid-token-generator) to your packages to make it work.
To add a product to your cart you can simply import the CartService class into your component and use it as :
This is it. Cheers! We are done here. We have been able to successfully register the user, authenticate the user and post data to our commerce cart.
P.S - If you face any issues. Kindly mention in the comments.
We are building a decoupled E-commerce site with Gatsby and Drupal commerce. As you are well aware of the fact that in all web applications one of the most important features is user-authenticated browsing. I will not go into the details of why user-authenticated browsing is important as you will find plenty of blog posts on that.This blog post is aimed at users who may find themselves struggling as I did while trying to add the user authentication functionality to a Gatsby site. So let us get started.

Clear Field Values Module: Drupal 8
While trying to build a form, I found that it would be useful to have a one-click/touch option to clear text field values instead of selecting all the text and removing it. Even though this appears like a small issue, solving this would make users life easy! This was the driving force behind creating the Clear Field Values module for Drupal 8. The Clear Field Values module provides a way to clear data in the text field values with a single click/touch.
| Clear Field Values module
This module adds a button to clear text field values in one click/touch and provides two options at present, one is a simple cross button and the other is using font awesome icons.
| Benefits
- Helps clear the entire input field without having to delete the whole text manually
- Clears a pre-suggested input present in the input field, that the user does not require.
| Implementing the Clear Field Values module
Follow these steps to configure the Clear Field:
- Go to /admin/config/clear-field/settings steps
- Enable Clear Field by selecting the checkbox
- Next, select the type of Button:
- Simple X
- Fontawesome for all generic fields
- You can then add the text and tooltip which you need to add along with icon or keep it empty if not required.
- Add classes for the text field elements where you need the cross button to be visible.
Step 1 : Move to Settings page /admin/config/clear-field/settings
Step 2: Enable Clear Field Checkbox
Select Type of Button
- Text along with X for all
Selecting the above option would add X(cross) with text beside the text field
- Font Awesome for all fields generic
Enable FontAwesome module https://www.drupal.org/project/fontawesome and you can add the cross button
Default values for the text of the icon and tooltip are Clear Field & Clear field value which can be overridden.
Default values for the Classes are form-text form-email separated by a space.
For a custom-form add custom classes defined under element’s attributes under Classes field.
https://youtu.be/1czrz9RcCs8
| Developer support
This module is supported by
- Harshal Pradhan https://www.drupal.org/u/hash6
- Kiran Kadam https://www.drupal.org/u/kirankadam911
| Module download links
https://www.drupal.org/project/clear_field
https://www.drupal.org/project/clear_field/releases/8.x-1.x-dev
Do send in your feedback around this module! We would love to hear from you.
Reference: https://www.geeksforgeeks.org/html-clearing-the-input-field/

Layout Builder Asset Injector module
| Benefits
- It allows you to inject CSS and JS within the layout builder blocks without the need to add it in the codebase.
- Append unique CSS and scripts specific to layout builder blocks
- It provides content editors with basic knowledge of CSS and JS to style their individual layout builder blocks and add short JS scripts to modify the behaviour.
- Instead of adding CSS and JS on a page level, this module allows you to inject them on an individual block.
| CSS Injector
CSS Injector allows administrators to inject CSS into the page output based on configurable rules. It's useful for adding simple CSS tweaks without modifying a site's official theme.
| JS Injector
JS Injector allows administrators to inject JS into the page output based on configurable rules. It's useful for adding simple JS tweaks without modifying a site's official theme.
Note: Block class will be appended automatically to each CSS.
For example when we add a CSS as given below:

| How does it work?
- Enable the Layout Builder Asset module
- After you enable the module, enable the layout option from the manage display section as shown below:

- Under Layout Options, check both ‘Use Layout Builder’ and ‘Allow each content item’ options.

- Click on the Add Block where you have CSS and JS text field (text area)

To understand Layout Builder in detail refer https://www.drupal.org/docs/8/core/modules/layout-builder
- You can add your styling and scripts under the CSS and JS fields respectively
- To make the styling and scripts specific to a block, add classes under the Classes text field. This class should be unique so as to reflect scripts and styling specific to a block.
- On adding the CSS and JS and saving the configuration, it will automatically prefix the CSS with a custom class added.
Note: You don't need to add it manually.

- Upon saving the configuration, it creates a block specific unique file in the backend.

- In the frontend, you can see the CSS applied to the respective block.

| Implementing the Layout Builder asset injector module
Click here for the steps to install the Layout Builder asset injector module - https://www.drupal.org/docs/8/extending-drupal-8/installing-drupal-8-modules
https://youtu.be/v3NYUYyg-3s
| Developer support
Kishor Kolekar: https://www.drupal.org/u/kishor_kolekar
Harshal Pradhan: https://www.drupal.org/u/hash6
Abhishek Mazumdar: https://www.drupal.org/u/abhisekmazumdar
Hardik Patel: https://www.drupal.org/u/hardik_patel_12
Naresh Bavaskar: https://www.drupal.org/u/naresh_bavaskar
| Module download link
https://www.drupal.org/project/layout_builder_asset
| Alternative module links
https://www.drupal.org/project/asset_injector
https://www.drupal.org/project/layout_builder_styles
Drupal 8's Layout Builder allows content editors and site builders to easily and quickly create visual layouts for displaying content. Users can customize how content is arranged on a single page, or across types of content, or even create custom landing pages with an easy to use drag-and-drop interface. Our recently contributed module - The Layout Builder Asset Injector module is definitely not a replacement for theming, but it provides site administrators with a quick and easy approach. The Layout Builder Asset Injector module allows site builders to add CSS and JS to the layout builder blocks.
Views Attach Library module: Drupal 8
The drupal_add_css(), drupal_add_js(), and drupal_add_library() were removed from Drupal 8 for various reasons. Thus to attach CSS or JS assets to views, nodes, etc., Drupal's #attached functionality had to be applied to 'attach' assets (like CSS and JS) to rendered elements on the page. Previously we used the hook_views_pre_render() hook method to attach a library in the view. Let's explore this recently contributed module by QED42, the 'Views Attach Library'.
Views Attach Library module is designed to attach JS and CSS library in views, by merely mentioning the library name. It provides a simple UI option in the views where a user has to simply mention the libraries name.
| Benefits of Views Attach Library module
- Easily attach libraries to any view’s page or block.
- Add single as well as multiple libraries in views.
- Easy to configure.
- Instead of writing custom coding to attach library in views, this module provides you simple configuration UI in views UI.
| Implementing the Views Attach Library
To implement this, I attached a CSS or JS library to a view in Drupal 8 via a custom module such that, wherever the view is displayed on a site, the custom CSS and JS file from my module were attached automatically.
The module provides a simple UI option in all view pages and blocks. We can upload single as well as multiple libraries just by declaring the libraries name in the UI textfield.

| How does it work?
Installation is as simple as copying the module into your 'modules' contrib directory and then enabling the module.
To add the library in view follow the below steps:
- Create or edit view
- Find Attach Library section
- Click on Add Library or Edit Library
- Add or edit library name in textfield.
| Using views_attach_library module
Let’s understand the application of this module via an example.
Consider a custom module called ‘abc’ and this module has a library called ‘abc-js’ and this library has one CSS(abc.css) and two JS(abc1.js, abc2.js) files.
Now add ‘portal_abc/abc-js’ in the textfield which is nothing but a library name, where ‘abc’ is the module or theme name and ‘abc-js’ is the library name.
In this way, the view will now include one CSS(abc.css) and two JS(abc1.js, abc2.js) file.
Check out this video for a step-by-step implementation of the Views Attach Library module.
https://youtu.be/oblgBx2Cmu4
| Developer support
Current maintainers:
- Hardik Patel - https://www.drupal.org/user/3316709/
- Yogesh Chougule - https://www.drupal.org/user/724666/
- Rahul Lamkhade - https://www.drupal.org/user/2718915/
| Module download link
Check out the Views Attach Library module here - https://www.drupal.org/project/views_attach_library
Page Specific Class Module: Drupal 8
At times different classes need to be applied to the body tags of different pages, for CSS styling or some different purpose. Page Specific Class module enables this by adding HTML attribute classes for CSS styling to the <body> tag based on path conditions. Body classes for pages are specified by using their paths.
Learn more about the Page Specific Class here - https://www.drupal.org/project/page_specific_class
This module enables a user to add different classes to the body tag of any desired page. It supports all pages which can be created via Node, Views, or a Custom Route.
| Benefits of Page Specific Class module
- Easily add different classes in the body tag of different pages.
- Add single as well as multiple classes in the body tag of the page.
- Easy to configure.
- Instead of writing custom coding to insert classes in body tag this module provide you simple configuration UI.
| How does it work?
Installation is as simple as copying the module into your 'modules' contrib directory and then enabling the module.
To add the classes in the body tag of the page follow the below steps:
- Visit the page specific class setting form (/admin/config/page-class/settings) or Configuration >> User Interface >> Page Specific Class.
- Enter the URLs ("|" separated) along with the class in the text area and save the form.
| Implementing the Page Specific Class module

For example: Enter below value in the text area:
Here:
- When you visit "/node/1" page, ‘abc’ class is added to the body tag because of the (/node/1|abc) settings.
- When you visit "/page-example" page, ‘page1 page2 page3’ class is added in body tag Because of (/page-example|page1 page2 page3) settings.
- If you wish to add multiple classes then enter multiple classes by comma-separated
- When you visit "/hello-world" page, ‘xyz’ class gets added to the body tag. Because of (/hello-world|xyz) settings.
- When you visit the home page, ‘home-page-class’ class gets added to the body tag Because of (/<front>|home-page-class) settings.
- When you visit any page, ‘all-page’ class gets added in the body tag. Because of (/*|all-page) settings.
You can add class to the body tag of any page like:
- Node Page
- Views Page
- Custom Route
https://youtu.be/bicPJaxA2Ak
| Developer support
Click here to submit bug reports and feature suggestions, or to track changes: https://www.drupal.org/project/issues/search/page_specific_class
| Page Specific Class module
You may download this module from Drupal.org - https://www.drupal.org/project/page_specific_class
In case of any queries please feel free to reach out to us by commenting below or send us an email at code@qed42.com and we'll get back to you! QED42 has always encouraged contributions to the Drupal ecosystem via code and community. This blog post talks about my recent contribution to Drupal 8 - the Page Specific Class module.
.avif "A preview of the breaking changes in Drupal 9")
A preview of the breaking changes in Drupal 9
Drupal 9 is scheduled to be released on June 03, 2020. This is when the final Drupal 8 minor release 8.9 will also be released. Considering the history of previous Drupal major upgrades, Drupal 9 will relatively be smooth. Thanks to the semantic versioning introduced in Drupal 8. The upgrade to Drupal 9 will just be another minor upgrade with deprecated code removed. Drupal 8 has brought a lot of standardization in the Drupal world, thus allowing Drupal as a project to grow incrementally.
To put it in simple terms, Drupal 9 contains the same code as of 8.9 + deprecated code removed. Here’s a reference image from the Drupal 9 documentation.

That is if you reduce Drupal 9 from the last Drupal 8 version (8.8.x) the rest is just the deprecated code and dependency upgrades.
However, upgrading all the underlying dependencies and removing all deprecated API is a challenging task. Contributors around the world are working hard to get this done especially when the world is facing an epidemic. This is a challenging time for the entire world, yet Drupal contributors have shown their love towards Drupal and are helping it advance to the next release.
This article highlights some of the system requirements, the new dependencies and some of the most commonly used APIs which are going to be removed in 9.0.0.
Let us expedite Drupal’s journey to its 9th version!
Third-party dependency updates
- Upgraded Symfony from 3 to 4.4
- Upgraded Twig from 1 to 2
- Upgraded CKEditor from 4 and 5
- Upgraded PHPUnit from 6 to 7
- Upgraded Guzzle from 6.3 to 6.5.2
- Popper.js updated to version 2.0.6
System requirement updates
- Apache, at least version 2.4.7
- PHP - at least 7.3. (PHP 7.4 also supported)
- Database: MySQL (5.7.8), MariaDB (10.2.7), SQLite (3.26), PostgreSQL (10)
Modules being removed in D9
- Block_place
- Entityreference
- Field_layout -> Replaced by Layout Builder.
- SimpleTest module has been moved to contrib
- Action renamed to action UI
New features in Drupal 9
Drupal 9 will have the same new features as of Drupal 8.9. Thus, Drupal 9.0 will not include new features. But Drupal 9.1 will continue to receive new features as it did for the minor D8 releases.
Breaking APIs
Following is a list of major APIs which were deprecated in Drupal 8 and will be removed in Drupal 9.0.0. That means if your code contains any of these codes, they need to be replaced before upgrading to Drupal 9. This list is not exhaustive and has been curated by scanning Drupal core codebase for deprecated warnings and sorted according to the usage of these APIs in contributed projects as given Drupal 10 Deprecation Status by Acquia.
- drupal_set_message() removed
- Drupal::entityManager() removed
- db_*() functions removed
- drupal_render() removed
- Methods for generating URLs and links deprecated
- File functions removed
- Loading of entities removed
- Functions to view entities are deprecated
- Date formats API changes
Some of the functions and hooks removed (change record)
- Unicode::* methods removed
Following functions removed (change record)
- Functions retrieving extensions info removed
- drupal_get_user_timezone() removed
- SafeMarkup methods are removed
More Changes/Updates
- Drupal core themes no longer extend Classy. Read more
- Drupal core themes, Bartik, Claro, Seven, and Umami no longer depend on Stable.
- New Stable theme for D9, recommended new themes to be built on new D9 stable theme. Old D8 stable to be removed from core and be moved to a contributed project before D10.
- A new administration theme, Claro (targeted for inclusion in Drupal 9.1)
- Drupal 9 won't be able to run updates from 8.7.x or earlier databases anymore, it is necessary for all new updates added to the code base to be tested from a Drupal 8.8.x starting point. Read more
- Changes to how HTML Elements are inserted via AJAX commands. Read more
- ZendFramework/* packages have been updated to their Laminas equivalents. Read more
- PhantonJS based testing removed. Read more
- The jQuery UI asset libraries not in use by Drupal core have been marked deprecated and have been removed from core in Drupal 9.
- Drupal 9 will continue to depend on CKEditor 4 and jQuery 3.4.
- Modules to be compatible with Drupal 8 and 9 at the same time and to support semantic versioning for contributed projects
- jquery.cookie has been replaced with js-cookie version 2.
Conclusion
At this point, 9.0.0-beta2 is released, which means the code for 9.0.0 is stable and is ready for testing by end-users. Now is a good time to test upgrade your existing D8 sites to the latest version of 9. If you have contributed a project in drupal.org, it is also a good time to check your extensions for D9 readiness. There are several tools which can speed up this process of making your extensions compatible with D9.
Have questions about how Drupal 9 will impact your site? We are here to help. Check out our Drupal Services or send us an email at business@qed42.com!
Important References
- Drupal 9 documentation
- Drupal 9 Deprecation Status
- How to prepare your Drupal 7 or 8 sites for Drupal 9
- [META] Release Drupal 9 on June 3 2020
- Search for Deprecated code
- “State of Drupal 9” slideshow by Gábor Hojtsy
If you see any discrepancies in the information provided above, please let us know.
Thanks!Drupal 9 is scheduled to be released on June 03, 2020. This is when the final Drupal 8 minor release 8.9 will also be released. Considering the history of previous Drupal major upgrades, Drupal 9 will relatively be smooth. Thanks to the semantic versioning introduced in Drupal 8. The upgrade to Drupal 9 will just be another minor upgrade with deprecated code removed. Drupal 8 has brought a lot of standardization in the Drupal world, thus allowing Drupal as a project to grow incrementally. To put it in simple terms, Drupal 9 contains the same code as of 8.9 + deprecated code removed. Here’s a reference image from the Drupal 9 documentation.
_0.avif "Concurrent editing in Drupal 8: Possible or Not?")
Concurrent editing in Drupal 8: Possible or Not?
Drupal CMS offers a rich user interface and powerful content editing experience. There are a lot of contributed modules that enhance the system and its editing experience. One of the projects I was working with called for concurrent editing implementation. Concurrent editing simply means allowing multiple editors to edit the same content at the same time, without the possibility of conflicts arising due to concurrent actions.
In today’s editorial landscape, content creators can not only access a document countless times to revise and update content but also work with distributed teams. For this reason, concurrent editing has become among the most essential and commonly requested features for any content management solution.
The project (Layout Engine) involved configuring pages and blocks of a mobile application through Drupal.
A single page of a mobile application consists of multiple sections, these sections could contain data as per user’s locations or any other criteria. A page in Drupal was primarily a content type. We used paragraphs to configure blocks which we call widgets. So basically, a banner on the homepage of a mobile application is a widget.
These pages and widgets were configured by our client’s marketing team. Any page on the mobile app could consist of 'N' number of widgets. Due to a large number of widgets present, it was difficult for a single user to be familiar with all of them. Multiple members of the marketing team worked on the app simultaneously, making it difficult to edit the layouts/widgets.
Thus the client needed a system where multiple users could simultaneously edit the layouts and their widgets independently.
Collaborative editing has long existed as a concept outside the content management system (CMS). It is a limitation of Drupal at the moment, and we don’t see any solution for it in Drupal core soon. A big thanks to the members of the community who contribute their code in the form of modules making solutions available to the world in a quick google search.
We explored a couple of modules which fulfilled our requirements to some extent.
| Paragraph Frontend UI
This module provides quick editing of widgets on the view page itself.
A user won’t have to go to the edit page and then search for the widget to update and then save the whole node. He can do it quickly on the view screen. We believed this would allow multiple users to quickly edit the widgets and will solve the issues. But, it turned out that the module throws a deadlock error when multiple users are updating different paragraphs of the same node. Therefore, we discarded the possibility of using the Paragraph Frontend UI module.
The next module we explored was the Paragraph Edit module. It provides a separate page to edit the paragraphs through the contextual links. It does not break when multiple users attempt to edit different paragraphs simultaneously. But the issue with this approach was that it supported separate editing only. So if a user had to create a new paragraph/widget, he/she had to go to the edit node form. The tricky part here is, if an editor is on the node edit form while some other editor made changes through the quick link, the current form will contain the old data. In this case, when a user saves the node, it will revert those changes to the previous version. We did not want that either.
| Conflict
It does not have any additional configuration attached to it. I am adding two screenshots below to show how it works. This is what the second user will see when the first user has already saved the node and content is in the database. To know more visit - https://www.drupal.org/project/conflict

Once the user clicks on the 'resolve conflicts' button, it shows two versions of each field, something like in the following screenshot. Users have to manually update the field accordingly and need to save the content again.
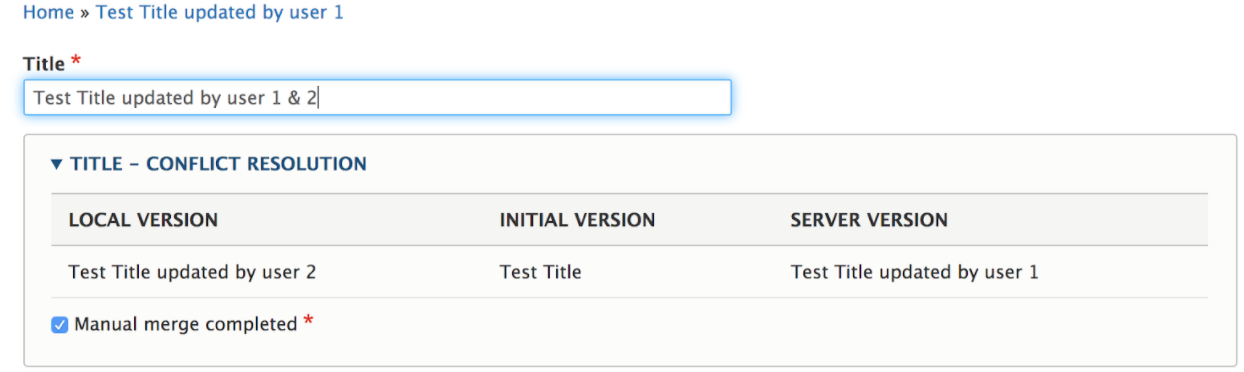
This module is a good solution under the following instances:
- If the node form has a simple structure and the user can afford to update the content manually. In a complex architecture where we use paragraphs to provide flexibility to the editors, this will create a lot of confusion.
- It only works for two users as you can see in the screenshot above, it shows what is the difference in the server. If a third user is editing the content at the same time, it will override the changes of the second user.
| Content Lock (anti-concurrent editing)
As the name suggests this module locks the content for the first editor who started to edit the content. Any other editor will see the message and all the fields will be disabled for him/her.
Features of Content Lock (anti-concurrent editing):
- The lock will break when the user saves the content. The other user will see the message and will know who is editing the content at the moment.
- If a user doesn’t save the content, it has a submodule called content_lock_timeout where we can set a time for the content to hold the lock. It breaks the lock on cron run as well as when the second user comes to the edit node.
- It has an option to manually break the lock as well, so a user with the permission to break the lock can also free the content from the editor.
The content lock was used until we had a proper solution for concurrent editing.
After countless discussions with the marketing team, we decided to provide a solution to overcome the concurrent editing problem. We decoupled all the widget creation as a separate node and referred those nodes into the Layouts. This way, everybody had control on their own widgets and they did not need to wait for the content lock to end.
If you have implemented a better solution for concurrent editing, we would love to hear about it!
.avif "Automatic Updates: a Drupal Initiative")
Automatic Updates: a Drupal Initiative
Consider a small-mid size Drupal Project. Usually what happens is that once development is complete, sites (Drupal or Wordpress or any other framework) are left forgotten. This leaves the site vulnerable to attack, especially when a new Drupal security release is announced as it exposes the vulnerability publicly. It is good if a site is properly maintained & updated at regular intervals. But not at all recommended if left unattended.
Many a time people have questions like:
- “Has anyone built the script which will download, backup, and install the updates?”
- “Why upgrade, with all security updates which pop up? It seems like I need to upgrade every month.”
What if we had a process where Drupal could automatically update itself removing the vulnerability altogether.
There have been talks since the past few years about automating the Drupal core updates, thus a Drupal core strategic initiative was formed “Automatic Updates”. If successful, it would secure a lot of vulnerable Drupal sites.
Currently, the Automatic Update feature is being developed as a contributed module and eventually, it will be shipped into Drupal core as an experiment and finally if all goes well it could land as a new Drupal core feature.
Since the work for Automatic Updates is so vast, tasks are being worked in phases. Currently, Automatic Updates is divided into the following two phases out of which, phase I is now stable.
Objectives of Phase I
- Providing a JSON feed of Drupal Public service announcements from Drupal.org
- Displaying PSAs in the Drupal admin interface
- Providing an extensible update readiness check system
- Generating update packages from Drupal.org
- Securing the update packages with a signing system
- Applying the updates, manually or automatically, with roll-back
In this first phase, the Automatic Updates module includes the Public Service Announcement and Readiness Check features and can apply In-Place Updates manually or on cron. Updates that contain database updates will cause a rollback of the update.
Objectives of Phase II
- Providing an A/B front-end controller for more robust testing/roll-back features
- Supporting contributed module automatic updates
- Supporting composer-based site installs
The goal is to implement a secure system for automatically installing updates in Drupal, lowering the total cost of ownership of maintaining a Drupal site, and improving the security of Drupal sites.
Public service announcements (PSAs)
Announcements for highly critical security releases for core and contrib modules are done infrequently. When a PSA is released, site owners should review their sites to verify they are up to date with the latest releases and the site is in a good state to quickly update once the fixes are provided to the community.
Drupal.org provides a JSON feed of Drupal Public Security Announcements to be consumed by the automatic updates module.
That feed includes values for the following:
- type (core, module, theme, etc)
- project: the short name of the project the PSA is for
- title: The title of the PSA
- is_psa: The flag which indicates that the post is a PSA (and not another kind of Security Advisory)
- link: The link to the full PSA on drupal.org
- insecure: Metadata about what versions of the affected project are known insecure
- pubDate: The date the PSA was published
Readiness Checks
Below are possible points that should be checked to decide whether a site is ready for an upgrade or not.
Sites can’t receive automatic updates in case
- If they don’t have sufficient disk space.
- If sites are placed on a read-only file system.
- If sites have un-run database updates(Pending database updates)
- Any modifications made to the Drupal core source code.
When PSA is released and the site is failing readiness checks, it is important to resolve the readiness issues so the site can quickly be updated.
A quick look at how to use Automatic Updates
Step 1: First, check if the update is available or not by going to “Reports » Available Updates” from the administration pages.

Step 2: Install & Configuration of automatic updates contrib module. Go to “Config » System » Automatic Updates”.

Step 3: Now check the PSAs and Readiness checks in the configurations. Notice the PSA shown in the messages section.

Step 4: Click on the “Manually run the readiness checks” link under READINESS CHECKS.
If the Readiness check has failed a list of error failed checks are shown in messages. These error messages with reasons can also be found under “Errors found” of the status report page.


Step 5: If Readiness check shows “No issues found. Your site is ready for automatic updates”. It means our site is ready for an automatic upgrade.

Step 6: Click on the “manually update now” link inside the “Experimental” section to upgrade the site.


Wish to contribute to Automatic Updates?
- You can contribute to Automatic Update by picking up an issue from issue queue or pick issues tagged automatic updates phase 2
- Join the automatic update team in #autoupdates channel in Drupal slack
- Link to project Automatic updates
- Link to strategic initiative page: https://www.drupal.org/about/strategic-initiatives/automatic-updates