All blogs

ReactJS Kick-starter - A full day workshop at QED42
Anyone who has worked in the Web domain doesn't need an introduction to ReactJS. Our team engaged with new as well as informed ReactJS enthusiasts in a full day hands-on workshop.
ReactJS is an open-source JavaScript Library for creating rich and engaging web apps. It's fast, efficient and requires minimal coding. Developers prefer to work with ReactJS in comparison to other frameworks.

Challenges
ReactJS can be a steep learning curve. Especially for those who haven’t worked with Angular, VueJS or any other modern front-end frameworks or libraries. React’s poor documentation is another inevitable hurdle that adds to the confusion.
When I started, the available documentation didn't help much. So I looked for other online resources. YouTube videos and Medium blogs helped me through my learning curve.
On the quest, I reckoned people are enthusiastic about ReactJS. But since the official documentation doesn't help much, people give up midway.
It’s not about just learning, but a quest for mastering.
At this workshop at QED42, we aimed at bringing together like-minded people in Pune. Those who came were willing to learn ReactJS as a team.
We received overwhelming responses. It surprised our team. Over 150+ candidates registered for the workshop and 80 actually showed up. The intention of the workshop was to - Get people started with ReactJS. Provide a boost to the JS community in Pune.
The kick-starter workshop had three phases -
Phase 1 - General Theory:
It was an interactive session. We discussed React’s origin, about working under the hood, workflows, types of problems solved by React, life cycle, props, state, etc.
Phase 2 - Hands-on Activity:
Participants programmed a to-do list. They had to render a pre-defined list and then allowing user for taking new actions on this list to add new items.
Phase 3- Evaluation:
With an online quiz, I evaluated the participant about learning ReactJS concepts and their hands-on activity. I also created a road-map on a Trello Board for those who are willing to learn ReactJS. Check it out - https://trello.com/b/3B8Vyyu7/reactjs-roadmap
The response from the candidates was overwhelming:
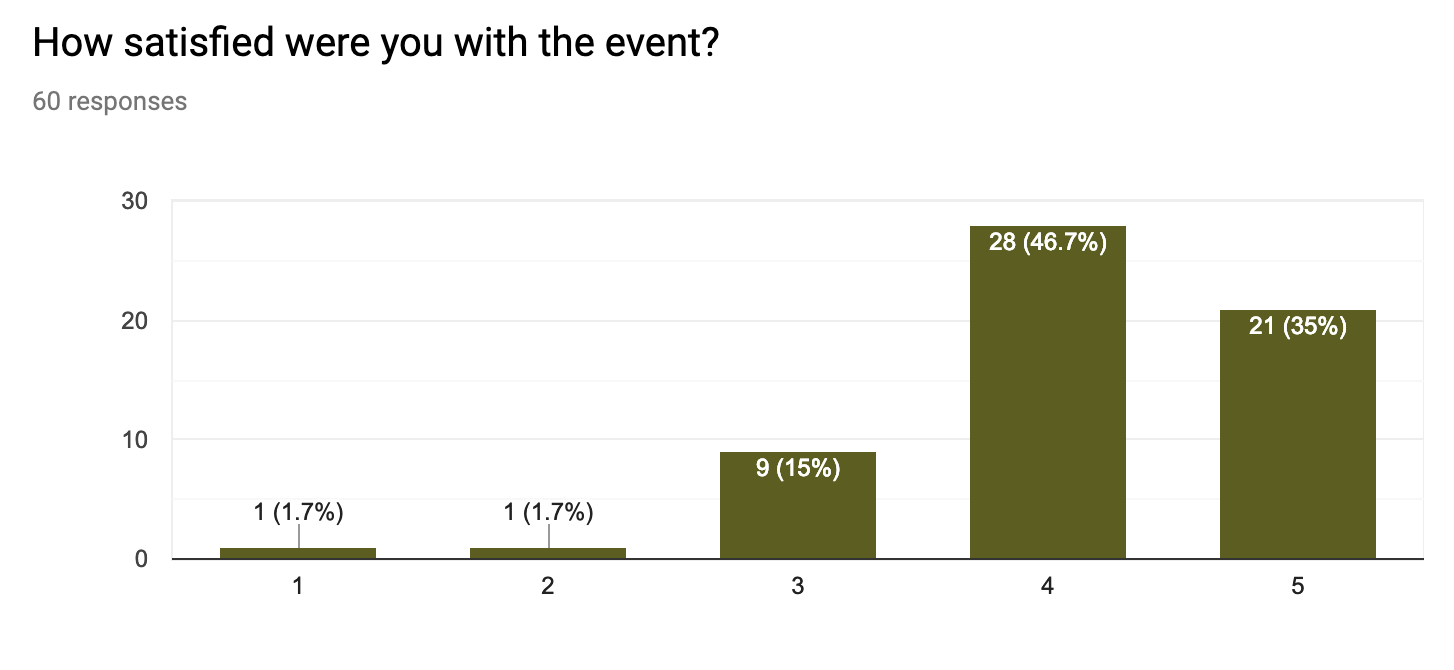

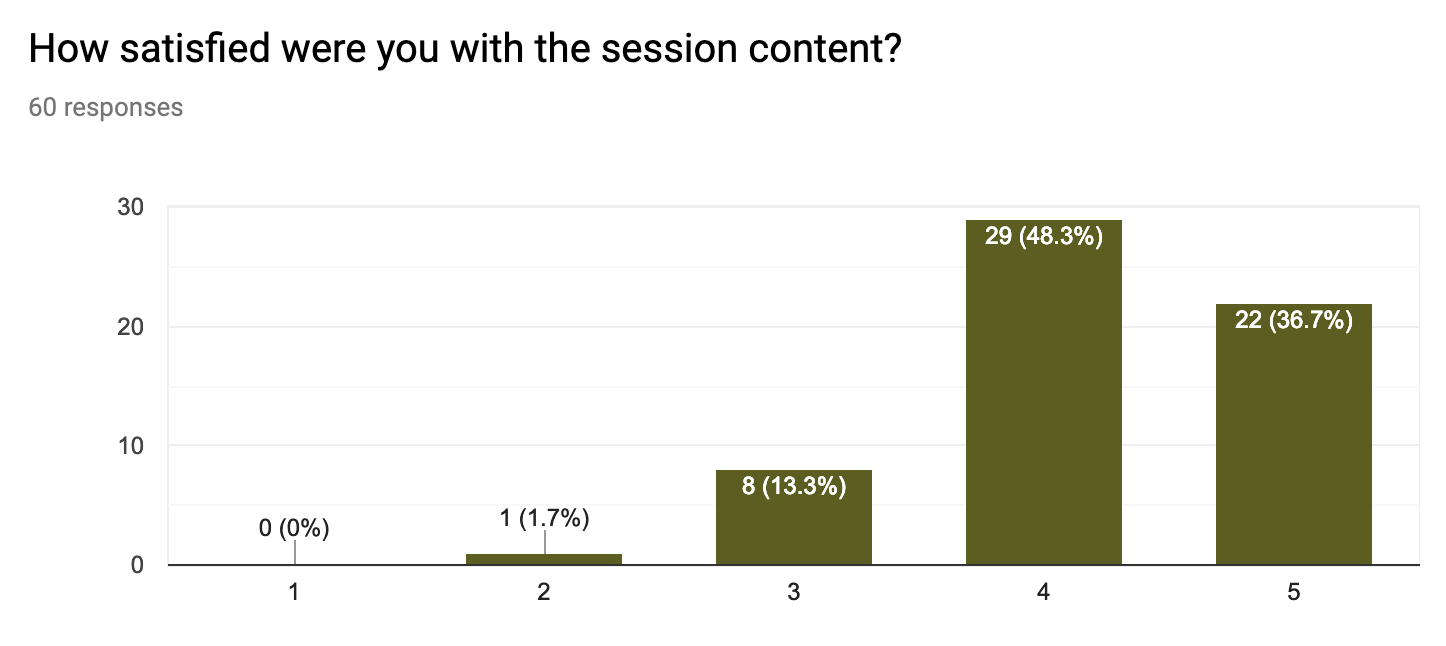




Our goal was to keep the experience as interactive as possible for new participants. To boost the community meetup, we could not accept remote audience. It was the inaugural session of an upcoming series of workshops on ReactJS.
Follow us (https://twitter.com/qed42) to stay tuned for all updates.

React Native Fabric - Why Am I So Excited?
React has truly changed the way we look at our web apps and with React Native, our vision for native apps is also transforming. It has helped JavaScript to realise its true potential but this is not enough, we still have a long way to go. In this article, we are going to learn about how JavaScript is taking over the Native Apps and how React Native plays a very critical role in achieving it. We are also going to look at a new architecture called Fabric, which is going to be proved as a big enhancement to the React Native architecture.
Current React Native Architecture
The current React Native architecture is very asynchronous and all of the things taking from rendering UI to the JavaScript optimizations are carried out asynchronously. If we look at any native app (developed using the platform-specific language), all the operations are performed synchronously (UI, animations and data manipulations) which makes the app buttery smooth.
How the different operations are carried out in React Native?
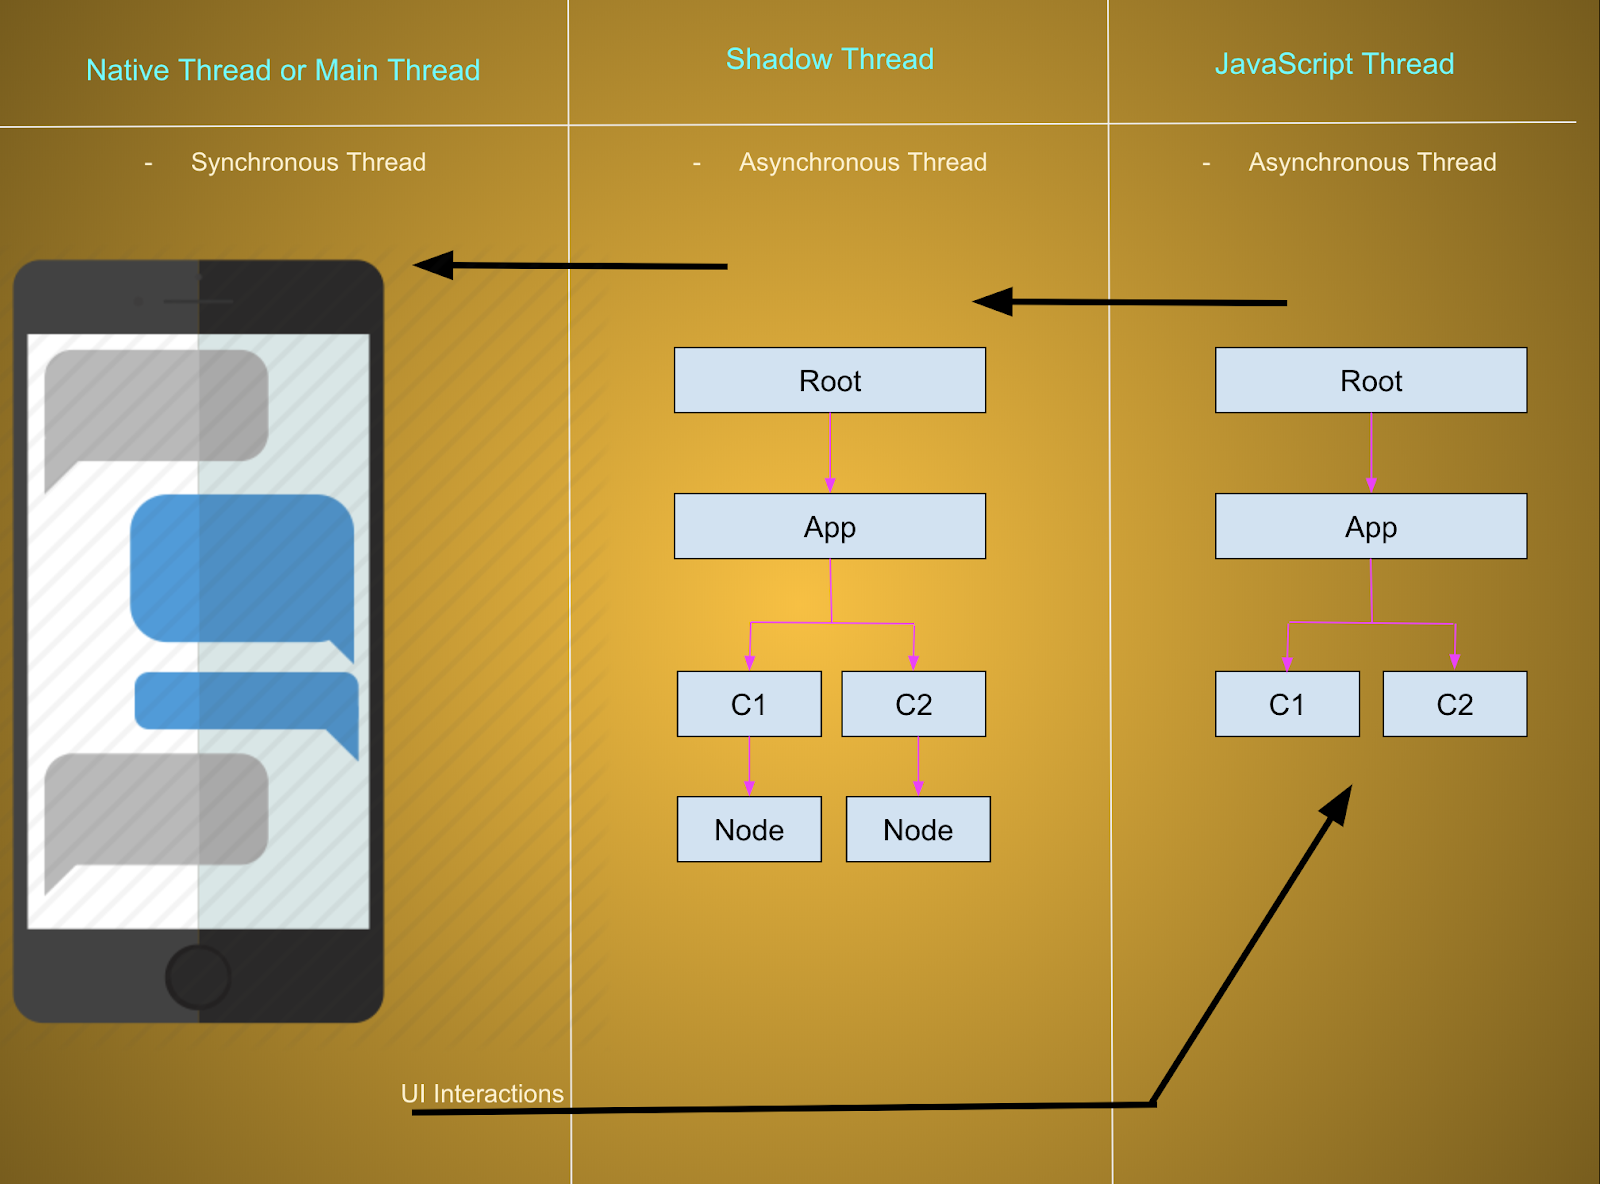
There are basically 3 threads in which takes care of all the operations
JavaScript Thread
This is an asynchronous thread which executes our React and JavaScript code. In this, all the DOM hierarchy operations are carried out straight from the code written by the developers. Once the hierarchy is in place, it is sent to the Shadow Thread for optimizations and other necessary operations.
Shadow Thread
This is also an asynchronous thread which acts as our Virtual DOM and executes operations received from the JavaScript Thread. This thread is specifically designed in a way to perform the deep enhancements of the hierarchy. With these enhancements, the redundant operations on user interactions are heavily avoided. Data generated over this thread is sent to the Native Thread over a bridge.
Main Thread
This is our main thread which executes operations synchronously. This is also regarded as the UI thread because at the end all of our component hierarchy is generated in the main thread. All the interactions based on JavaScript is asynchronous so our hierarchy will be out of sync from the UI or frames displayed on any user interaction, animations etc.
Problem with this Architecture?
As we all know, JavaScript works asynchronously so our interactions on the React component’s UI is handled asynchronously. JavaScript thread listens for the user events, scroll events etc. and performs the DOM manipulations accordingly and this whole process is out of sync from the main thread and UI. These are further sent to the Shadow thread for DOM and other refinements which is further sent to the main thread queue. Yoga (a framework) is used to transform the shadow thread response. On the execution of the main thread queue, the changes are reflected on the UI.
So even for a small interaction, it has to traverse all the threads which are in fact not bad but performance wise or especially frames are dropped as the responses cannot be kept synced with the main thread unless these are really synched operations.
It may seem like a small problem but this small problem gives rise to a whole lot more problems e.g Input text interactions are stuttery, animation frames are dropped, long lists are rendered with delays, lag during drag and drop inside the app and a lot more…
Fabric
Fabric is the new React Native architecture proposed by the community to make the mobile application user experience close or even better than the native apps. Just like Fiber architecture in ReactJS has greatly improved the diffing and overall performance, Fabric is to be put in the same direction to improve the performance and efficiency of the app.
There are basically three main principles of Fabric -
Prioritizing the Tasks
As we all know JavaScript treats all async events as the same and all of the events/processes are treated equally in terms of resource allocation but with the Fabric architecture, user interactions such as scrolling, touch, hold, gestures etc will be prioritized and will be executed synchronously in the main thread or native thread. While other tasks such as API requests will be executed asynchronously.
Immutable Shadow Tree
As any thread can request a change so this becomes very important for us to have a consistent data or DOM hierarchy. To achieve this, the shadow tree must be immutable. With this, it won’t matter where the changes are coming from as long as our tree is consistent with all other thread that it is being shared with. This is a very important concept which would ensure that there would not be any deadlock condition independent of a synchronous or asynchronous request.
Reducing Memory Consumption
We have seen in the current architecture that we have to maintain two hierarchies/DOM nodes i.e inside Shadow thread and JavaScript thread. This involves a lot of memory consumption, nearly the twice of what it should be. So a new concept is introduced to keep a single copy of it in the memory while the other threads such as JavaScript would only have a reference of it to perform any operations. This concept is very similar to our web applications e.g
Where document.getElementById(‘domNode’) returns the native object instead of a JavaScript Object
domNode only keeps a reference to this native object.
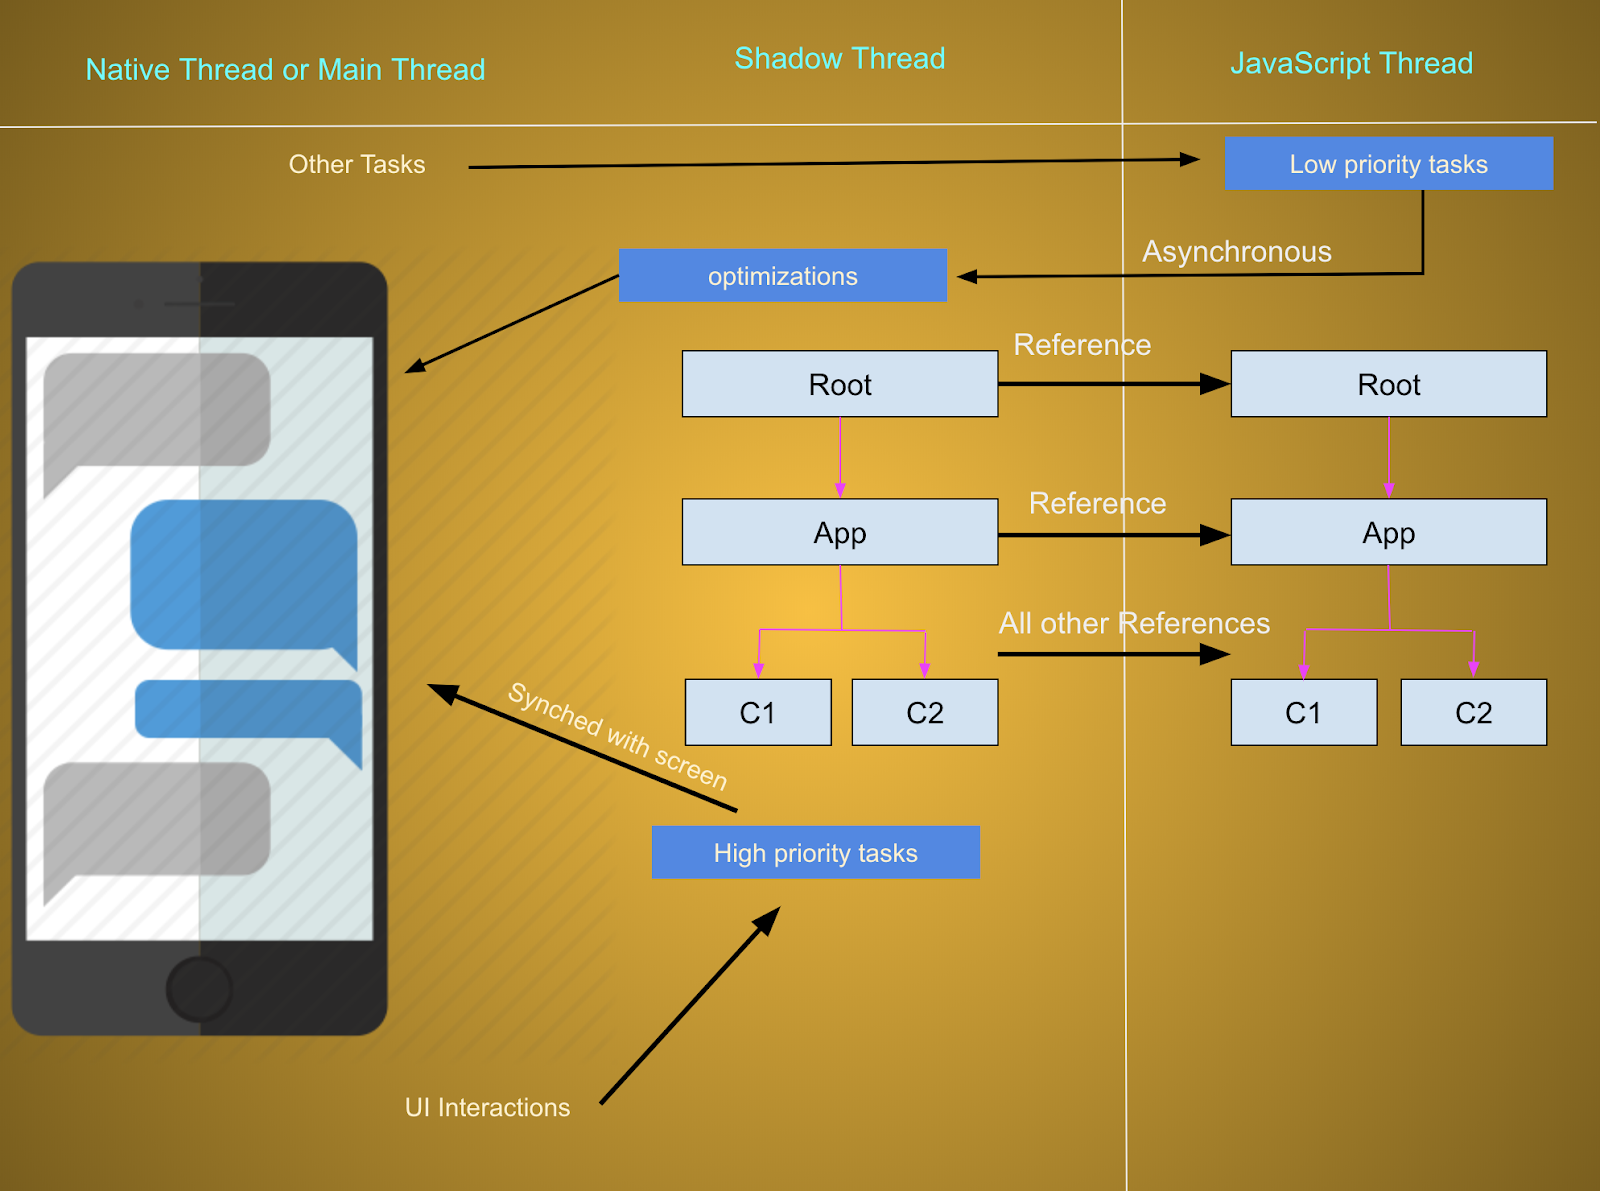
How does this new Architecture work?
In the new architecture, there are still three threads but designed in a way to make them as performant and efficient as possible. The first main concept that is used is, now the tasks are divided into sync and async instead of only async. It enables us to perform the important UI operations first and in sync with the frame rate of the mobile screen. In this way, absolute no frame is dropped as the tasks are executed in sync with the user interactions (high priority). Also as any thread can bring out the changes in the Shadow thread (synched with the main thread for priority tasks), it would have to be made immutable to have the consistency and avoid deadlocks.
The other important concept which would greatly reduce the memory consumption is using references instead of a whole new copy of the DOM nodes. This is very helpful in having consistent and efficient DOM nodes. Also with the reference, we can perform any operation that we would have done with its copy but in a much quicker way.
Summary
React Native Fabric architecture is a huge step forward towards innovating the mobile app platforms. Fabric is based on dividing the tasks into sync and async tasks which would be handled by the immutable shadow thread followed by the memory refinements. This architecture makes a lot of sense if we think natively and can truly help us match up with the native applications. I am very excited to see these changes.

Custom Redux Middlewares with Example
Redux has now become an integral part of the web app development, especially when developed with React. It offers so much flexibility and scalability that no other library as of now. With good coding practices, it is now very feasible to use redux even for small projects and for incremental projects it really leads the way.
Redux is not just only about the store, actions and reducers, it is much more powerful, robust and scalable when middlewares are used. Conventionally, the middlewares come under the advanced redux but I think middlewares are also a very important part of the redux architecture.
What is a Redux Middleware?
A redux middleware is nothing more than a function which is invoked on every action and we can do almost anything e.g Data manipulations, popups, confirmations, API response validation and more, before pushing the updates to the reducers followed by the state change.
Advantages
- Helps in writing very reusable code.
- Writing unit tests becomes like heaven.
- A product becomes easily scalable.
- It makes the process completely automated.
- Tons of reducers are available in form of node packages e.g redux-saga, redux-thunk, redux-beacon and so on.
- A dev can write its own middleware.
Disadvantages
- Harder to grasp in the beginning.
How to write your own middleware?
Writing middlewares is as simple as writing simple functions and all you need to do is wrap the middlewares in your redux store using applyMiddleware method.
What are we going to make?
We are going to make an API middleware which will process our API requests and send the API response (success/error) and other data (isLoading / isLoaded). With this we won’t have to worry about writing the same code again and again, like retrieving the response data or setting/resetting the loading. Also, one of the biggest advantage is we can dispatch multiple actions inside our middleware when needed.
Let’s Get Started
- Let’s first setup our create-react-app with Redux. You guys can follow the following guide to setup the redux in your react application. https://medium.com/backticks-tildes/setting-up-a-redux-project-with-create-react-app-e363ab2329b8
- A redux middleware is a simple function which is a nested hierarchy of functions returning itself to its parent
OR
Where store = Redux store, next = Dispatch function, action = Action fired by the user
- Our middleware must come into play when there is an API request action needs to be performed and else for other actions it shouldn’t do anything.
- We are going to add our custom attributes e.g type replaced with types, introducing API attribute.
- Our action would look something like this
You can see here, we have modified the type to types in order to dispatch multiple actions. E.g Firing loading actions to set/reset isLoading before and after the API request.
- Let’s start writing our middleware and add some validations to make it only work for API requests
- We need to include this newly created middleware inside the store, which will make it work for all the actions
- We have now filtered the API request, it’s time to add the actual action which is going to request our data.The final code looks something like this - https://github.com/vishalchandna1/react-example/blob/redux-middleware/src/redux/middlewares/api.js
- We need to define a reducer to handle the state changes. There are a few cases that are required for our current scenario. POSTS_REQUEST - Fired when the posts are requested, POSTS_REQUEST_SUCCESS - Fired once the posts are fetched successfully POSTS_REQUEST_FAILURE - Fired if there is some api failures. The final code will look something like this - https://github.com/vishalchandna1/react-example/blob/redux-middleware/src/redux/modules/api.js
You can use the redux dev extension to know about the changes and actions fired. In this way you will be able to check state diffs on each action.
Code Repository - https://github.com/vishalchandna1/react-example/tree/redux-middleware
Summary
We have implemented an API middleware function which is fired on all the action and filters out the API actions. A number of actions are fired e.g setting/resetting the loading before and after the API is requested and the final response is received. The code might confuse you a bit but try to understand the big picture here. With middlewares, we wouldn’t have to worry about handling the same stuff repeatedly.

Code Splitting in React
React is truly revolutionizing the way how we look at our front-end. With React we are not only making our UI faster but also very scalable. It may require some initial efforts to get the momentum but it’s totally worth the efforts. The development hadn’t been more fun before React.
SPAs
React is a great tool to create Single Page Applications also regarded as SPAs, where conventionally, our whole application is loaded all at once at the start and thus providing the user a seamless experience.
Problems with SPAs
The biggest problem that a developer faces with SPAs is the bundle size. It may get pretty big over time and in case of big applications the bundle size is going to be huge i.e in MegaBytes. So requesting MBs of data from servers can take a lot of time which makes the User Experience not fun at all.
Solution
Well, we don’t have to worry anymore. There is a very simple solution to it i.e Code Splitting It sounds like fun right? Definitely, it is fun. There is a library called `react-loadable` which make this whole code splitting process easier. With react-loadable, we cannot only load the components/templates dynamically but also in a much faster and user-friendly way.
React Loadable
React loadable is a great library and with react loadable integrated in the application, you don’t have to worry about defining the webpack configs. It takes care of all the sweat work and works seamlessly with multiple chunks of modules. The only thing that you need to take care of is what and when to split.
Getting Started With Code Splitting
We can code split our code at any level mainly :
- Component level
- Page Level
It is a matter of use case or I would say preference and where to implement what. Also both can be implemented at once. I personally consider Page Level code splitting to be a bit better as it helps you to keep a cleaner code and a developer can easily keep track of the actual number of modules.
Let’s look at an example and how does it work
- Setup create-react-app on your local machine.
- Install and setup react-router node module in your react application. (can be skipped)
- Install react-loadable node module (very important step)
- Initially, you would have only one component i.e App.js, you would need some more components to understand how code splitting works with react-loadable. E.g I create a component called TodoList which is code splitted to a separate component.
- Loading a component Dynamically is very easy with react-loadable in place, just write the following line of code to load a component dynamically or in other words
Where Loading is a component that will be rendered until the actual component TodoList is loaded
- Detailed Code - https://github.com/vishalchandna1/react-example/blob/react-code-splitting/src/App.js
- As you see in the above code, there are two routes
1. "/", where our Home Component is rendered (comes with the Main Bundle)
2. "/todo-list", where our TodoList Component is imported and rendered (Code Splitted to a separate file)
- If you go to "/todo-list" , you will see a new .js file being fetched from the server. This is, in fact, our TodoList Component that is being imported dynamically in the app and will be rendered where required.
- To have a more clear picture, run `npm run build` , which would produce a production build of our app. It would list all of our chunks or splitted components that is required by our main bundle when required.

- If we check the network tab in the console window then we will have two cases
1. Home - Which is going to be our default route
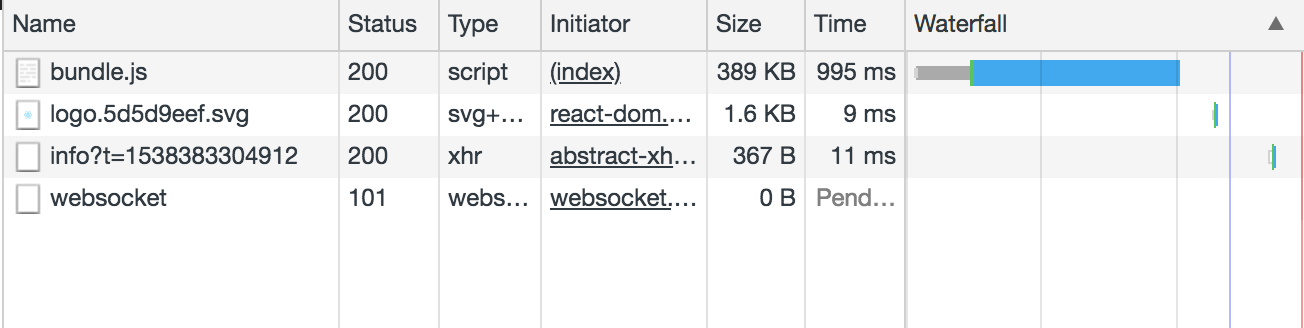
2. TodoList - On which our TodoList component will be loaded dynamically.
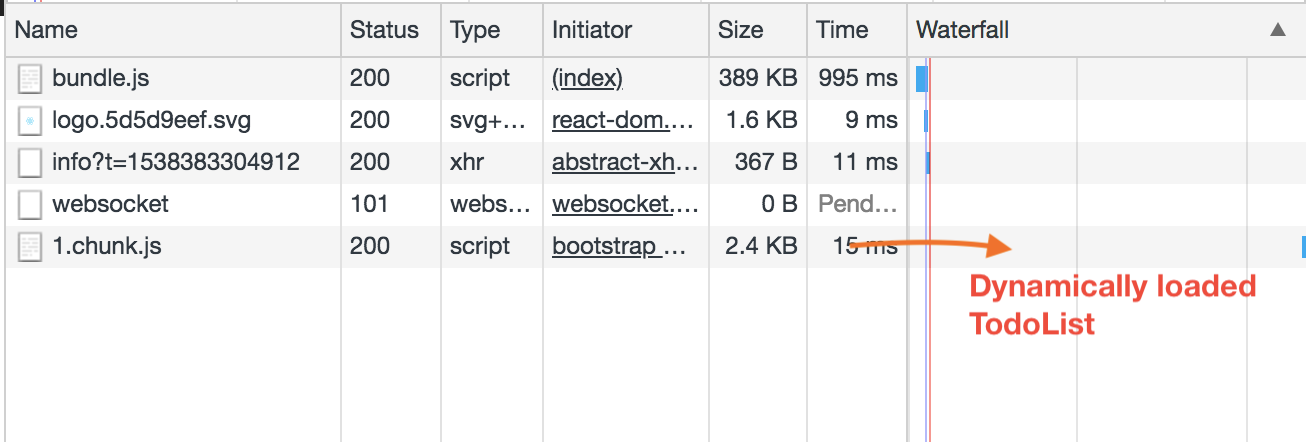
As we have seen with react-loadable, we can load our components when required and it will manage all the dynamic imports, exports and other configs. In case our bundle size becomes tremendously big then we can take advantage of code splitting and reduce our overall bundle size and greatly enhancing the User Experience.
Repository Link - https://github.com/vishalchandna1/react-example/tree/react-code-splitting

React’s Context API and How it can replace REDUX
React is a great library used to build the user interfaces but when it is combined with tools such as Redux, Reselect, Router and more, it really takes the lead in terms of performance and reusability. Well, these may sound like some really cool stuff but these are really complex and expensive especially Redux.
What is Redux?
Redux is primarily a tool used to manage the business logic of the front-end. It can be integrated with any JS framework but with React, it is just seamless. Its best part is it helps to create the code completely reusable, very easy to maintain and completely separated from the UI. To learn more about the Redux - https://redux.js.org/
Why and When to Use Redux?
ReactJS is a great tool to create UIs but it also needs some data store, data inputs and data manipulations. Keeping the data-bound inside the components itself works well for small applications but for bigger applications, it can become really messy and can cause regression issues. So Redux is a cure for mid-scale to big-scale applications which act as a central store for components data and provides a way that helps in data manipulations easily.
Pros Of Redux
- Business logic is completely separated from the UI
- The code is easy to maintain and very reusable.
- Heaven for mid to large scale applications.
- Have its own debuggable tool
- Redux-form is far better than the conventional way of doing form-related stuff.
- Redux Middlewares can make your job easy.
Cons of Redux
- Not recommended for small-scale applications
- Very complex and high implementation cost
- Needs to be injected as a dependency
- Very high cost just to add a small feature
- Integration of React’s modules may require alteration and needs to be bound with the redux state.
- In order to make a big component reusable, the data needs to be passed at each level of the hierarchy of the tree which is cumbersome but this can be resolved with the context API integration along with Redux.
Redux should be avoided for smaller applications, why?
The main problem with Redux is the complexity that’s why it is only recommended for mid to large scale applications. Even for a small addition in the product, a developer would have to write a good amount of code. So for smaller applications, a developer would have to write tons of lines of code to set up the architecture and further add features on it.
What is Context API?
Context API is a great tool which has now been officially stabilised and is used to transfer your component’s state from any higher-level component to any lower-level component. Conventionally what happens is we would have to transfer the state from the higher-level components to the lower level components at each level. Following is a diagram for better understanding:
Pros Of Context API
- Scalable from any range of application (small, mid, large)
- Comparatively less complex than Redux
- Implementation cost is lower
- No need to pass data to the children at each level. Consumer component instance can access all the data provided by the Provider Component at any level.
- The core part of React JS library so no need to import any additional libraries thus dependencies is reduced.
- Code is easy to maintain and very reusable.
- Integration of React’s modules is seamless
Cons Of Context API
- Libraries such as Redux-form which has excellent integration with React + Redux. So Redux needs to be integrated to use redux-form.
- Middlewares need to be written as custom code.
- A bit harder to debug.
Why and When to choose Context API?
We can make our front-end architecture similar to Redux Architecture and it would offer the same benefits which Redux offers but not completely. Using context is not such a big coding effort and new features can be included with a bit more effort than usual but that would completely worth it. I would definitely recommend using the Context API no matter how small or big a product is. So using Context API is completely independent if we are using Redux or not and you can simulate the behaviour of Redux with Context.
Context API / Redux
The main purpose of Redux is to have a central repository of all the states in the app but if that could be accomplished with Context API which now comes as a core part of React Library, that would be great. We can write some code to accomplish the Redux architecture with Context API.
How Context API works?
Context API provides us with some objects which are used to wrap our JSX template with some values and corresponding callbacks. The object is created as
This context object has two parts {Provider, Consumer}. A provider is an object which acts as a data/state provider and this data would be consumed by the Consumer object wrapping our React Component Template. Now the consumer component can make use of the data for representation and corresponding callbacks to manipulate the data. It would be more clear with an example.
Well, Redux works in the same fashion. It takes up a state/data from the store and gives them to a component in the form of props. The data passed to the component is further manipulated by the callbacks provided by the Smart Components (Injected with the callbacks).
Example
- Download and setup a demo project from the create-react-app and the project structure will look like below
- We will create all of our contexts inside/src/context(new directory).
- Create AppContext.js inside /src/context and add the necessary state data in the Provider and export the whole context
- There is one thing that you need to keep track of is you will have to use the same instance of the context for the consumer. Otherwise, that would create it as a completely separated instance and you won’t receive your data from the Provider. The same needs to be exported and imported to have consistency.
- Now we have created the RootContext i.e AppContext, Wrap our App Component being imported in the index.js inside the Provider with the state provided in the AppContext and Consumer will come into the play for wrapping up the actual template i.e App.js, where data/functions will be used from the Provider to create the Rich UI.
- To explain the example, I am providing the state in the Provider as
where this.setAge is a function changing the age in the state with the value provided as arguments.
- Now we can make use of this data wherever we want and independent of the tree. we just need to use the Consumer from the AppContext as
- That’s it and you are done.
To have a closer look at the code repo (Branch -> context-api-redux) https://github.com/vishalchandna1/react-example/tree/context-api-redux
Now if you closely observe the code then you will know that it is acting pretty much similar the Redux architecture but a bit more advanced. With the help of Context API, we can build as many stateless components as much as we want.
The true advantage of using contexts is you don’t have to pass the state at each step. Just create a Provider and the state passed will be available to any level children with the help of Consumer Component of the same instance.
How Context API can replace Redux?
As you have seen Context API is very similar to the Redux but a bit advanced and comparatively less complex. You can create the modular contexts for your React Components and wrap one inside the other. React doesn’t care about how you are passing the data to the components, the thing of consideration is how simple, efficient and reusable it is.
Just like redux, with multiple state object merging into one single object, providing us a with a store, we can do the same with Context API but with much more flexibility. There are certain coding patterns that you can use Context API as your store but you can always create your own. I would definitely recommend you guys to look out for the coding patterns available for the Context API as it would give you a much bigger scope and how things can be made more reusable.
Hybrid Approach?
As Context API is a core part of the React library so it wouldn’t take much sweat to integrate it with Redux which I personally consider is ideal for mid to large scale applications. For small applications, Context API can handle it just fine. I just love Redux-form library but I couldn’t use it without Redux which is a big pain.
What do I recommend to be more productive? Integrate Redux with Context where all of the states will be managed and manipulated by the Redux but for the internal working of the component, Context API should be used which would provide an edge when passing props to the lower level components thus accessible at any level. It would be very seamless integration and no overhead at all.
To learn how Context API can be used with React hooks visit /insights/coe/javascript/context-api-react-hooks.

Drag & Drop Reorderable Grid List With REACT + REDUX
Generally, a lot of devs face problem when it comes to drag and drop functionality implementation and its integration with the Redux states is a big pain. Well, we all can do in some way with some workarounds but what should be the actual process of its implementation and what coding patterns to be followed to make it as performant and as reusable as possible.
We are going to use React-sortable-hoc, a cool React Lib, available to implement the drag & drop, is going to be our base of the implementations. We will also see how the data is sent to the Sortable component through Redux store and how the corresponding data is updated on reordering of the list.
DEMO URL : https://qed42.github.io/react-redux-reorderable-grid/
Let’s Get Started!
- First, you need to set up the Redux in your React project. You guys can take a reference from https://medium.com/backticks-tildes/setting-up-a-redux-project-with-create-react-app-e363ab2329b8 to set up your modular Redux store.
- Inside react-sortable-hoc, There are basically three basic components (SortableContainer, SortableElement) that are helping us achieve the drag & drop functionality. SortableContainer will act as a list container (Unordered List - <ul>) which will contain the list item as SortableElement wrapped around a list item.
- Let’s define some dummy data inside our root redux state as our initialState which is going to be used for the list item representation in a grid layout.
- Create a new directory Container where we are going to create a new component AppContainer through which our redux state will be injected into the App Component.
- Inject the data as
- orderList Function as
- Now we have the data available in the App, we now need to render these items and I am using Bootstrap 4 to make the grid layout and it is pretty straightforward to implement
Where the list is the data and orderList is a function, coming from the AppContainers followed by redux, will provide data and take care of the order of the list.
Summary
Let’s look at the summary of our implementation. The data is being fetched from the redux state along with a callback called orderList, which is injected into the App component through AppContainer. Finally, we have defined a template to be wrapped inside the SortableElement which would act as a Grid List Item. Sortable Component wrapper inside App component takes over to handle the drag and drop stuff. Now if you see the business logic to reorder and fetch the list is completely separated from the UI and reordering of the list is achieved with minimal efforts.
Complete code - https://github.com/vishalchandna1/react-example/tree/redux-sortable-dnd
DEMO URL : https://qed42.github.io/react-redux-reorderable-grid/
Implementing Permission System with MEAN
MEAN has a concept of roles but doesn't yet have a granular permission system to go with it, in this blog post we will implement a permission system and screen to manage permissions. Roles is a way to segment users based on access requirements of your application, all users associated with that role will have the permissions assigned to that role. Common examples of roles are: anonymous user, authenticated user, and admin.
By default, MEAN defines two roles as a part of app setup:
- admin -- has permission to manage the site and also can access the mean-admin package functionality.
- authenticated user -- the role assigned to new accounts on a MEAN site.
On one of our MEAN projects we had requirement of setting up granular access permission on content and other functionality, which ideally will be managed by the Admin of the site and can be changed in future. Some of the example of content permissions are -- Edit, create, Delete and can be assigned selectively to roles. The basic structure for role management is more or less similar to other CMS, we create a collection "variable" (could be used for other settings as well) with "Roles" as data in it and use this collection to map roles with permissions. This approach works well but at the end of the day - when we analysed the load times of our app, we found that roles retrieval from variable collection took most of the time. Looking to optimise our permission system we turned to global object provisioning of MEAN's system package and initialised our roles during system package bootstrap, which resulted in significant performance boost.
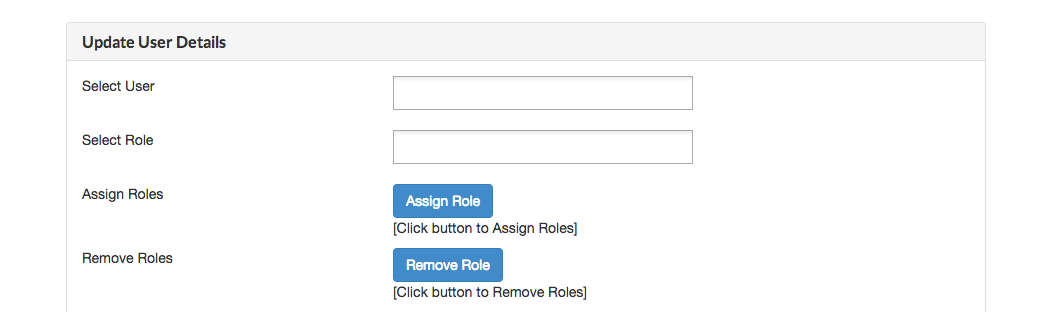
From the UI perspective, we primarily implemented 3 screens:
- Addition of Roles

Please find below sample structure for storing roles inside variable collection

- User -> Role Assignment
- Permission Management screen
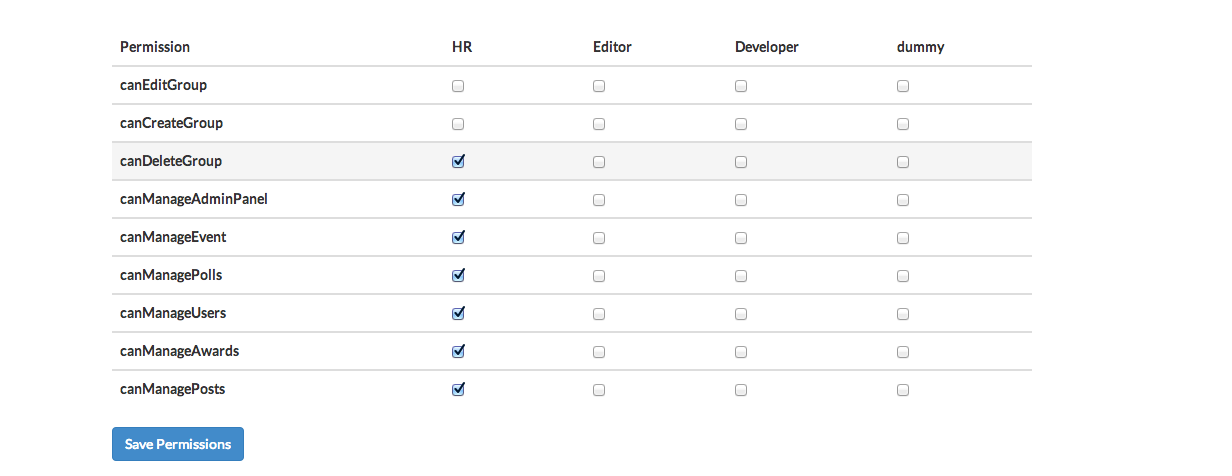
First two screens are straight forward CRUD implementations that need to deal with User and Variable collections (Please see the structure above), hence will just focus on the Permission management screen for which we will rely on Angular Checklist. The Permission variables in your app should have a structure similar to the screenshot below
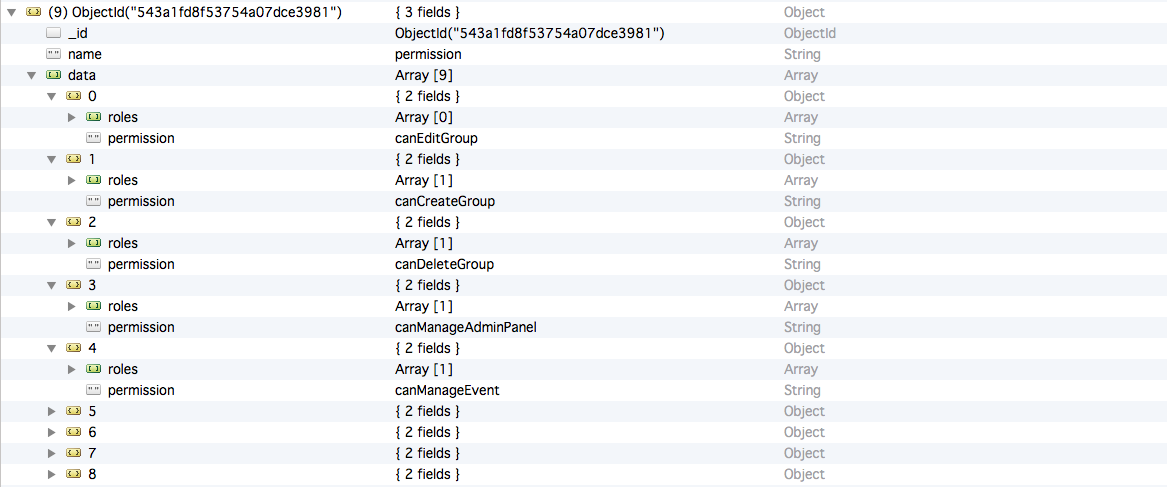
We are using "Permission" Object to store all the available permissions in the variable collection. Permissions object comprises of "data" which is an array of objects, with each object containing role and permission mapping e.g. If we have 9 permissions in our app, we will have 9 permission objects. The third screen is built by retreival and iteration over Permissions object and rendering them using Angular Checklist (You can use any other library that suits your UX)
With data modelling done and roles and permissions mapped, lets see how to inject permissions in the global User object which is initialised at the time of user login. The initialisation is a two step process
- Retrieval of Permissions object from collection
- Injection of User Permission list in the global.user
You can find this code for initialization of global.user in system server controller's index.js .
Here "listUserPermission" is the function which will insert the permission in a array.
Now on Angular end global.user will contain a field "permission" containing list of permissions applicable to the user. Furthermore on Angular we need to define a factory which will check if the global.user variable consists of particular permission for us to check user access cleanly. Note: here we are defining a factory which can be used throughout the app by inserting it in you controller options:
Now you can use this hasPermission in your html directly
Create Group
Voila, your authentication system is working perfectly on angular side.
In order to have verification at server end, You can have code in you route similar to the angular end verification. Since we can not define something in node which is available globaly so we define hasPermission for all the routes file. it goes something like
Using Curl commands with Webdav
Curl is a command line tool for doing all sorts of URL manipulations and transfers, but this particular post will focus on how to use curl for managing (read/ delete/ rename/ upload) files on Webdav Server. While the second part of the post will cover implementation of Two Factor Authentication for the same. I'll assume that you know how to execute 'curl' command using terminal and invoke 'curl --help' or 'curl --manual' to get basic information about it.
Assume we have following Data:
Webdav URL: https://example.com/webdav
Username: user
Password: pass
Note: It is recommended to read article completely (both management and curl options) before implementation.
Reading Files/Folders on Webdav Server:
Reading files or folders on Webdav Server is simply implementation of Curl Get request. So, the command would be:
Also Optionally, you can get response headers from the webdav server, based on which you can get to know about completion of the operation. Click here
Deleting Files/Folders on Webdav Server:
For deleting an existing file or folder on Webdav Server we need to send DELETE request followed by path to the folder/file of the webdav server. Let's say we need to delete test folder on webdav server, so our command would be:
Similarly for deleting file say test.txt:
On few Webdav Servers, it is possible that curl -X DELETE command is not able to delete folder because of index.* file in that folder. In that case try renaming index file first.
Renaming File on Webdav Server:
Rename operation can be performed using -X MOVE request. Let's say we wanna rename old.txt to new.txt:
Creating new foder on Webdav Server:
To create new directory on webdav server use -X MKCOL request:
Uploading File on Webdav Server:
For uploading file on webdav server use PUT request. Let's say src file is /path/to/local/file.txt and we want to upload it in test folder on webdav server, so our command would be:
CURL --Options:
Curl provides various options which makes our life easier. In this article we will focus on few necessary options required for basic webdav access.
Username/Password
To specify username and password for webdav, use '--user' or use alias '-u':
HTTP Authentication
Authentication is the ability to tell the server your username and password so that it can verify that you're allowed to do the request you're doing. Commonly used Authentications in case of webdav are : Basic and Digest.
Usage:
It is always better to let curl decide the authentication method to be used and hence use --anyauth:
Get Response Code
We definitely need a way to know if our request performed desired operation successfully on Remote Webdav Server or not. In that case, there are various options provided by curl which could be useful. One of them is to get response code and hence analyze the behaviour.
This command will output only the response code sent in response header by Webdav Server. Let's say the output is: 200, this means operation completed successfully. So, different http codes correspond to different meaning.
To use curl command for Two factor Authentication (2FA) on Webdav follow this post.
Using Curl for Webdav with Two Factor Authentication
Web Distributed Authoring and Versioning (WebDAV) is an extension of the Hypertext Transfer Protocol (HTTP) that allows for remote Web content authoring operations. There are various clients available to perform such operations but sometimes you need to access webdav and perform operations programmatically. We had such requirement, and we chose to use curl as our HTTP client.
For intro to curl commands on webdav, follow this link. In this post will see how a much more complex scenario where curl has to be authorised by 2 Factor authentication to do those operations.
Two Factor Authentication: Two-factor authentication (also known as 2FA or 2-Step Verification) is a pattern of authentication in which users are asked to authenticate to use a service by following two steps -- typically password and OTP ( One time login ) delivered by SMS but could also be other set of combinations.
Implementation of 2FA in webdav context typically includes authentication of client-server transactions using certificates. So, we need a brief understanding of the required certificates. For 2FA Client is provided with three things:
- crt file (Let's say cert.crt)
- key file (cert.key)
- passphrase (passphrase)
The crt and key files represent both parts of a certificate, key being the private key to the certificate and crt being the signed certificate. Assuming you have these three things, our very first step is to generate valid pem/p12 file for using it with curl command to access webdav server. A PEM file contains both certficate and private key. Depending on our server's operating system we either have to use pem or p12 file format. A p12 file is generated from pem file only.
Generation of pem/p12 file:
Generation of valid pem/p12 file is a series of sequential steps and requires all the above things. Firstly put both files in a directory and in the terminal moce to that directory. Now change the permission of .key file.
Now we need to enclose passphrase to key file. So following command would be used and when terminal prompts for old/new passphrase provide the passphrase you are having each time.
Now we have to generate either pem file:
In case our server is OS X (mac) based, we also need to generate .p12 file:
So now we are finally ready to use curl command for 2fa while sending requests.
Curl Command for 2FA:
For linux environment, we need both pem and crt file:
For OS X environment, we need only p12 file:
In this way we can use curl commands for two factor authentication on Webdav Servers.
Web Components - Introduction to the future web
Web is evolving rapidly, If we analyze heavy modern web applications they are not only complex to design but also quite difficult to develop and manage. Given the range of tools involved, amount of testing required, and the combination of libraries/frameworks used, the development process has become complex. As the application scales in terms of features, it becomes harder to maintain the code and make enhancements.
For instance, take a look at the DOM of these few popular websites:

The complex DOM structure of modern web applications is largely due to indiscriminate use of divs and spans. HTML5’s semantic markup came to rescue, but it still falls short due to following reasons:
- We have too many similar components in our web page that fall under the same semantic structure. To distinguish them from each other, we use classes, IDs, or other attributes.
For example:
Tabs can be a very genuine example here. This codepen contains the simplest tabs we can have -
- The available list of semantic tags are simply not enough to target the wide variety of components that constitute our design. As a result, we fall back to traditional tags like div or span.
Given needs of modern web and innate need of DOM structure as essential, developer community has been mulling to make things easier and one of the manifestation of such discussions led to the birth of web components support at the browser level.
The promise of Web Components
Web components are a collection of specifications that enable developers to create their web applications as a set of reusable components. Each component lives in its self-defined encapsulated unit with corresponding style and behavior logic. These components can not only be shared across a single web application but can also be distributed on the web for use by others.
Fundamentally web components consist of 4 major specifications:
- Custom Elements – These enable developers to create their own elements that are relevant to their design as part of the DOM structure with the ability to style/script them just like any other HTML tag.
- HTML Templates – These let you define fragments of markup that stay consistent across web pages with the ability to inject dynamic content using JavaScript.
- Shadow DOM – This is designed to abstract all the complexities from the markup by defining functional boundaries between the DOM tree and the subtrees hidden behind a shadow root.
- HTML Imports – Similar to import one CSS file into another, these allow you to include and reuse HTML documents in other HTML documents.
Links if you want to dive deep into understanding web-components
- https://www.w3.org/TR/2013/WD-components-intro-20130606/
- https://css-tricks.com/modular-future-web-components/
- https://css-tricks.com/using-encapsulation-semantic-markup/
- https://moduscreate.com/web-components-introduction/
- https://www.w3.org/TR/components-intro/
Custom Elements
They allow web developers to define new types of HTML elements.
Web Components don't exist without the features unlocked by custom elements:
- Define new HTML/DOM elements
- Create elements that extend from other elements
- Logically bundle together custom functionality into a single tag
- Extend the API of existing DOM elements
Registering a custom element
There are 3 simple steps to register a custom elements:-
- Create prototype of existing HTMLElement object.
- Add any custom markup, style, behavior via it’s created lifecycle callback.
- Register the element name, tag name and prototype with the document.
Lifecycle callback methods
createdCallback - an instance of the element is created
- attachedCallback - an instance was inserted into the document
- detachedCallback - an instance was removed from the document
- attributeChangedCallback(attrName, oldVal, newVal) - an attribute was added, removed, or updated
All of the lifecycle callbacks are optional. Following is the diagram showing the processing of lifecycle callbacks in custom elements.

Resources for Custom Elements
- https://webcomponents.org/articles/introduction-to-custom-elements/
- https://www.w3.org/TR/custom-elements/
- https://www.smashingmagazine.com/2014/03/04/introduction-to-custom-elemen...
HTML Templates
HTML Templates are another new API primitive that fits nicely into the world of custom elements.
The <template> element allows you to declare fragments of DOM which are parsed, inert at page load, and instantiated later at runtime. They're an ideal placeholder for declaring the structure of custom element.
Example: registering an element created from a <template> and Shadow DOM:
Resources for HTML Templates
- https://www.html5rocks.com/en/tutorials/webcomponents/template/
- https://robdodson.me/html5-template-tag-introduction/
Shadow DOM
Shadow DOM is a powerful tool for encapsulating content. Use it in conjunction with custom elements and things get magical!
Shadow DOM gives custom elements:
- A way to hide their guts, thus shielding users from gory implementation details.
- Style encapsulation.
Creating an element from Shadow DOM is like creating one that renders basic markup. The difference is in createdCallback():
Resources for shadow DOM
- https://www.w3.org/TR/shadow-dom/
- https://glazkov.com/2011/01/14/what-the-heck-is-shadow-dom/
- https://webcomponents.org/articles/introduction-to-shadow-dom/
HTML Imports
HTML Imports, part of the Web Components cast, is a way to include HTML documents in other HTML documents. You're not limited to markup either. An import can also include CSS, JavaScript, or anything else an .html file can contain. In other words, this makes imports a fantastic tool for loading related HTML/CSS/JS.
Include an import on your page by declaring a :
The URL of an import is called an import location. To load content from another domain, the import location needs to be CORS-enabled:
<!-- Resources on other origins must be CORS-enabled. -->
Resources for knowing more of HTML Imports
- https://webcomponents.org/articles/introduction-to-html-imports/
- https://w3c.github.io/webcomponents/spec/imports/
- https://blog.teamtreehouse.com/introduction-html-imports
Use Web Components today
The specifications mentioned above are quite new and it is hardly surprising to know that browser support is not very good. But, thanks to the Polymer library, created by the awesome folks at Google, we can use all these features in modern browsers today. Polymer provides a set of polyfills that enables us to use web components in non-compliant browsers with an easy-to-use framework. Polymer does this by:
- Allowing us to create Custom Elements with user-defined naming schemes. These custom elements can then be distributed across the network and used by others with HTML Imports.
- Allowing each custom element to have its own template accompanied by styles and behavior required to use that element.
- Providing a suite of ready-made UI and non-UI elements to use and extend in your project.
In my coming blogs we will get deep into each of the specs of the Web Components and check out what role does polymer play in each of them to make the use of Web Components more easy and relaible.
Art of writing template files - Drupal 8
When it comes to Drupal 8 theming layer, there is a lot Drupal 8 offers. Few concepts that come to mind while thinking of Drupal 8 theme layer include Renderable Array, Cacheabilty, Cache Context, Cache Tags, Twig and Preprocessors. Some of these are improvements of old concepts, while others are new introduction in Drupal 8. In this post, I'll share my experience on how to best utilise these concepts for a robust and performant frontend with Drupal 8.
To get best out of this post, you should be comfortable with:
- Drupal 8 #cache
- Twig Debug
- Preprocessor functions
We will focus on the following concepts:
Renderable array caching, walk through Drupal 8 caching power and Cache contexts
Drupal 8 comes with a lot of changes and almost all of us are even familiar with these changes. So, now it’s high time we start exploiting these to get best out of Drupal 8. It’s very important to understand how Drupal 8 caching works. Go through drupal.org documentation besides implementing the same once thoroughly on a vanilla Drupal instance. At the end have an answer to all these questions:
- What is a renderable array?
- Understand that every renderable array is cacheable.
- One Renderable array can consist of other renderable arrays (nesting):
So it’s like, a page is a renderable array which actually consists of other renderable arrays: region (renderable) arrays and in a region, we can have block (renderable array). The main point to understand here is hierarchy and nesting and the caching among this.
Reference: https://www.drupal.org/docs/8/api/render-api/cacheability-of-render-arrays - Making use of cache context:
A general mistake I have seen many of us perform is using
There come few scenarios where we cannot use direct caching but that particular array can be cached on per user/URL basis. Especially for those cases, we have cache contexts. It’s very easy concept and you would love once you start using this, there are several other bases on which you can decide cache-ability of a renderable array.
Reference: https://www.drupal.org/docs/8/api/cache-api/cache-contexts
Selection of template files/preprocessor functions and placement of the same.
With great flexibility, comes responsibility. Most of the time, we come across scenarios where we need to do tweaks to field output based on certain requirements. Drupal provides us handful of ways to do so, an important point here is to know and analyze what will be the best way to achieve expected results for the case. So, generally, we follow the following rule for customizations:
Hence, when we have to do some custom work where we have to alter data conditionally, we make use of preprocessor functions. Consider overriding display of date field value based on certain conditions. In that case, a general approach we may take is to write hook_preprocess_field. But we need to consider that this preprocessor will run for all fields, which will definitely affect the performance. In this case, writing a specific preprocessor for date field makes more sense.
One more important thing regarding hook_preprocess_HOOK:
Consider a scenario, where we are using node.html.twig for node and then we have to do some alteration for a specific content type teaser view.

In that case creating specific twig and then using the specific preprocessor (node__content_type__teaser) for alteration is an extra step, instead, we can directly use the preprocessor hook_node__content_type__teaser without writing the specific twig file. So, for a generic twig, we can make use of specific hooks as suggested by twig debug too which definitely gives better performance.
Regarding placement of these preprocessors, it is completely based on the project requirement and usage. We place them in the module, in case the functionality to be provided should work on a modular approach. Placement of Preprocessors will work both in module and theme, while for twig files placing them in the module may need hook_theme_registery_alter based on the twig file we are overriding.
Use of Drupal Attributes
It’s not recommended to hardcode drupal attributes (HTML attributes like id, class) in twig files and the reason for this is: there are several modules which perform alteration of drupal attributes and make use of Drupal attributes and will no longer work if we hard code this. One example I can think of is Schema.org module which provides RDF mapping through attributes only.
Moreover, I would always suggest doing styling based on default classes provided by Drupal. Drupal by default provides appropriate classes both generic and specific and id for better styling. It is our duty, to make better use of them by understanding Drupal way. It also helps in saving project time and cost especially when we are following best practices and Drupal way of doing things. Drupal Core and Contrib are the best examples of how to proceed further on this. Also, following a proper structure makes possible use of styling written in Drupal core itself.
Logic in template/twig files - Yes/No?
In Drupal 7 To speed up the output process, it’s always recommended to avoid writing logic in template files. Instead, as discussed earlier consider writing preprocessors for this purpose. But with Drupal 8 adopting Twig Theme Engine things are different now. Doing tradeoff among the twig and preprocess (PHP) is mainly centric over performance concerns. We basically need our site to be faster. Drupal 7 PHP Engine used PHP theme engine and hence we recommended avoiding logic in template files, but in D8 with twig into effect, we have a faster theme engine with several twig filters, functions to be used. So, here we categorize our logic in 2 ways based on the type of work to be accomplished: soft logic and hard logic.
Soft Logic: Consider a scenario where we need to display comma separated values. Now, in this case, instead of writing a preprocessor for altering data we should use available twig filter "safe_join". It is definitely faster than the traditional way of using PHP preprocessor.
Hard Logic: In the above case, let's say if the value is taxonomy term and we need to print all the parent taxonomy term too. Then we need to load parent terms and we can then join them for final display, then this preprocessing should go in preprocessor only.
Frontend / Backend Collaboration
One more important thing I’ve observed is, it is very important to have a good collaboration between frontend and backend developers during the project. Sometimes as a frontend developer we come across weird requirements, in that case, it is very important to sit together to understand requirements and get the things done in the Drupal way to achieve best out of Drupal.
Also, go through this official guide to understand best practices for Drupal theming: https://www.drupal.org/docs/8/theming/twig/twig-best-practices-preprocess-functions-and-templates
Ionic compatibility with iOS10 -- Content Security Policy
If you have been building Ionic / Cordova apps, you might have noticed your app breaking with public release of iOS 10 launched recently. Common symptom of apps suffering from this issue is that the app continues to work as expected on Android, uptill iOS 9 but doesn't launch / load on iOS 10.
This is because of the newly introduced Content Security policy.
Content Security policy is used to prevent cross-site scripting (XSS). It is now supported by all modern browsers.

CSP provides a standard method for website owners to declare approved origins of content that browsers should be allowed to load on that website.
CSP comprises of multiple directives each separated by a ‘;’
If your Ionic / Cordova app does not load data from remote content / stuck on splash screen on iOS 10, this could be the issue you must be facing and the fix is to add the below meta tag in your index.html
Below is a brief description of the attributes:
- default-src : default policy for CSP.
- gap://ready file://* : is required to allow the loading of remote content in iOS 10 app .
- script-src : Defines the valid sources of Javascript to be loaded.
- unsafe-inline: Allows use of inline source elements such as style attribute, onclick, or script tag bodies.
- unsafe-eval : Allows unsafe dynamic code evaluation such as JavaScript eval().
- self : Allows loading resources from the same origin (same scheme, host and port).
- style-src : Defines valid sources of stylesheets.
CSP seems to be pretty helpful:-
White screen on iOS 10 (#6928): https://github.com/driftyco/ionic/issues/6928#issuecomment-249765889
White screen on iOS 10 (#7052): https://github.com/driftyco/ionic/issues/7052#issuecomment-249234164
Disclaimer: Please use it in line with your security considerations and evaluations.
Factory for Data Operations on SQLite using Ionic
One of the pain points in hybrid app development is data persistence & data storage. Though LocalStorage can be used for storing less critical data like cache, devs usually look at SQLite for consistent data storage backend. SQLite works fine for both the platforms (Android & iOS).
In this post we discuss how to efficiently work with SQLite using a simple factory that can be used for doing simple operations on your SQLite Database.
SQLite can be accessed natively only, so you need to install the cordova plugin for SQLite.
Download ngCordova dependancies
Include ng-cordova.min.js in your index.html file before cordova.js and after your AngularJS / Ionic file (since ngCordova depends on AngularJS).
Inject as an Angular dependency
Install SQLite Cordova Plugin
Declare a global variable
So that 'db' is accessible through our the scope the app.
In your app.js :-
'myapp.db' is the name of your DB. The github page for cordova-sqlite-storage plugin have examples on how to do different operations on the database, below is a simple factory that can make these operations clean and readable:
Disclaimer -- This factory code is for demonstration only, please sanitise and secure your user inputs. Additionally, you can make "your_table" dynamic depending on your use-case.
You may use this factory and do the CRUD operations
Add name in db :-
Get name :-
Update name :-
Delete name :-
Hope you find it useful, Let us know in Comments if you extend this factory or have a better one!
New Polymer Element for Balanced Photo Galleries - <polymer-bg>
Balanced Gallery is a jQuery plugin that evenly distributes photos across rows or columns, making the most of the space provided. Photos are scaled based on the size of the 'container' element by default, making Balanced Gallery a great choice for responsive websites. On a recent project we needed a similar photo gallery for Polymer based frontend, hece we created and are open sourcing <polymer-bg> : a polymer element to evenly distribute the photos across rows or columns using balanced gallery plugin.
Demo - https://qed42.github.io/polymer-bg/
Github project -- https://github.com/qed42/polymer-bg ( Test, Use, Fork and let us know of your issues )
Using polymer-bg Element in your Project
Install this using bower
Add the element element using html imports
Now you can use the tag, pass the images in the <img> tag and use the tag attributes to configure the settings as shown, exhaustive list of attributes below the example:

Available attributes
- auto-resize - re-partition and resize the images when the window size changes
- bg-background - the css properties of the gallery's containing element
- ideal-height - only used for horizontal galleries, defaults to half the containing element's height
- ideal-width - only used for vertical galleries, defaults to 1/4 of the containing element's width
- maintain-order - keeps images in their original order, setting to 'false' can create a slightly better balance between rows
- bg-orientation - 'horizontal' galleries are made of rows and scroll vertically; 'vertical' galleries are made of columns and scroll horizontally
- bg-padding - Space in pixels between images
Polymer Element for zooming image on mouseover - <polymer-zoomove>
Zooming-in on images with mouse hover is a common feature used on E-commerce websites to let buyers see details of the products. We had a similar requirement on a polymer project for which we integrated the Zoomove jQuery plugin into polymer to use it as reusable component and now open sourcing it.
Demo - https://qed42.github.io/polymer-zoomove/
Github project -- https://github.com/qed42/polymer-zoomove
Using zoomove-polymer Element in your Project
Install this element using bower in your project
or you can grab the element from the github from here - https://github.com/qed42/polymer-zoomove and place it in the components for referencing.
Now you can add the element in your html page using html imports
And in your HTML you can now use the tag as follows,

Available attributes for this elements are:
- image-path - The url of the photo to be displayed.
- image-scale - Sets the zoom size that should be applied to the image.
- image-move - Choose whether the image should move with the mouse move
- image-over - With 'over' it is possible to define whether the image may be above
- image-cursor - Define the cursor pointer or default
Vagrant NFS Sync Problem on macOS High Sierra
Disclaimer: This is a temporary workaround which worked for me, not a permanent fix and may not work for everyone
Many of us have already tried to enjoy the flavor of new OS by Apple, macOS High Sierra. And doing that might have given you nightmares, if you were using vagrant based project.
If anyone is facing missing files or file changes not getting detected issue inside Vagrant, this might be because of compatibility issues with Apple’s latest APFS (apple file system) and Vagrant’s synced folder type: nfs.
I experienced this a couple of weeks ago, when I upgraded to beta version of masOS High Sierra. I was not able to see few modules (like views, taxonomy) and files present inside vagrant (guest) even though these were actually present in my mac machine (host). This is an already reported issue.
After struggling for next few days and nights, I found the quickest possible solution for this problem which worked for me.
Please follow the steps mentioned below:
- Install the vagrant gatling rsync plugin.
- Do changes in VagrantFile as mentioned here : https://github.com/smerrill/vagrant-gatling-rsync
Add the following part only:
Add this code in Vagrant.configure(VAGRANTFILE_API_VERSION) do |config| function of your VagrantFile. You can also refer to VagrantFile line number: 108 & 114 given in https://github.com/navneet0693/high-sierra-vagrant-problem.
- Important: Change vagrant_synced_folders type from `type: nfs` to `type: rsync` in box/config.yml. Sync folder is mostly your project repo, which shared b/w host (mac) and guest (vagrant box).
- Then you will have provision your Vagrant again.
New Polymer element to indicate reading position of your visitor - <polymer-meter>
Now a days we have seen quite a few websites that have some kind of an indicator to display the current reading position of readers. Generally, such indicators are used on blog posts or long form articles and help readers understand how far they are from finishing the article.
So here I have created a polymer element which can be used on your site easily and gives this functionality. I have used a horizontal progress bar to use as a indicator.
The principle logic behind this element:
To build this element we had to use two information from the user -
- What is the length of the page ?
- What is the current reading position of the user?
So to develop this element we used the fact that user has to scroll to the end of the page, to read the article. Here the main principle targets the scroll event which is used to determine the position of the user while reading the article.
- To get the length of page - I checked the amount of page user scrolls to reach the end of page, this would become the max attribute.
- To get the current reading position of the user - I calculated the vertical offset of the top of the document from the top of the window which would be our value attribute.
Demo - https://qed42.github.io/polymer-meter/
Github project -- https://github.com/qed42/polymer-meter
Using polymer-meter Element in your Project
Install this using bower
Add the element element using html imports
Example Usage:
Place this element at the top your page, it will watch the length of the page and at the top it will display a indicator show how much of the page you have already covered.
You may not insert any custom DOM inside of this indicator element.
Styling
You can control the color of the indicator using css property '--progress-meter-color'
Example:

Ionic and Android 6 Runtime Permissions
Android Permission Provisioning has changed recently, If an app is using Android SDK API level 22 or below, users are asked for all the permissions in bulk at the time of installation i.e. Without granting permission user can not install the app. Now with Android 6's security patch called Run Time Permission (API level 23 and above) the app while in use can request for specific permission when the need arise ( similar to iOS ) e.g. you will be asked for the location's permission when you actually try to access the location of the device.
To work with runtime permissions on Ionic, you would need to install Cordova diagnostic plugin which gives you the function to fetch the status of the native api's exposed to the app. If a certain permission is mandatory for you app you can prompt the user to grant access to proceed. Further you have specific functions for granting permissions.
Install the plugin
To avail the features of Run Time Permission, you have to build the app with Android platform 6.
Check you current Android platform version
If the version of your Android's Platform is below 5, you will need to update it to 5 or above.
Remove android platform:
Install Android platform version 5 or above:
In config.xml, set the target of sdk version to 23
So far we are all set to ask user's for permission on the fly. We will have to call a functions to fetch the status of particular permission for the app. On the basis of the status we will ask the user to grant permissions or ignore it.
Add the following function in your app.js in $ionicPlatform.ready() function.
This will make $rootScope.checkPermission() global and you can call it whenever you wish to check if the user has given the permission to fetch device's location.

Here is a link of the code snippet.
Of course, you can choose to skip all this and stick to sdk target version 22, but you will miss out the new cool feature of Android 6 and amazing user experience.