

MEAN has a concept of roles but doesn't yet have a granular permission system to go with it, in this blog post we will implement a permission system and screen to manage permissions. Roles is a way to segment users based on access requirements of your application, all users associated with that role will have the permissions assigned to that role. Common examples of roles are: anonymous user, authenticated user, and admin.
By default, MEAN defines two roles as a part of app setup:
- admin -- has permission to manage the site and also can access the mean-admin package functionality.
- authenticated user -- the role assigned to new accounts on a MEAN site.
On one of our MEAN projects we had requirement of setting up granular access permission on content and other functionality, which ideally will be managed by the Admin of the site and can be changed in future. Some of the example of content permissions are -- Edit, create, Delete and can be assigned selectively to roles. The basic structure for role management is more or less similar to other CMS, we create a collection "variable" (could be used for other settings as well) with "Roles" as data in it and use this collection to map roles with permissions. This approach works well but at the end of the day - when we analysed the load times of our app, we found that roles retrieval from variable collection took most of the time. Looking to optimise our permission system we turned to global object provisioning of MEAN's system package and initialised our roles during system package bootstrap, which resulted in significant performance boost.
From the UI perspective, we primarily implemented 3 screens:
- Addition of Roles

Please find below sample structure for storing roles inside variable collection

- User -> Role Assignment

- Permission Management screen
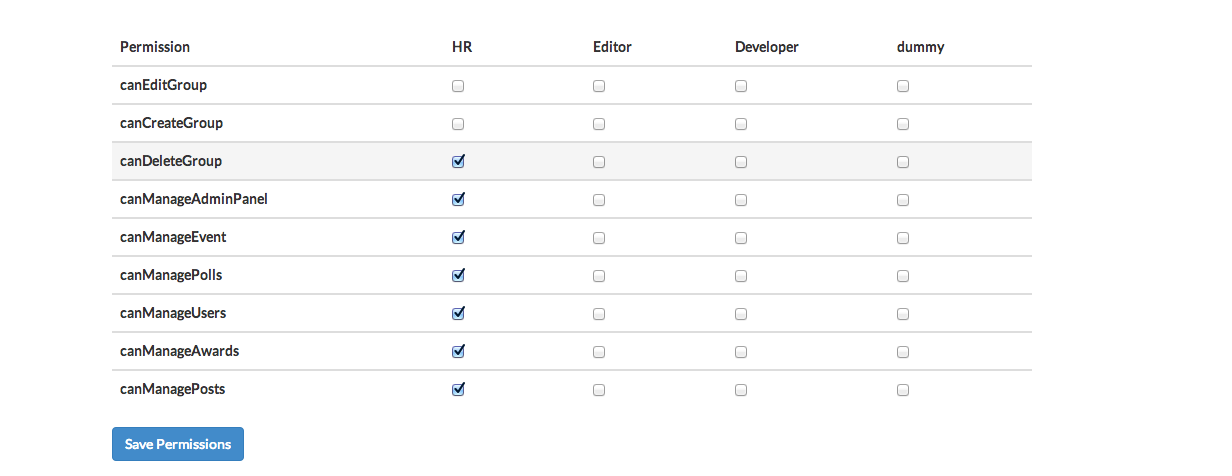
First two screens are straight forward CRUD implementations that need to deal with User and Variable collections (Please see the structure above), hence will just focus on the Permission management screen for which we will rely on Angular Checklist. The Permission variables in your app should have a structure similar to the screenshot below
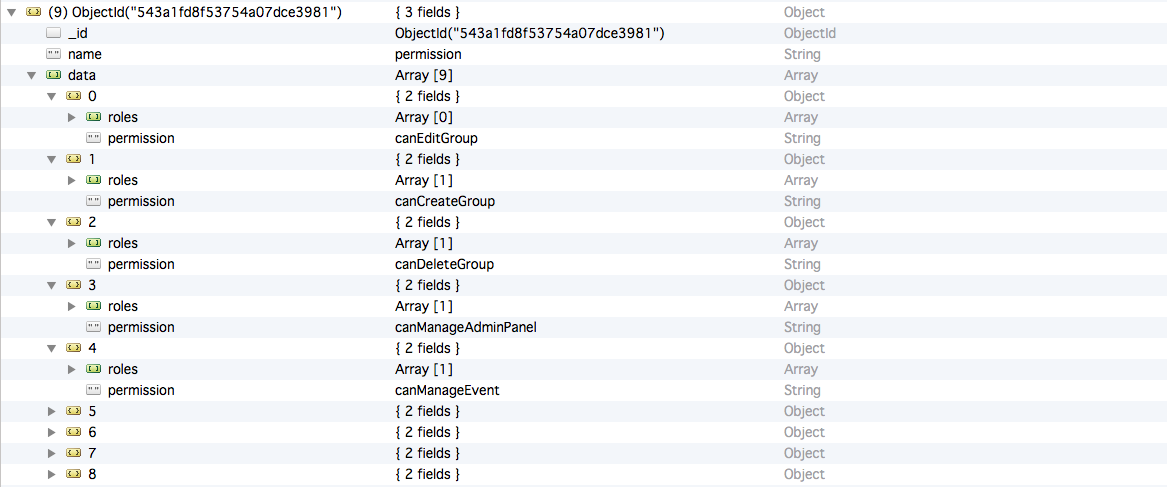
We are using "Permission" Object to store all the available permissions in the variable collection. Permissions object comprises of "data" which is an array of objects, with each object containing role and permission mapping e.g. If we have 9 permissions in our app, we will have 9 permission objects. The third screen is built by retreival and iteration over Permissions object and rendering them using Angular Checklist (You can use any other library that suits your UX)
With data modelling done and roles and permissions mapped, lets see how to inject permissions in the global User object which is initialised at the time of user login. The initialisation is a two step process
- Retrieval of Permissions object from collection
- Injection of User Permission list in the global.user
You can find this code for initialization of global.user in system server controller's index.js .
Here "listUserPermission" is the function which will insert the permission in a array.
Now on Angular end global.user will contain a field "permission" containing list of permissions applicable to the user. Furthermore on Angular we need to define a factory which will check if the global.user variable consists of particular permission for us to check user access cleanly. Note: here we are defining a factory which can be used throughout the app by inserting it in you controller options:
Now you can use this hasPermission in your html directly
Create Group
Voila, your authentication system is working perfectly on angular side.
In order to have verification at server end, You can have code in you route similar to the angular end verification. Since we can not define something in node which is available globaly so we define hasPermission for all the routes file. it goes something like