All blogs

Building interactive maps with Leaflet and React
Having a map is a vital tool for engaging with audiences for many online businesses. Interactive maps allow direct interaction with your site visitors. It also responds and anticipates the needs of your users/customers. In this article, we are going to develop a simple interactive map that shows the state and union territory wise Covid-19 cases in India using Leaflet JS and React.
Let’s get started.
What is Leaflet?
Leaflet is an open-source JavaScript library for developing interactive maps. Weighing just about 39 KB of JS, it has all the mapping features most developers ever need. It’s a lightweight, open-source mapping library that utilizes OpenStreetMap. It has more than 30k stars on GitHub.
Installing React-Leaflet
We need to install react-leaflet in our React project. Please follow the steps provided in the following guide.
Once the react-leaflet is added to our package-JSON file, we need to add a few more things to view our map correctly.
Now we need to add some CSS to our file to start using the map straight away. You can do that either by including the CSS link tag in your head, or you can simply copy-paste the CSS from the file below directly into your project(index.html):
We need to set the width and height of the .leaflet-container that the map renders itself into, otherwise it won’t be visible because the div will have a height of 0px:
Once this is done we are ready to get started. The below code displays the code required to render the Leaflet map in the React App. Here we have imported the MapContainer from react-leaflet (along with some other packages which we’ll use in later stages) and we’ll return it from our App component.
MapContainer component: It initializes the map. We set the center position of the map by adding latitude and longitude along with the default zoom level of the map.
TileLayer component: A tile layer is a set of web-accessible tiles that reside on a server. We have added the URL and attribution to our TileLayer component.
Adding Map Markers
To display the data in our map as markers, first, we need the data source. I have created the data source in a JSON file that contains all the state-wise(and union territories as well) covid details in India. We will load this data locally from a JSON file, but to get an idea how our data looks like, here’s an example:
Once the data source is created, we can map through the data inside our MapContainer component, which returns a marker component for each of the state-wise data related to covid. A Marker component is used to display clickable/draggable icons on the map. It requires a position property to display the render location on the map. It takes an array of [ latitude, longitude ], the same as the center property in MapContainer.
In addition to this, we have initialized a useState hook with null. Inside the click eventHandler we will set the activeCovid when the user clicks on the marker. It will show the information to the user about the particular selected stated in a map popup.
Adding Map Popups
Since we are tracking which state or union territory the user has clicked on, if the data is available for that state or union territory then we can display the Popup. The Popup component will display a white rounded rectangle shape that can be closed, and much like a Marker component, we need to give a position so it will know where to render on the map. Inside the popup, we can pass our HTML to show the total cases, new cases (1-day *), cases per 1 million people for the selected state or union territory.
There is an onClose property/event on the Popup component. When a user closes the popup it will help us track and update the setActiveCovid state hook accordingly.
Displaying the Custom Marker Icons
Now we can add our custom icons as well. It is very easy in the leaflet to add our custom icons. First, we need to import the icon from the leaflet itself. With that, we can create a new icon instance by providing the URL location of the image along with its size.
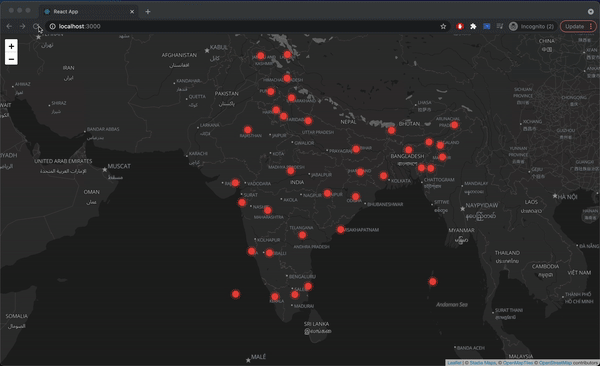
The Marker component provides an optional property icon that can be set to the covidIcon variable that we created. Once the custom marker is added our website will look like this.
Final Website
Conclusion
In this article, we have learned that React-Leaflet is a great open-source free mapping library alternative to Google Maps and MapBox. It is an extremely easy-to-use package and is extremely lightweight (39KB of JS). We have also demonstrated a small use case where we have displayed the state or union territory wise Covid-19 cases in India using Leaflet-react. Feel free to play around with this code to develop your own interactive maps. And share your experience with us in the comment section below!
To know more about how to implement navigation with Leaflet Maps click here.

Navigation with Leaflet Maps
Today, we are going to see how we can add routing to our leaflet maps. This blog will show how we can make use of the leaflet maps to show the route between a source and a destination. For achieving this we will be using the Leaflet Routing Machine module.
What is Leaflet?
Leaflet is an open-source JavaScript library for developing interactive maps. Weighing just about 39 KB of JS, it has all the mapping features most developers ever need. It’s a lightweight, open-source mapping library that utilizes OpenStreetMap. It has more than 30k stars on GitHub.
What is Leaflet Routing Machine?
Leaflet Routing Machine is an easy, flexible, and extensible way to add routing to a Leaflet map. Using the default is just a few lines of code to add fully functional routing, but you can still customize almost every aspect of the user interface and interactions.
Key features of Leaflet Routing Machine include:
- Standard Leaflet control, with Leaflet, look and feel
- Routing from start to destination, with the possibility of ‘via’ points
- Add, edit and remove waypoints through both address input and using the map
- Multiple language support
- OSRM - Open Source Routing Engine is built-in
Installation:
We need to install react-leaflet in our React project. Please follow the steps provided in the following guide. Once the react-leaflet is added to our package-JSON file, we need to add a few more things to view our map correctly.
Now we need to add some CSS to our file to start using the map straight away. You can do that either by including the CSS link tag in your head, or you can simply copy-paste the CSS from the file below directly into your project(index.html):
We need to set the width and height of the .leaflet-container that the map renders itself into, otherwise it won’t be visible because the div will have a height of 0px:
Apart from the react-leaflet, we need to install a leaflet-routing-machine package as well:
And afterwards, we need to import the below files in our routing component:
Import library's CSS file:
Import library's JS file:
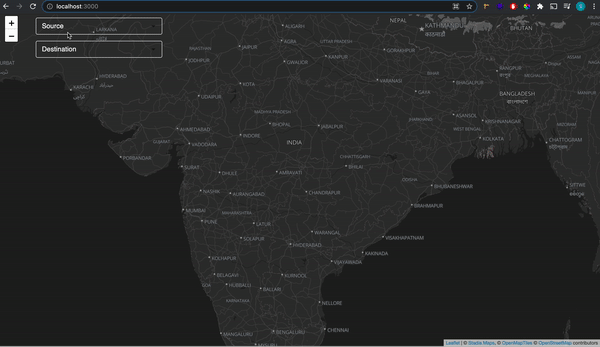
So for our current use case, we will create a simple leaflet map and add routing to it. Users will be able to enter source city and destination city, based on which it will show the routes between the two locations. Just for our understanding, our website will look like below:

Now let’s get started
First, we’ll render the leaflet map in our React app. We can do this by importing 2 components from the react-leaflet:
Once the import is done now we’ll display the map with the help of the imported component.
This will render the leaflet map in our React app. So the basic functionality of the imported components are:
MapContainer component: The Map component requires that we set a center position, which is an array containing latitude and longitude, along with the default zoom level of the map.
TileLayer component: A tile layer is a set of web-accessible tiles that reside on a server. We have added the URL and attribution to our TileLayer component.
Once the Map is loaded in our React app now we add two Autocomplete dropdown menu’s in our React app and we will create a data source containing data of all the major cities around the world as below:
Data Source sample
Dropdowns
In the above dropdowns, we are saving the value of our selected city using setSourceCity & setDestinationCity using theuseState on the onChange event in the dropdown. Once we get our selected city we will pass these values to the Routing Component as props.
Now in our Routing.js
Now in our Routing component, we will destructure the props to sourceCity and destinationCity.
Now we will use the useMap hook which will provide the Leaflet Map instance in any descendant of the MapContainer.
Then we will instantiate a new routing control with the waypoints. We will initialize the waypoints with the latitude and longitude coming from the de-structured props sourceCity and destinationCity. Then we will add that to our map.
That’s it we have added the route to our map. It’s that simple. So our final website will look like below:
Final Website
Conclusion
In this blog, we have learned how to add routing to our leaflet maps using the leaflet-routing-machine module. Also, we have developed a small use case where we can select the source city and destination city from the dropdown and it will show the route between the two cities. You can access the complete code of this tutorial here. If you would like to know more about how to build interactive maps with Leaflet and React click here.

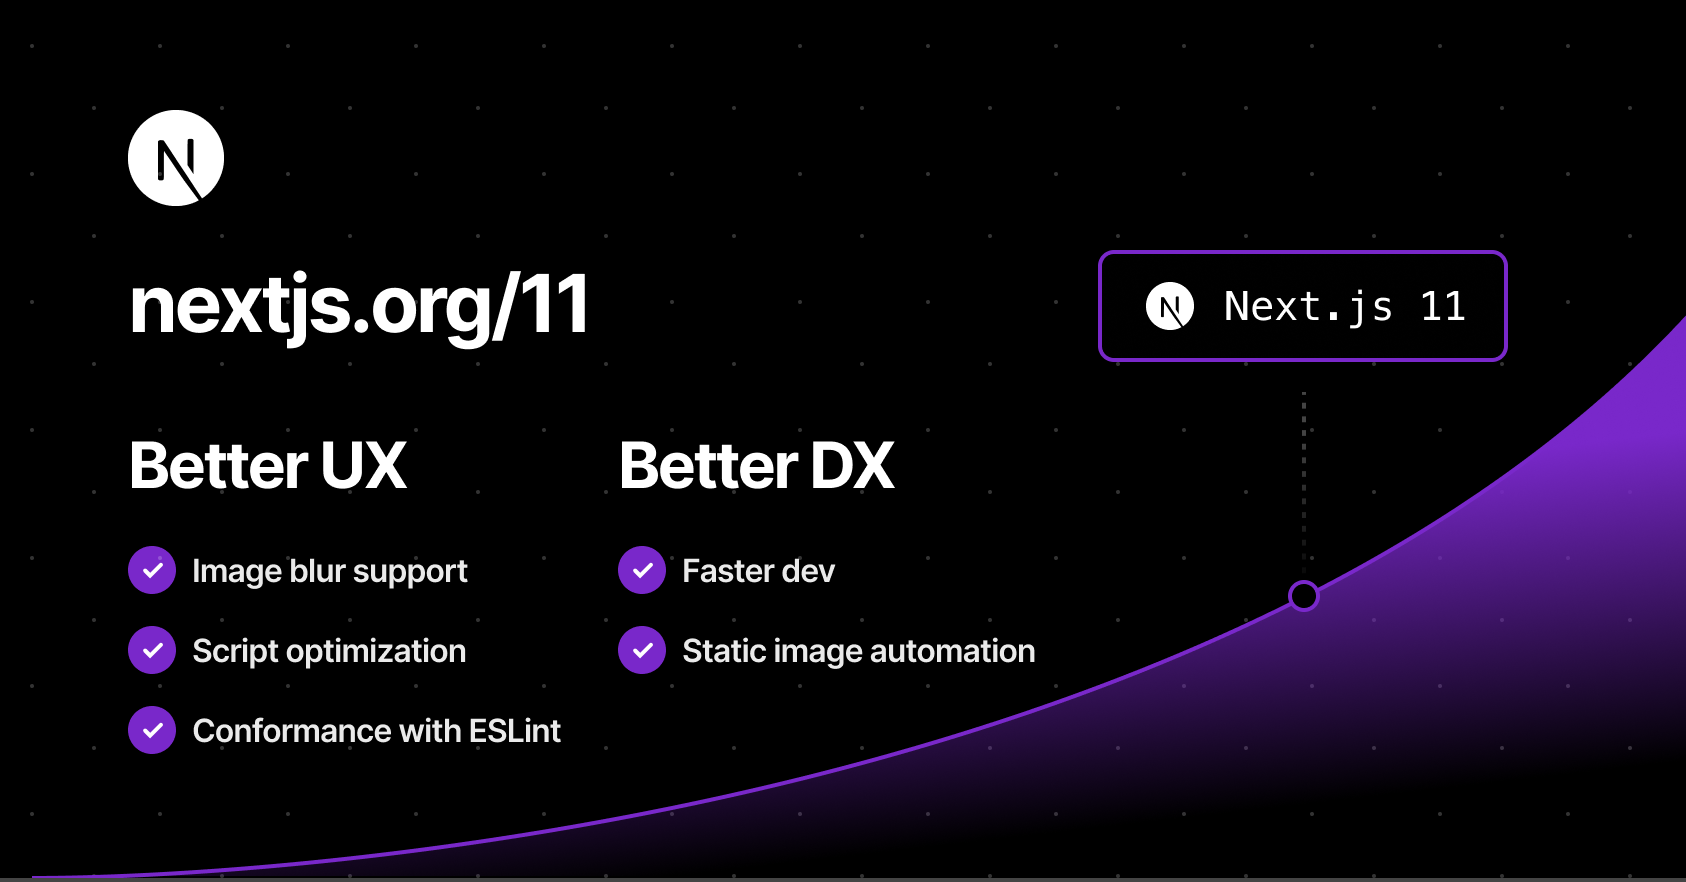
What's new with Next.js 11?
Next.js is a result of the combined work of 1600 community developers, industry partners like Facebook and the core Next.js team. Its philosophy has always been to make DX (Developer Experience) as good as UX (User Experience). And this really shows with all the different features Next.js has introduced over the last few years making it the first hybrid framework to succeed at scale. Providing features to build both static and dynamic websites with blazing fast speed.
Whether you’re starting with a single static page or deploying a dynamic site with billions of pages, NEXT.JS is the hybrid framework that meets you where you are and grows with you.
– Vercel CEO Guillermo Rauch
Vercel, the company behind the React and JavaScript framework Next.js, announced the release of Next.js 11 yesterday at its Next.js Conf.
Source - Nextjs.org
Let's dive into some of the important new features that Next.js has introduced in their latest Next.js 11 release.
Next.js Live (Preview Release)
This is basically Figma for developers. This feature will let you code in the browser, with your team, in real-time. This is probably the most important feature and will simplify team collaboration to a large extent.
Source - sdtimes.com
How this works – You need to be a part of the team which has deployed the application to the Vercel platform. If you are a part of the team all you need to do to get started here is to simply change your URL from .app to .live and Hola! This feature does not support collaborative editing inside the editor yet, which means that it will only update the changes in the UI and not in the editor.
Conformance for Next.js
Conformance is a methodology used by Google internally from their experience over the years of building web, to codify best practices in a way that they are automated and enforceable. Google's web platform team has now begun open-sourcing their system for different frameworks.
In simpler words, it's basically a linter that does something more than just code analysis. You can simply type npx next lint after upgrading to Next.js 11 to get started.
You can read more about conformance here.
Next.js Image Enhancements
Images are essential to performance for any website and one of the most commonly used elements on the web. Since version 10.0.0, Next.js has a built-in Image Component and Automatic Image Optimisation. In Next.js 11, the image component has been upgraded to support:
- Automatic size detection for local Images
- Image blur-up placeholders for static and as well as dynamic images
Next.js Script Component
Next.js 11 comes with a new component named next/script which will let you prioritise the loading of 3rd party scripts. In practice all you need to do is define the strategy property on the Next script tag and Next.js will take care of optimally loading it as per the strategy value. E.g:
Automatic Font Optimisation
In Next.js the CSS of fonts are automatically inlined at build time hence eliminating the round trip of fetching font declarations which as per Next.js will improve the FCP and LCP by as much as five seconds. Next.js also uses a pre-connect tag by default, establishes a connection with the underlying font files even faster. It supports both Google fonts and Adobe kit.
Create React App Migration
This feature is currently experimental, considering the issues encountered while migrating a React application to Next.js. To convert your React app into Next.js you simply need to use the following command
This will transform your React app into the Next.js app while taking the React app compatibility into consideration.
Webpack 5
With Next.js 11, there is no need for any custom added configuration to make webpack 5 work for your Next.js app. Webpack 5 is now enabled by default, removing the manual overhead of adding the configuration in your next.config.js. Here is the upgrade documentation for webpack 5 you can follow.
Conclusion
Next.js 11 includes significantly faster starts and changes, real-time feedback, instantaneous live collaboration and significant image optimisation enhancements. Learn more about Next.js 11 updates here. You can also check out the upgrade guide for upgrading your Next.js app from version 10 to 11.

How to Cache your Node.js application with Redis
This article is a simple introduction to Redis and how to cache your Node.js application with Redis. Here, you will learn the utilization of Redis for caching through an example and how you can use it to improve your application speed and performance. Before that, let us understand what caching & Redis is.
What is caching?
Caching is the process of storing copies of files in a cache or a temporary storage location so that they can be accessed more quickly. The goal of caching is speeding up data access operations better than a database or remote server could allow. It is ideal in the case of expensive (in time) operations. As a back-end developer, our task is to complete the clients’ requests as fast as possible. Sometimes, queries require several operations like retrieving data from a database, performing calculations, retrieving additional data from other services, etc., that drag our performance down.
With caching, we can process the data once, store it in a cache and then retrieve it later directly from the cache without doing all those expensive operations. We would then periodically update the cache so that users can see updated information.
What is Redis?
Redis is an open-source (BSD licensed), in-memory data structure store used as a database, cache, and message broker. You can think of it as a No-SQL database, which stores data as a key-value pair in the system memory. If needed, Redis supports disk-persistent data storage too.
Redis is best in situations that require data to be retrieved and delivered to the client in the least amount of time. Now that you have an understanding of what Caching and Redis are, let’s build a basic project that implements caching using Redis.
Install Redis:
If you are an OSX user, you can install Redis using the command below. For other platforms, please follow the guide on https://redis.io/download.
Create a new directory for the application by running the following command on the terminal:
Initialize the directory to create a package.json file by running
After running the above command, you should have a package.json file in the redis-nade-cache directory. Now, we are going to request a json placeholder API https://jsonplaceholder.typicode.com.
Start by creating a simple Express server in index.js:
Now, start the server by running node index.js and open postman to request the photos endpoint.
First Request-Response:

Second Request-Response:
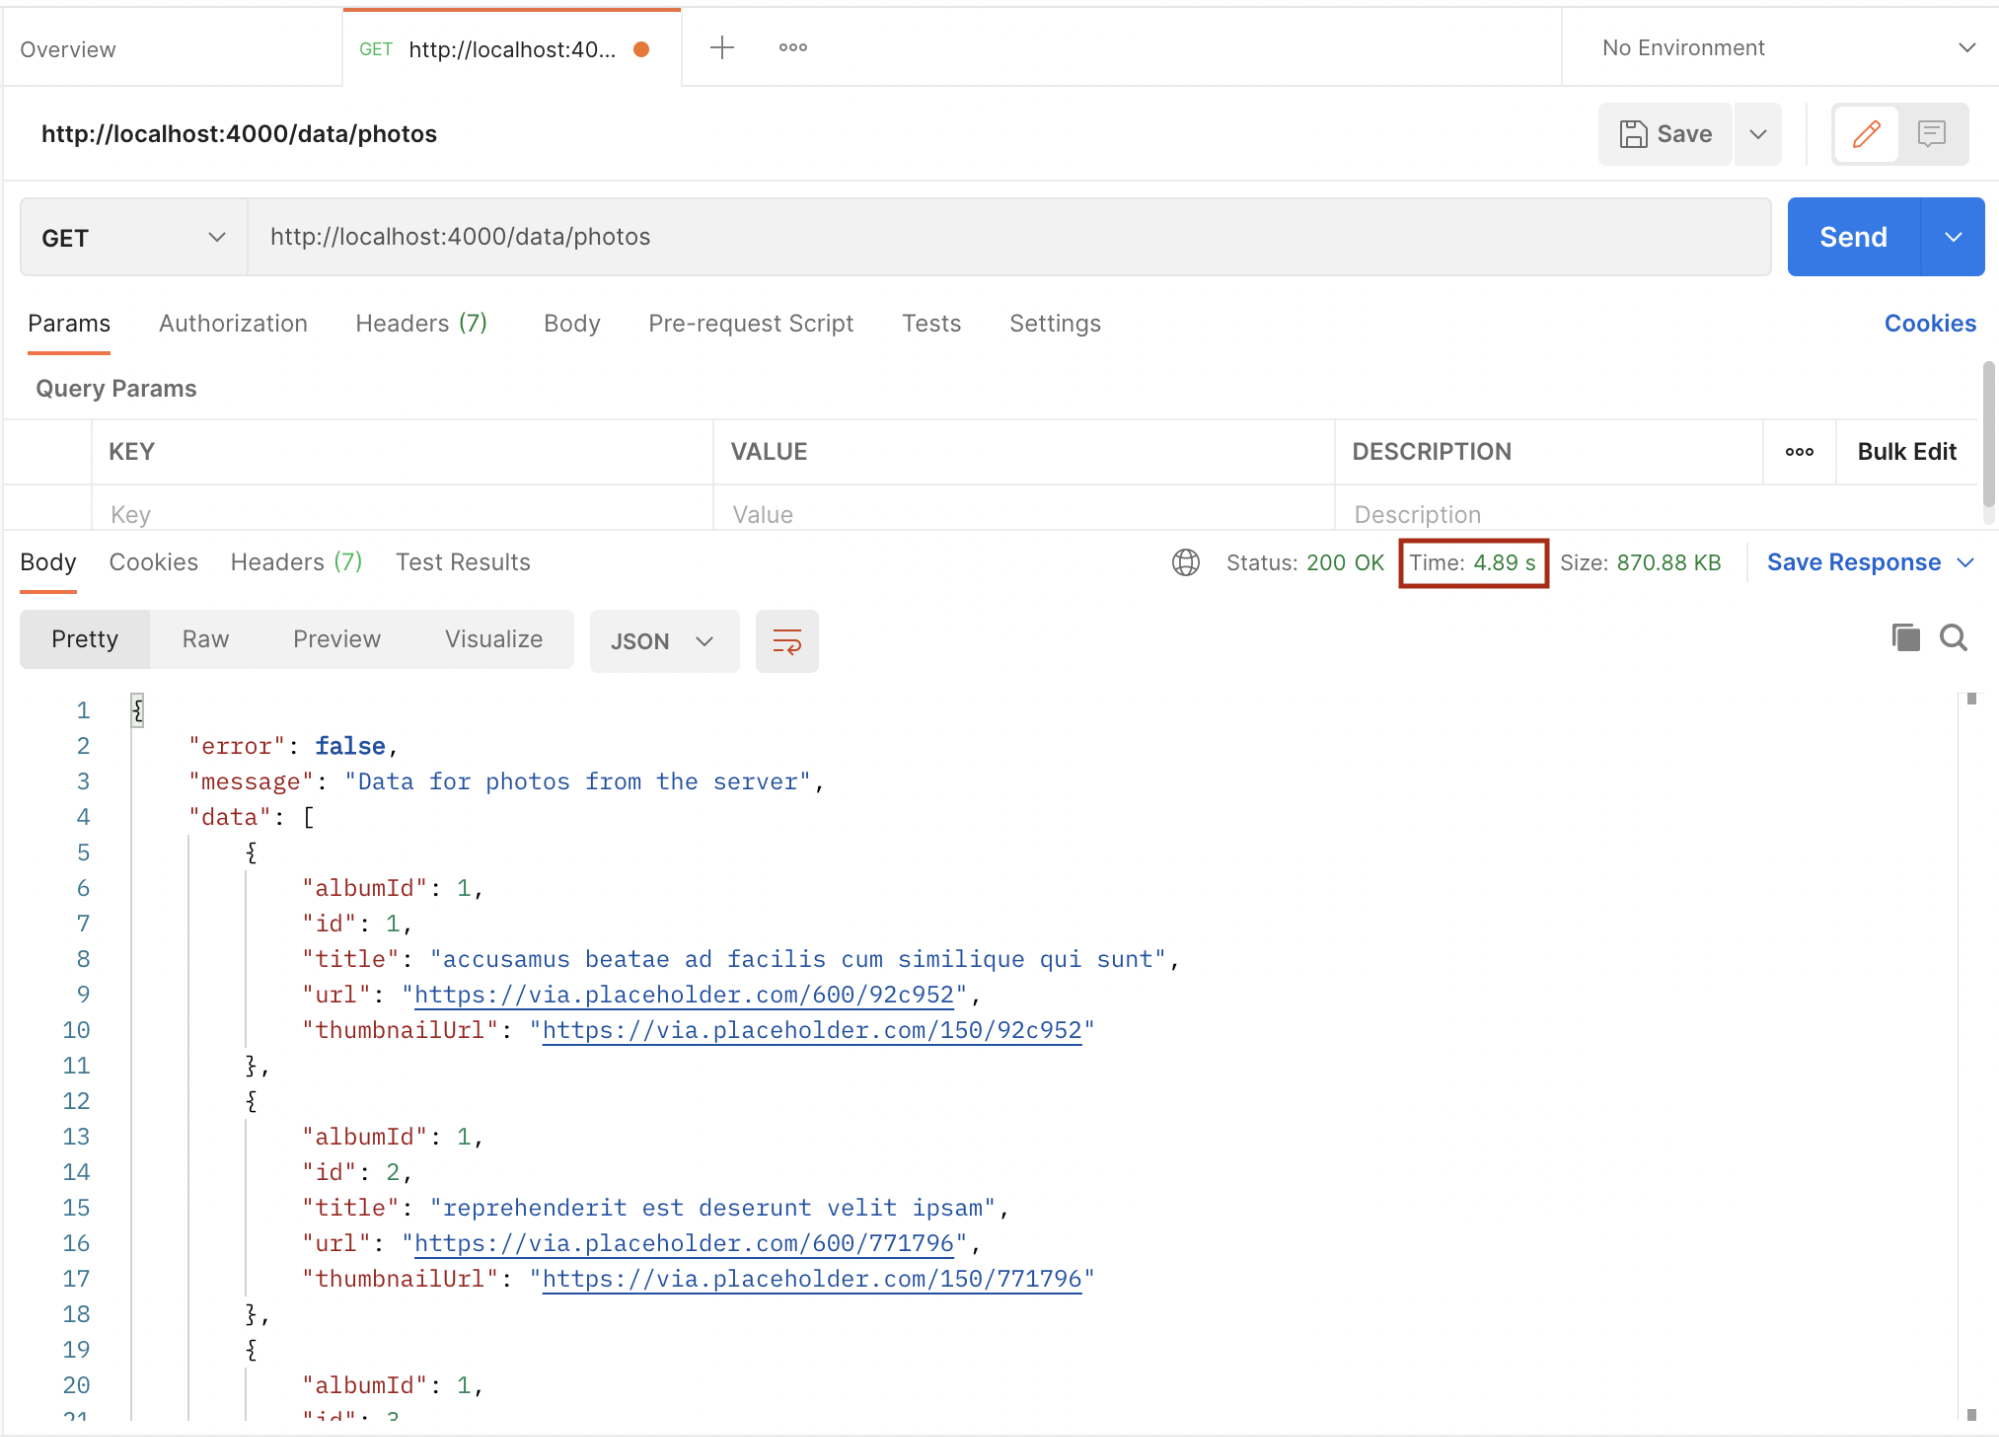
Take note of the time from the above images. The first request took 5.38 seconds while the second one took 4.89 seconds. We will improve this by implementing caching using Redis. Let’s implement Redis in the above example.
Install Express, Redis, and node-fetch npm modules with the below command:
Now that we have successfully set up Redis, the next step is to use it in our application to improve it by reducing the turnaround time of request and response. Now we will add the following changes to the index.js file.
First, we create a Redis client and link it with the local Redis instance using the default Redis port (6379)
Then, in the /recipe route handler, we will try to get the appropriate matching data to serve the request by checking for the key in our Redis store. If found, the result is served to the requesting client from our cache and there is no need to make the server request anymore.
If the key is not found in our Redis store, a request is made to the server and once the response is available, we store the result using a unique key in the Redis store:
Hence, subsequent requests to the same endpoint with the same parameter will always be fetched from the cache, so long the cached data has not expired. The setex method of the Redis client is used to set the key to holding a string value in the store for a particular number of seconds which in this case is 1020 (17 minutes).
Final code of index.js
Now, let’s test the application after implementing cache. Open postman and request the same endpoint as before.
If the key is not found in the cache, the request is sent to the server which takes 566 minutes to complete. Since the key didn’t exist in the cache before, it is now saved in the cache and subsequent requests with the same data will be fetched from the cache which makes it faster, and also reduces the load on the server. Below is the response time after the cache:
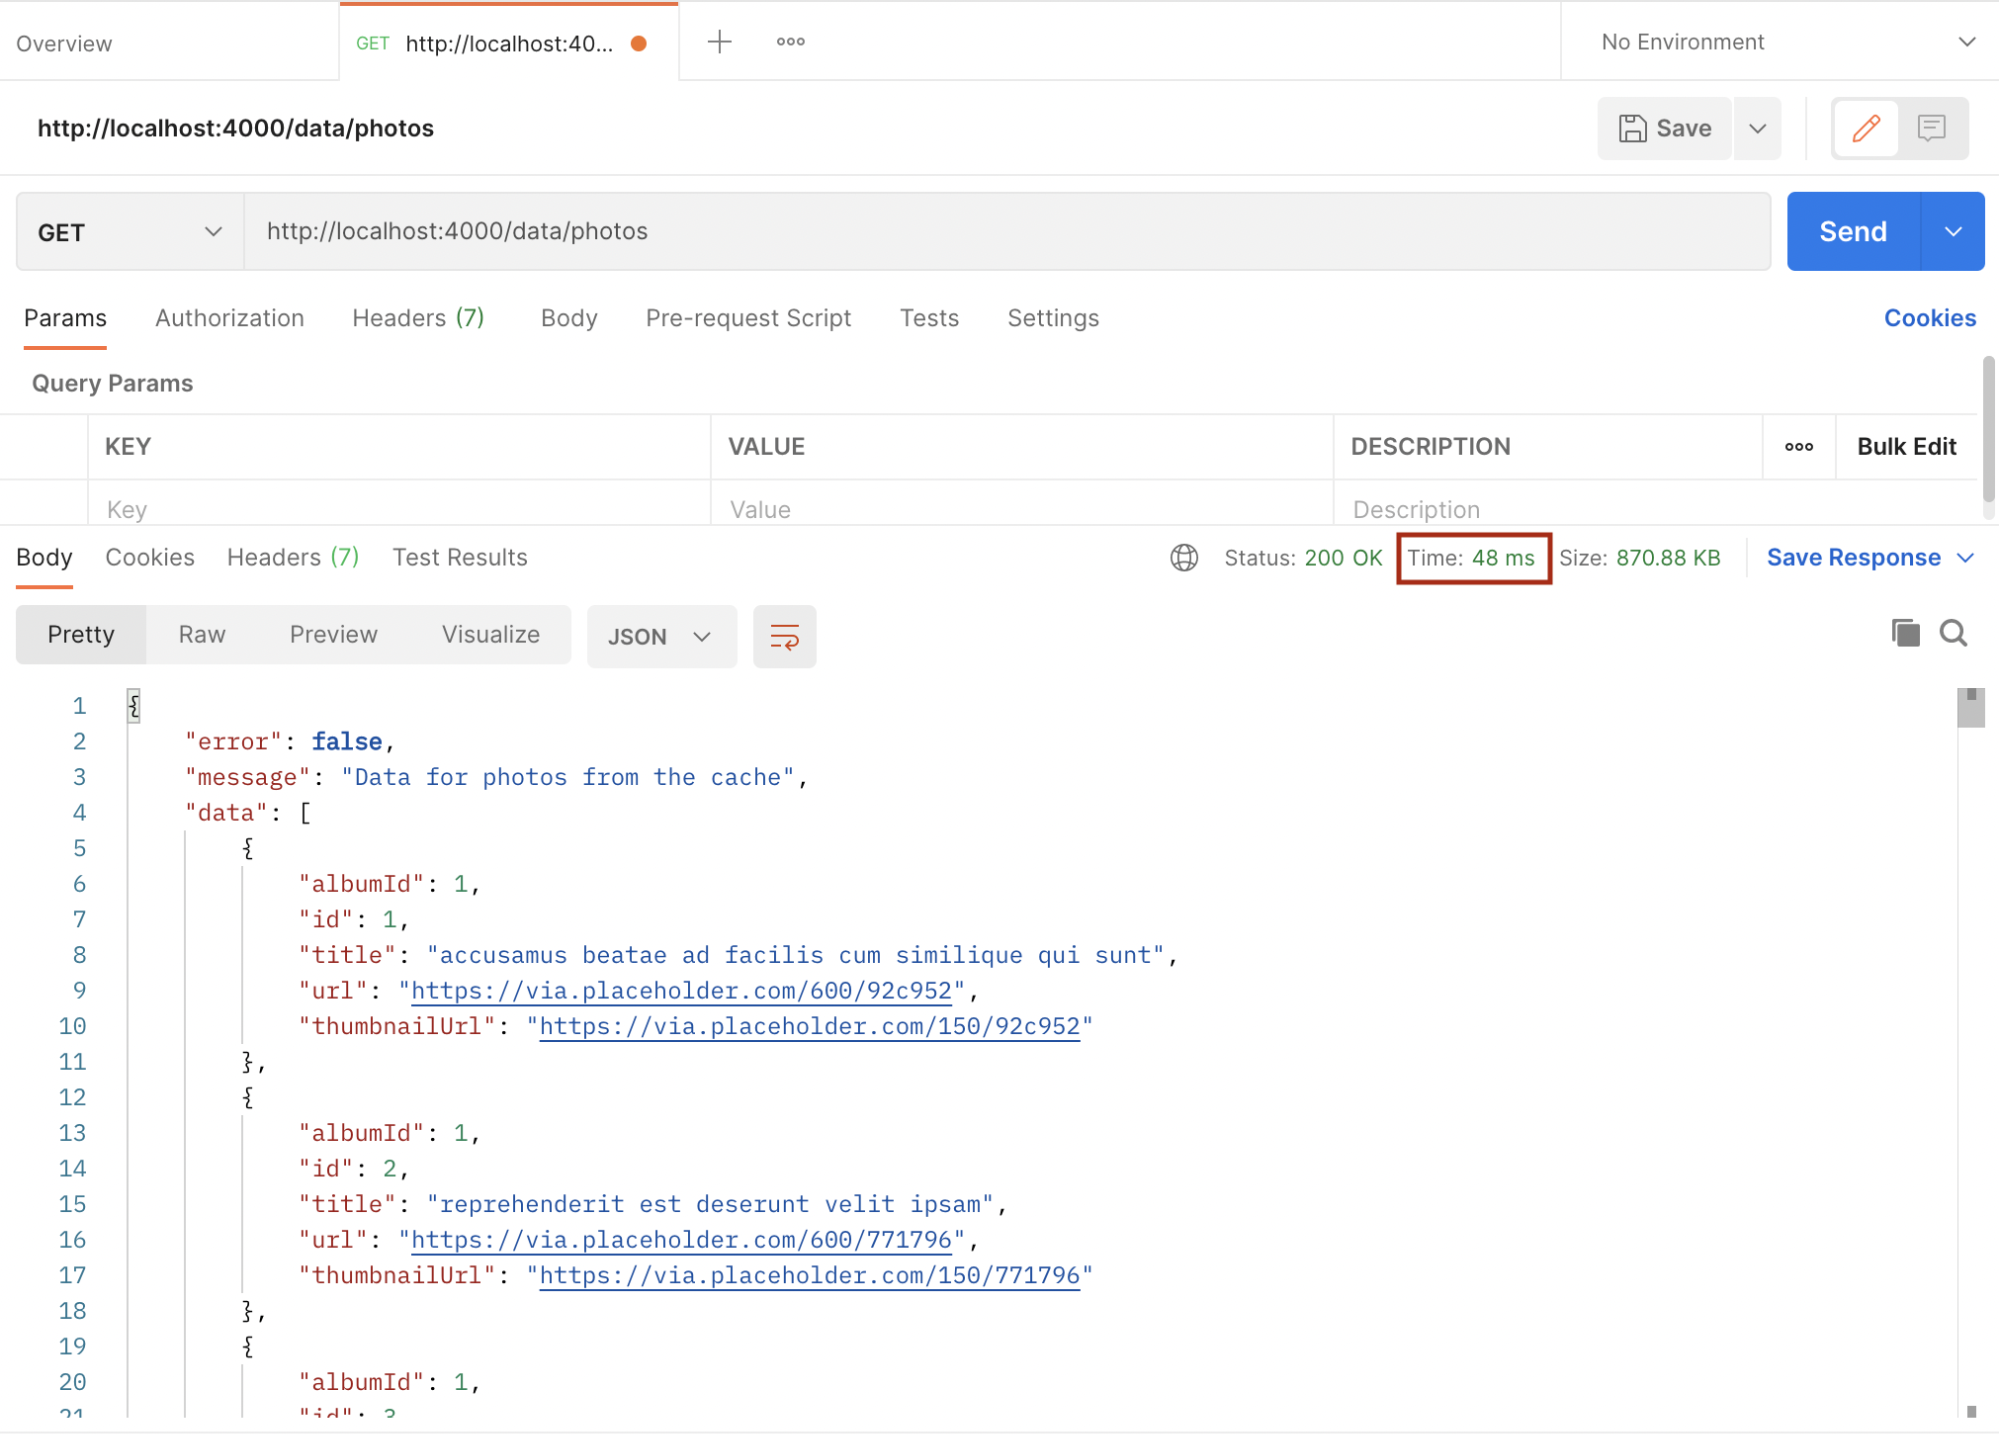
As we can see above, it took a blazing 48 milliseconds for the request to be completed because it was fetched from the cache.
Conclusion
Redis is a powerful in-memory data store that can be used in our applications. It’s very simple to save and get data without much overhead. Refer to https://www.npmjs.com/package/redis for more use cases and refer to https://redis.io/commands for more Redis commands.

React Suspense - A Quick Introduction
React 16.6 has added a <Suspense> component that allows you to “wait” for some code to load and declaratively specify a loading state (like a spinner) while you’re waiting. React Suspense was pitched as an improvement to the developer experience when dealing with asynchronous data fetching within React apps. This is a huge deal because everyone who is building dynamic web applications knows that this is still one of the major pain points and one of the things that bring huge boilerplates with it.
Let’s see what suspense is and how it’s used.
What is React Suspense?
Suspense is a component that wraps the custom components and enables them to communicate to React that they’re waiting for some data to load before the component is rendered.
It is important to note that Suspense is neither a data-fetching library like react-async nor is it a way to manage a state like Redux. It simply prevents your components from rendering to the DOM until some asynchronous operation (i.e., a network request) is completed.
Here, the StudentList component is wrapped with a Suspense component that has a fallback prop. This means that if StudentList is waiting for some asynchronous operation, such as getting the lists of students from an API, React will render <p>loading..</p> to the DOM instead. The StudentList component is rendered only after the promises and API’s are resolved.
This can also be written as –
Let’s look at some scenarios related to the same –
What If StudentList was the one who triggered the operation?
In that case, we would have to move the loading check from the parent component to the StudentList component.
What if there are more components apart from StudentList, each triggering their async requests?
This would mean that each child component would have to manage their loading states independently, and that would make it tricky to organize the data loading operations in a way that doesn’t lead to a janky UX.
Take a look at the example below –
Here's an example that I have implemented on the CodeSandbox:
https://codesandbox.io/s/suspense-example-rvi1e
How to use Suspense to display a loader?
React comes with the support of lazy components. Instead of handling the dynamic import Promise, React.lazy allows you to use the dynamic component like a statically imported one. React.lazy() is a new function in React that allows you to load react components lazily through code splitting without help from any additional libraries.
Lazy loading is the technique of rendering only needed or critical user interface items first, then quietly unrolling the non-critical items later. It is now fully integrated into the core React library itself. We formerly used react-loadable to achieve this but now we have react.lazy() in the React core.
Suspense is a component required by the lazy function basically used to wrap lazy components. Multiple lazy components can be wrapped with it. It takes a fallback property that accepts the react elements you want to render as the lazy component which is being loaded.
React.lazy takes a function that will execute the dynamic import. It returns a component that will run this function during its first rendering.
The resulting promise status is used by Suspense:
- to render the fallback during the chunk download (pending Promise)
- to render the real StudentList component once downloaded (resolved Promise)
Conclusion
Suspense helps us to coordinate asynchronous resources with our loader component rendering. We have already used it in the above example.
We have seen how to get started using the lazy and suspense components provided by React to load components lazily. The above example is a basic one as compared to the numerous possibilities these new features bring.
This was a quick introduction to “React.Suspense” and how it is used with code splitting. Stay tuned for our upcoming blog on ‘What Suspense will become in the future.’
A hint – It will be used for much more than just code splitting!
Here's a glimpse of the React team’s vision for what the future of React might look like, including some never before seen prototypes.

Developing Multilingual sites with Headless CMS - Strapi
Over 4 billion people are using the internet today. It is used by different businesses (like e-commerce, social media, etc.) for attracting more customers. Every business is going online (especially during this pandemic) with the notion of gaining the upper hand on the competitors with different marketing strategies.
One of such marketing strategies is Multilingual websites to attract more customers, by catering to different demographics.
What is a Multilingual website?
As the name suggests, a multilingual website is a website that has content in more than one language.
Benefits of Multilingual websites
- English is not the only language:
English might be the most widely spoken language globally but there are other well-known popular languages like Mandarin, Spanish, etc. A website that displays its content in more than one language is reachable to more people comparatively.
The most common languages used on the internet as of January 2020, by the share of internet users are -

Source: Statista
- Everyone loves their native language:
Human beings have a special regard for their native language even though they can speak and read English well enough and it is a normal thing. Similarly, if the website displays content in the region’s native language, it will connect with people easily. It also shows that your business truly cares about the non-English speaking customers and their language is just as important.
The most spoken languages worldwide in 2021:

Source: Statista
- More customers mean more sales:
As you develop your website in multiple languages, your target audience is getting bigger. There will be an increase in the number of customers and as a result, the sales will also increase.
- A different approach from competitors:
There is a famous quote by Dr Seuss:
Why fit in when you were born to stand out?
No matter what your business is, it faces market saturation and huge competition these days. A multilingual website is a great way to stand out from your competitors.
- Search engines:
On Google, there are a lot of languages to choose from. If you have a multilingual website then search engines will show your website’s result in the user’s preferred language.
Now the question arises of how can we make our website multilingual. There are a lot of options available in the market but today we are going to discuss how we can achieve this with Strapi (Headless CMS).
What is a Headless CMS?
A Headless CMS is a back-end-only content management system where the content is built from the ground without its head, which is the front-end. It makes the content accessible via API for display on any device.
What is Strapi - Open Headless CMS?
Strapi is one of the most popular open-source Headless CMS right now. It has more than 35k stars on Github with growing popularity each day. Strapi enables content-rich experiences to be created, managed, and exposed to any digital product, channel, or device. It gives a very user-friendly experience that you can stack up with any technology. Please check out their Github repo below:
https://github.com/strapi/strapi
The current scope of Multilingual website with Strapi
There is no plugin available for making a website Multilingual. As per the below road map, the plugin is still in the testing stage and according to the recent update, it will either be launched at the end of Q1-2021 or might get postponed by a few weeks into Q2-2021.

Building a multilingual website with Strapi
- Building the back-end with Strapi:
Firstly we need to do the local setup for Strapi. Please follow the instructions mentioned in the guide: Installing from CLI
URL: http://localhost:1337/admin/
- Creating the collections in Strapi:
Step 1 - On the left panel of the dashboard, click content-types builder, it will give you an option to create new collections. Click on it and name the collection as ‘article’ and click continue.

Step 2 - It will now ask you to add fields for the collections. Since we are building a multilingual website, we will specify each field name with the language code as a suffix in the field name just to differentiate between each language.
For eg: If we need to specify the field ‘title’ for the English language then the field name can be mentioned as ‘title_en’. In the same way, we can mention the Hindi language as ‘title_hi’.
Likewise, we need to add the title and description along with the language code as the suffix for the field name. After adding all the fields, click Save.
Here is the list of all field names created for this multilingual website:
We are using 4 languages here English(en), Hindi(hi), French(fr) and German(de). Article collection will have the following fields:

Step 3 - Now, let’s add a few articles to the created collections. In the left side panel, under collection types, click on ‘Articles’ and then click on add New Articles.

Now as per the defined language suffix, type the content in its specific language field as shown below:
Title_en: Munnar Travel Blog – Tourist Places
Title_hi: मुन्नार यात्रा ब्लॉग - पर्यटक स्थल
Title_fr: Munnar Travel Blog - Lieux touristiques
Title_de: Munnar Reiseblog - Touristenorte
The same needs to be done for Description fields as well. This will help in distinguishing different languages to display in the front-end by using their field name. We can easily differentiate with the help of the language code provided in the Suffix.
The full approach for adding an article is below:

Step 4 - After adding a few articles, we need to provide the ‘Article’ collection permission to send the API requests to fetch the data from Strapi. For That Click on settings > Roles > Public.

Scroll down to the Permissions and check the find and findone boxes. Save it and we have successfully given permissions to our Article collections.

- Building the front-end using React
- Fetching data from Strapi.
App.js:
Here we are fetching all the data from the Strapi using the URL ‘http://localhost:1337/articles’ and then feeding the JSON data to our header component as props.
index.js(Header Component):
The data from App.js is used here as props to display the content in multiple languages.
Now, we’ll handle the multiple languages by creating a Header for our blog.

Here, we have created 4 radio buttons for each language (English, Hindi, French, and German) and on selecting any one of the languages, our content will display in that particular language.
Here, the default selected language will be English and if the user selects any other language our function handleChange will get invoked and the useState hook will set the new value for that language code. With this, the page will start showing the content in that language.
Final Website

Conclusion
In this tutorial, we have learned how to build multilingual sites with Strapi. We first started by developing our back-end with Strapi and added collections with articles, then we went on to build our front-end with React to display content fetched from Strapi. You can access the complete code of this tutorial on Github.
Github Links
Backend: multilingual-with-strapi-backend.git
Frontend: multilingua-with-strapi-frontend.git

How to build a real-time tracking app with GraphQL Subscriptions & Apollo Client
One of the exciting things about GraphQL is its ability to build real-time applications using GraphQL subscriptions. In this tutorial, I’ll be showing you how Google Maps updates your location in real-time with GraphQL subscriptions & Apollo Client.
Prerequisites
- Basic knowledge of Node.js and React.js
- A basic understanding of GraphQL concepts such as schema, query, mutation, etc.
What is GraphQL Subscription?
Subscriptions are a GraphQL feature that allows a server to send real-time data/updates to its GraphQL clients when a specific event happens. Subscriptions are usually implemented with WebSocket. In this setup, the server maintains a steady connection to its subscribed client. This also breaks the “Request-Response-Cycle” that was used for all previous interactions with the API.
Instead, the client initially opens up a long-lived connection to the server by sending a subscription query that specifies which event it is interested in. Every time this particular event happens, the server uses the connection to push the event data to the subscribed clients.
Using Apollo Client (a comprehensive state management library for JavaScript that enables you to manage both local and remote data with GraphQL), you can unlock the power of subscriptions. Apollo implements subscriptions based on web sockets.
Publish-subscribe (PUB-SUB)
GraphQL subscriptions are based on a simple publish-subscribe system. The subscription query will re-run whenever some data changes are published. A common pattern will be to publish mutation results to a channel, so a subscription can send a new result to clients whenever a mutation happens. This is why some people call subscriptions the result of someone else’s mutation.
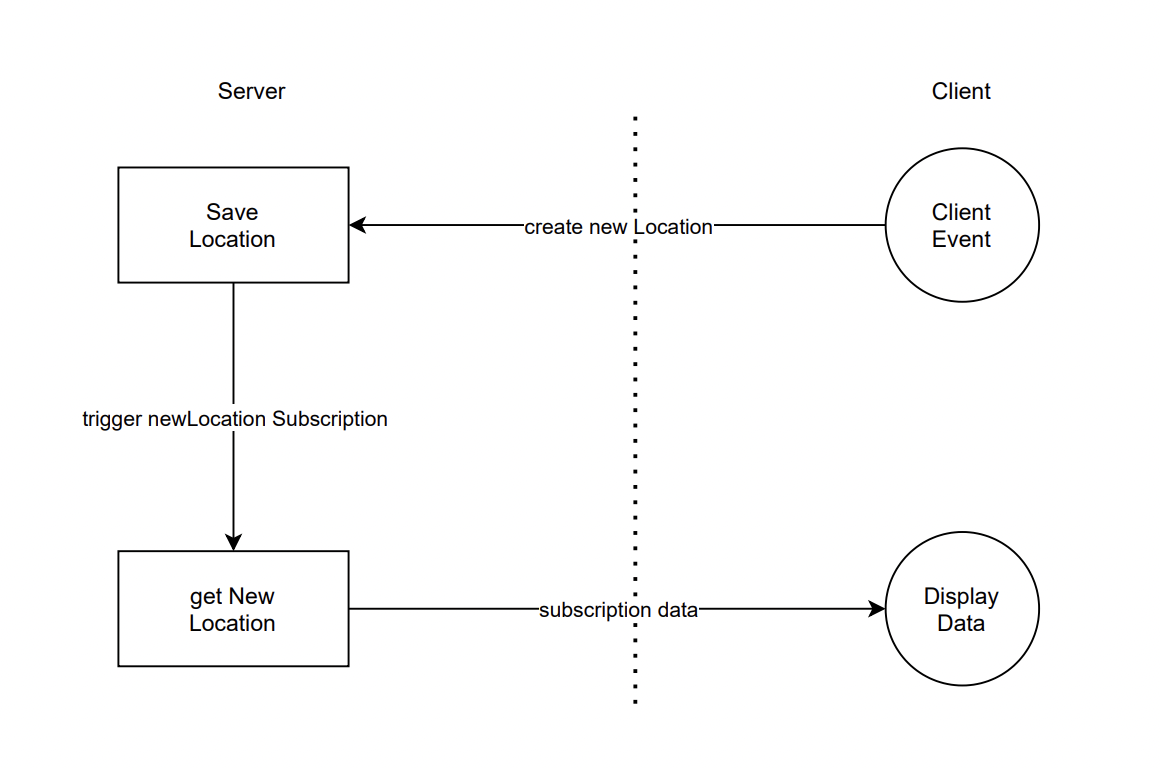
Subscription Server-Client Flow
Real-time vehicle tracking app
We’ll be building a simple vehicle tracking app. We’ll start by building the GraphQL server, then we’ll build a react.js app that will consume the GraphQL server.
Implementing GraphQL subscriptions
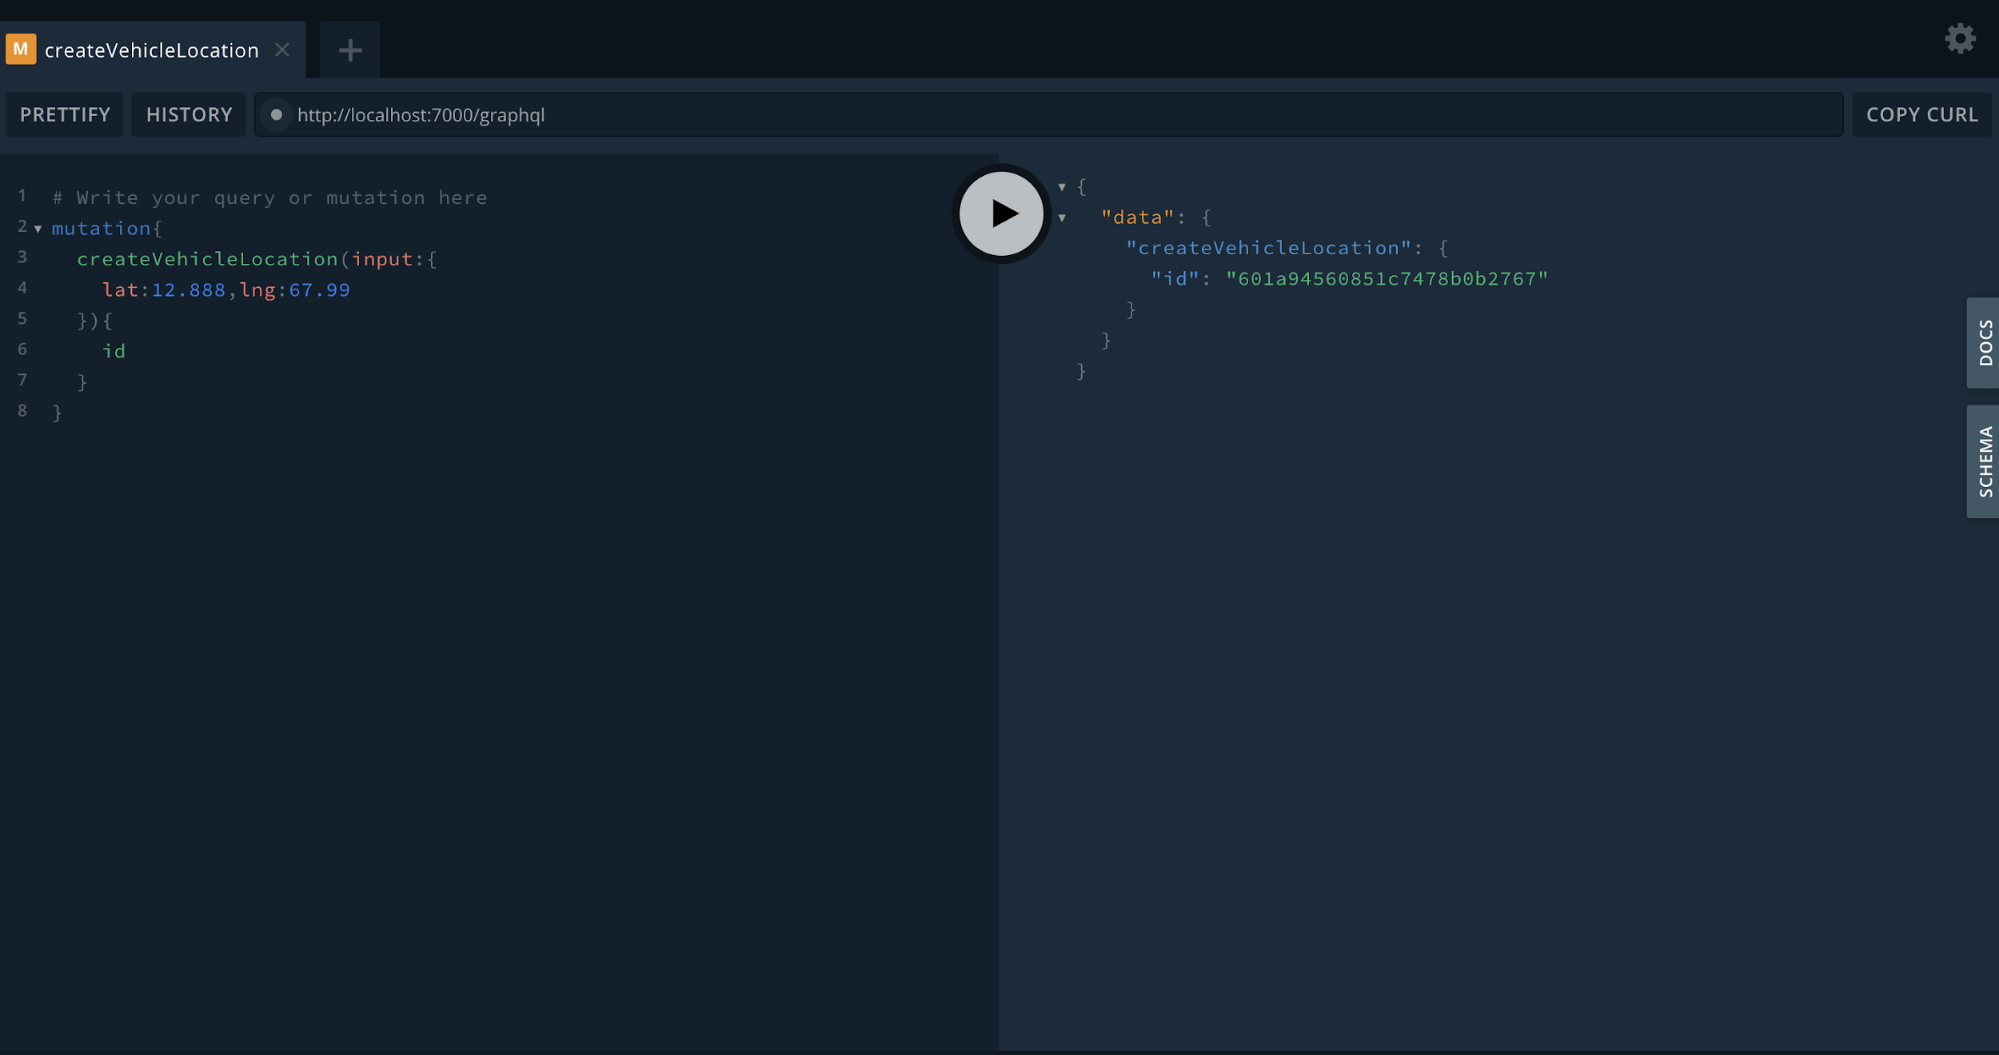
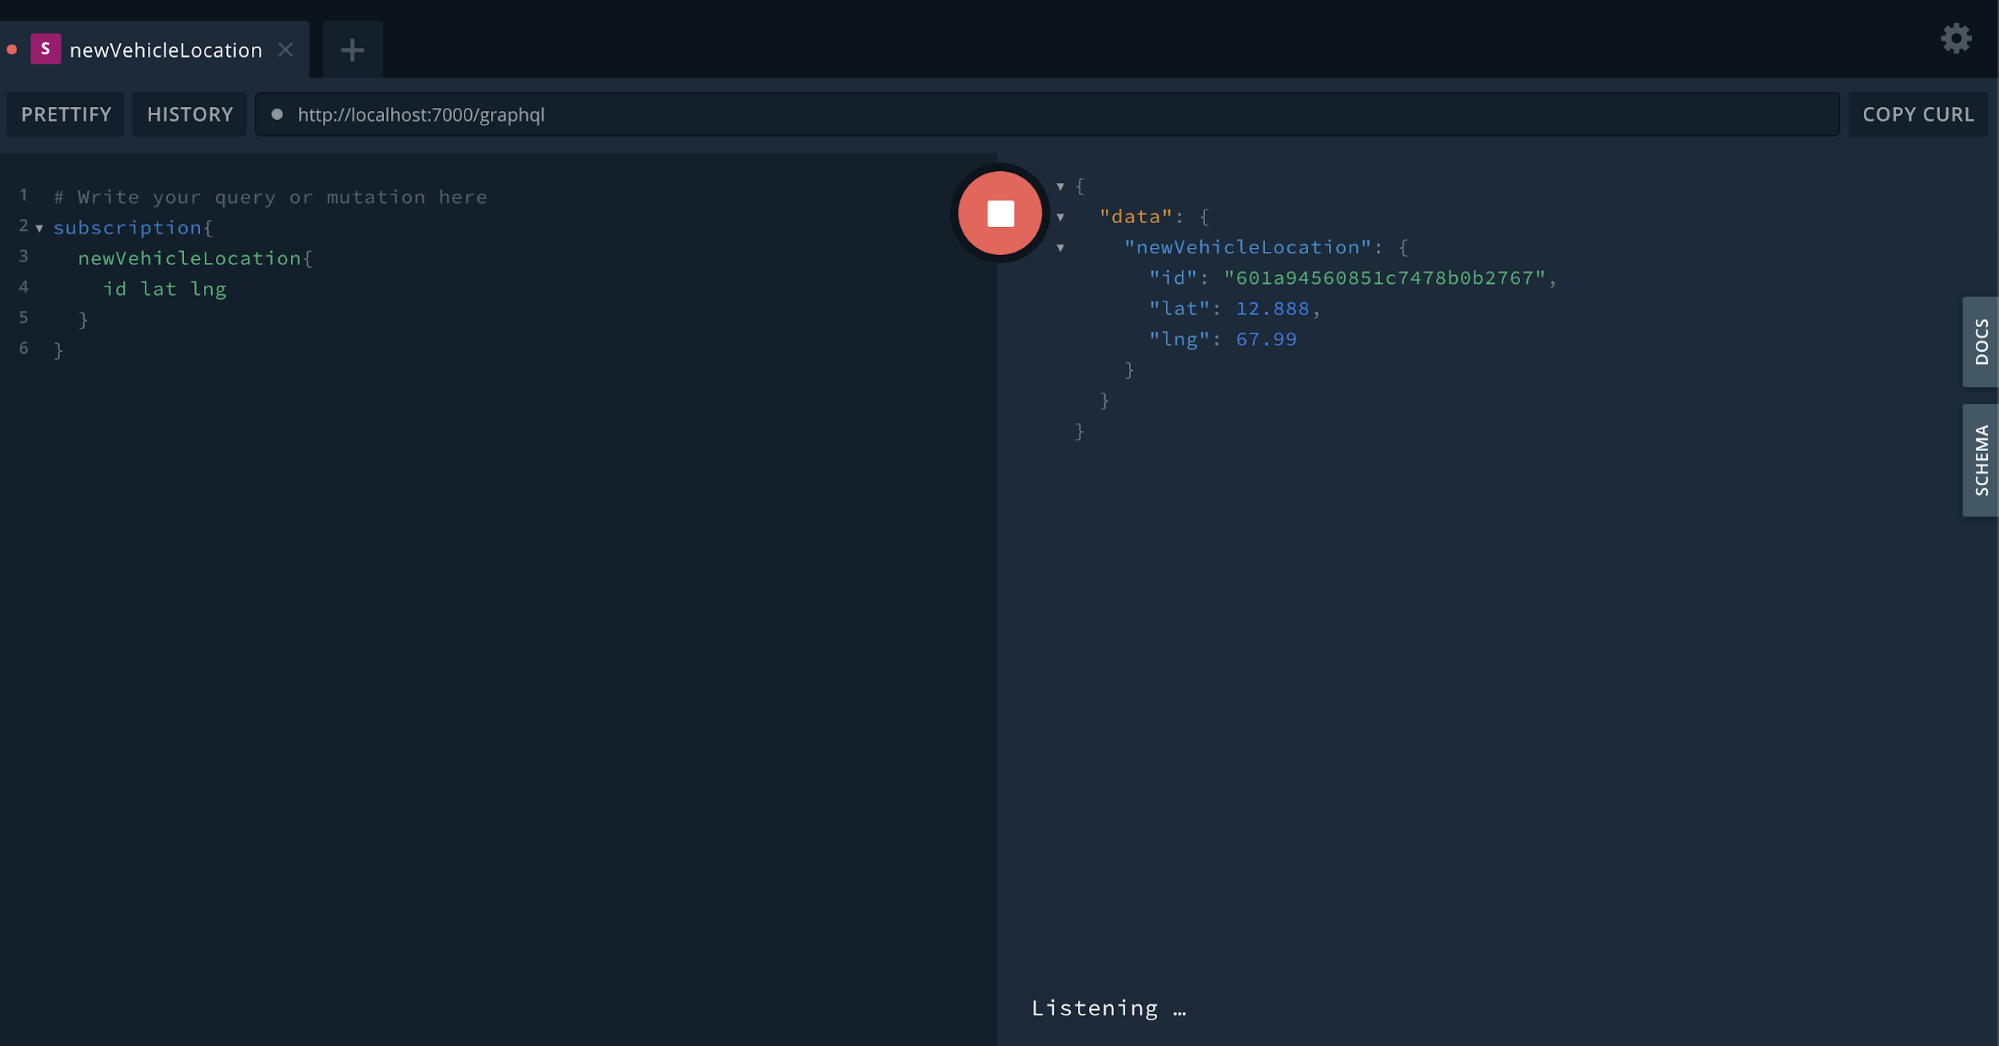
We are implementing GraphQL subscription through two packages, graphql-subscriptions and subscriptions-transport-ws. We want GraphQL clients to be notified when new-vehicle locations are added, so let's add a subscription schema with the root subscription operation type.
Next, we add the resolver for this operation and its root value, this root value is then added to the schema.
After adding schema changes we created the controller method getNewVehicle where we implemented pubsub from the graphql-subscriptions package for the actual subscription activity.
The subscribe property is mapped to a function that will return AsyncIterator, which is used by the GraphQL server to push the event data to the client. Now let us publish a subscription event when a new vehicle location is added.
The final step is to create a subscription server with the help of subscriptions-transport-ws package.
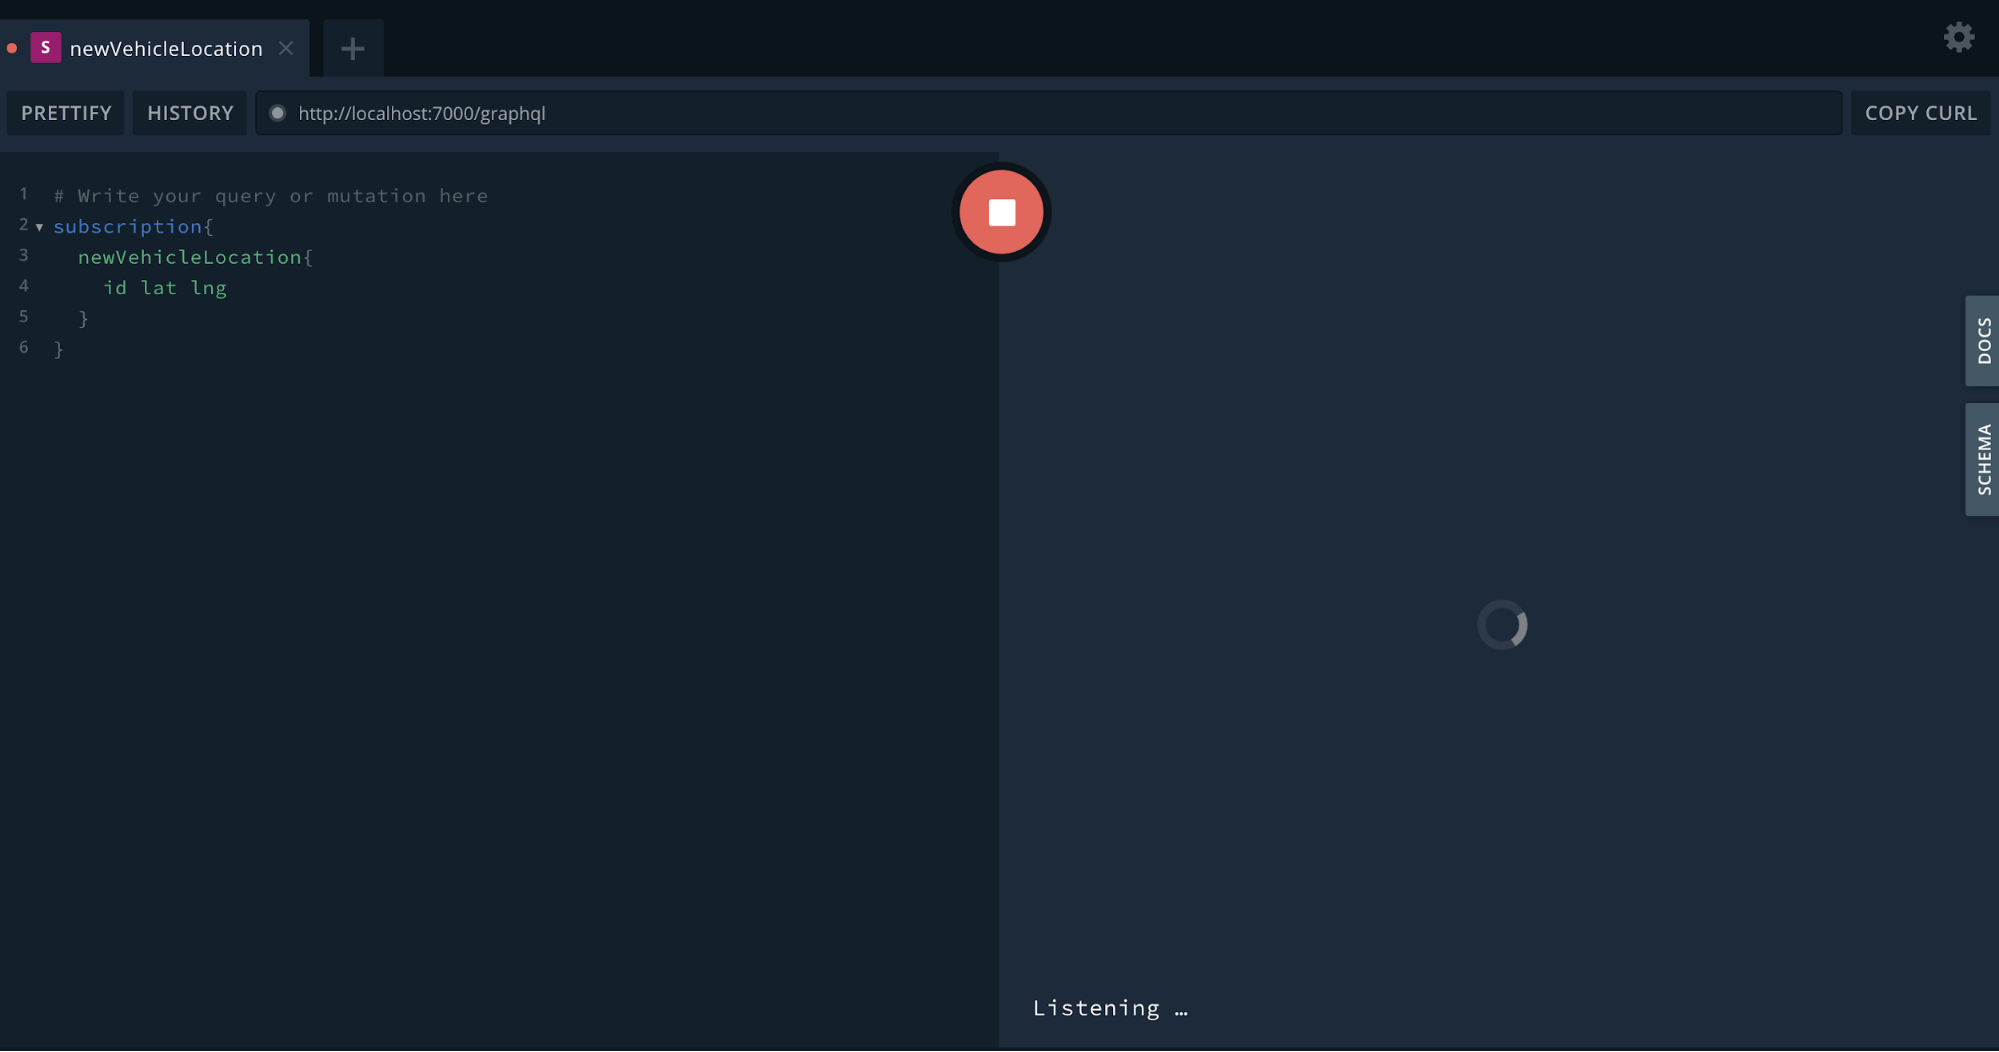
Testing Subscription
Building the frontend app
Now let us implement GraphQL Subscription in a React app with Apollo-Client. Let’s set up the Apollo plugin in App.js
Here, we create new instances of both HTTP link and WebSocketLink with the URLs (http://localhost:7000/graphql and ws://localhost:7000/subscriptions ) of our GraphQL server respectively. Since we can have two different types of operations (query/mutation and subscription). Then we pass the ApolloClient as a prop to the ApolloProvider and wrap all components that we would like to access, with the data that is managed by Apollo.
Let’s now look at how we implement the map feature in our application.
Here we are implementing an example of animate a car, moving through the road, as it reaches its destination. For this, we are using react-google-maps, which is a wrapper for the Google Maps library.
All we need for the map functionality is one query to retrieve all locations from the database.
We then subscribe for changes on the VehicleLocation type
We now define a subscribeToMore object, which contains our subscription. To update the location in realtime when a new location is added to the database.
Now, if we test it out, we should see our vehicle tracking in realtime.
Conclusion
In this tutorial, we have seen how to build realtime apps with GraphQL subscriptions. We started by first building a GraphQL server, then implemented a React app of vehicle tracking that consumes the GraphQL server. You can access the complete code of this tutorial on Github.

React Native: Custom Navigation Tabs are here!
The Idea - React Native Custom Navigation Tabs
I was browsing through the internet in search of some custom navigation tabs needed for my React Native app. I found out that there are no good options available on the npm that provide good animations or customizations to the user. So, I thought of making an open-source module called ‘react-native-custom-navigation-tabs’ which enables the users to customize the tabs according to their needs and supports 5 different styling types with amazing animations.
This blog is a walkthrough of its development process and its usage. I will briefly talk about the APIs and other modules that I used for implementing animations. I hope you find this blog engaging and as a valuable addition to your knowledge.
Prerequisites
Nothing special is needed to develop this module apart from the react-native-pose module that is needed to perform some animations. But for most of it, I have used the Animated API of React Native.
The Development Process
Apart from conventional development, the animations are an added feature. I defined the TabBar component for each type and added the animations to the active route. A whole lot of things are passed as props to the TabBar when we pass it as tabBarComponent to the createBottomTabNavigator (you can see it in the Usage section below). The navigation prop is the one that contains all the routes and information about the active route.
Here we get all the routes and the activeRouteIndex from navigation prop. So while mapping the routes, we check for the active route.
Now based on this, we can pass our animated variable to the transform property of the style attribute.
The animated variable is initialized inside the constructor using the Animated API and its value is controlled by the functions that I have covered in the Animations section.
Animations
All the animations that you see in the gifs in the Usage section below are implemented using the Animated API of React Native. At first, it was a bit tricky to understand but the process became quite simple once I got the idea.
You may have seen that the active icon is a bit larger than the inactive ones or you can say it is a bit zoomed in. This zooming effect is implemented using the react-native-pose module. It could have also been implemented using Animated API but I wanted to test out this module and it's pretty simple to use.
react-native-pose
This module can create an animated version of any component and has built-in support for View, Text, ScrollView, and Image elements of React Native.
We can pass a configuration object to the posed component according to our requirement. Here, I am scaling my component to a value of 1.4 times the original in case it is active.
And in the JSX you just need to wrap your component inside the newly created animated component -
So, if a particular route is active, the Scaler will pick up the active configuration defined earlier otherwise will pick the inactive one.
It can do almost everything that the Animated API of React Native does, and maybe in a much simpler way. I am yet to explore more about it and if you wish to try, then do refer to these docs first, just to get a better idea of what this library is all about.
Animated API
Other animations like rotating the icon, animating the tab bar horizontally etc. are implemented using the Animated API. Some of the functions used are -
Animated.sequence([ ]) - to perform animations in a sequence i.e one after the other
Animated.parallel([ ]) - to perform animations simultaneously
Animated.timing() - to perform an animation over a period of time as shown in the above code example
Animated.spring() - to perform a simple spring animation
These are some of the glimpses of how Animated API works. If you wish to explore more about this API, then you can refer to my dedicated blog about it and also the official docs.
Clean and Simple Usage
I have developed 5 types of navigation tabs and the cool thing is, that the user can switch from one type to another just by changing a prop in the implementation.
- Import the TabBar component from react-native-custom-navigations-tabs
This imported component needs to be passed to the tabBarComponent of the createBottomTabNavigator as shown in the example below -
Let’s see tabBarOptions{} for all types one by one -
Tab type - light

tabBarOptions{} -
Tab type - dark

tabBarOptions{} -
Tab type - colorFillTab

tabBarOptions{} -
NOTE: activeBackgroundColor is the background colour that each active tab takes. And in the case of colorFillTab, the keys should be the same as the labels of each screen/route with the first letter in CAPITAL.
tabBarBackgroundColor is the colour that the whole tab bar takes for e.g it is ‘#000000’ in case of ‘dark’ tab type and ‘#ffffff’ in case of ‘light’ tab type.
Tab type - bubbleTab

tabBarOptions{} -
Tab type - zoomInOut

tabBarOptions{} -
Important Links
Find react-native-custom-navigation-tabs on the following platforms -
The next step that I have in mind for this module is to add animations to the closing tab as the user moves on to the next one. This module will get timely updates making it more optimized and user friendly. Being an open-source module it is also open for contributions!
Looking forward to people trying and reviewing this module.
That’s all for today. See you in the next one!
Keep Learning!The Idea - React Native Custom Navigation Tabs

Developing a real-time secure chat application like WhatsApp & Signal with end-to-end encryption
Lately, there is a lot of fuss around end-to-end encrypted chat applications. WhatsApp and Signal are two messaging apps dominating the headlines, let's take a look at why - WhatsApp recently updated its privacy policy, stating that the messaging platform will share user data with other Facebook-owned and third-party apps. This has prompted several users to look for alternative platforms, top among them is Signal. Signal is essentially an encrypted messaging app. Messages sent through Signal are said to be encrypted, meaning the platform cannot access private messages or media, or store them on their server. This is called end-to-end encryption. End-to-End Encryption(E2EE) is the most important feature in real-time chat applications. Our article will cover:
- Real-time Systems
- Web Sockets
- End-to-end Encryption
- Comparison of messaging applications
But first, let’s look at what Real-time Systems mean?
A real-time system means sending and receiving of data instantly over a network among multiple clients. One may specify this as bi-directional flow. This enables users to make the right decisions at the right time. In simple systems, data transfer usually takes place through a request-response mechanism using a client-server architecture.
Let’s find out what can be a suitable mechanism for our application.
Use Case - Healthcare

Our application is based on conversations in a Healthcare system. These conversations take place between doctors and their respective patients. This means that the patients will only be able to see their doctor in the contact list and vice versa. Therefore the users are categorized on the server based on their ‘role’. Also, E2EE is needed here to keep a patient’s details/conversations secure and confidential.
Technology Stack
Client Application
- ReactJS for UI
- Axios Library for handling AJAX calls
- WebSocket library for real-time message exchange
- Signal Protocol for end-to-end encryption
- Tailwind CSS
Server Application
- NodeJS
- Express
- Mongoose for MongoDB integration
- TypeScript as the server-side language
- REST APIs
The Challenge - Making it real-time
For any app to feel real-time, the user needs to be kept updated with any activity happening as soon as possible. The challenge arises in selecting and implementing a suitable development technique. With the traditional request-response model, we have few options:
- Refresh Webpage
The user might refresh the web page time-to-time to check for message updates. But that is not an optimal solution. This may result in bad UX.
- HTTP protocol
The concept of HTTP request-response is widely used. But this requires establishing a TCP connection every time data is sent to the server. Being a one-way synchronous communication protocol, this may result in a lot of overheads while creating and destroying a TCP connection every time a message is sent in real-time chat applications.

- HTTP 1.1 Keep-Alive Protocol
This version of HTTP eliminates the need for opening a TCP connection for each HTTP request. This means that it helps in maintaining a persistent connection. But it still does not provide us with full-duplex communication as required in real-time applications.
- Short Polling
An AJAX based-timer! Means that the client sends HTTP requests time-to-time and the response is immediately given by the server. Although it is asynchronous, it uses a lot of resources, thus creating traffic. The resources are immediately released but cannot be used in heavy applications as in real-time.
- Long Polling
This involves less traffic as compared to short polling. Here, the responses are not immediate, but this makes the application hold the resources for some time, hence leaving the requests unresolved. Also, we have to perform re-authentication or re-authorization several times. Again, this is not a good option for real-time applications.
- Server-Sent Events
This is a mechanism used by the server to update the client whenever any event takes place. It is quite useful in real-time applications and it performs like a one-way publish-subscribe model. We want our application to perform bi-directional communication.

Source: Polling vs SSE
Web Sockets
This concept resolves most of the issues we just discussed. It implements instant two-way communication of messages with a persistent connection just as required for developing a real-time system. NodeJS offers several libraries to implement this technology. What we will be utilizing for our application is the Web Socket API with ‘WebSocket’ library.
- The WebSocket API
According to MDN, “The WebSocket API is an advanced technology that makes it possible to open a two-way interactive communication session between the user's browser and a server. With this API, you can send messages to a server and receive event-driven responses without having to poll the server for a reply”.
- The WebSocket Handshake
- It is the bridge between HTTP to Web Sockets protocol.
- The client usually initiates with a request.
- The server listens to the incoming socket connection and responds with a protocol Upgrade.
- The status code changes to 101, representing the switching of protocols, on the same TCP port number.
- The server keeps track of all the connected clients manually.
- The pings are the Heartbeat of web sockets, that are sent by either side, client or server, to verify if the connection persists between the two.

Step 2: Client Initiates request with “ws” protocol in URL

Properties of the WebSocket (ws) Object

Step 3: Server listens for TCP socket connection using ‘WebSocket’ library of NodeJS

Step 4: Status Code - 101 Switching Protocols; Check-in Network>>WS>>Headers
- Exchanging Messages
- The messages are exchanged in the form of data frames rather than a stream of data
- It is a bi-directional flow of data
- Messages are masked using XOR encryption
- The event listeners of the ws object are used for message exchange

Event Listeners of “ws” object at Client

Sending New Message to Server

Handling Web Sockets events at the Server

Exchanging Messages using Web Sockets; Check-in Network>>WS>>Messages

Fetching Chats from Local Storage using getItem()

Storing New/Updated Chats to LocalStorage using setItem() on websocket event ws.onMessage()

Storing Messages in LocalStorage of Web Browser for Each Client
- Closing the Connection
The closing handshake can take place either by the client or the server. Reconnection has to be done manually.

Real-Time Chat Application Architecture: High-Level Diagram using Web Sockets
- Steps 1 and 2: HTTP request-response for Login of Users
- Step 3: Verifying User from MongoDB
- Steps 4 and 5: Web Socket Handshake request-response to switch protocols
- Step 6: Bi-directional message exchange.
- Step 7: Storing and Fetching of Chats to/from LocalStorage
- Step 8: Web Socket connection closes from either client or server
End-to-end Encryption
Now that we have our messages transferring instantly from client to server and back, let’s discuss how we can make our data secure over the network. Various algorithms and protocols are working on the internet these days to make the exchange of confidential information secure. Messaging applications do implement encryption, but not each one of them makes the encryption end-to-end. This means that not even the server can decrypt our messages. But why do we need to make the application that secure?

Source: wikimedia.org
- Need for End to End Encryption
The answer is simple - to make the user’s private information hidden from any third party user. This may be the government, hackers or any other intelligence agency. The service provider may or may not allow third-parties like the government to access the data as in the case of any criminals or terrorist activities. But what if the servers get hacked? The information might then be in the wrong hands. In such cases, the users prefer to choose end-to-end encryption, where even the service provider cannot access decrypted data.
- Comparison of existing messaging applications
While many applications mention that they implement end-to-end encryption, only a few of them prove to do so. The very famous Telegram application provides an optional feature of Secret chats, using a protocol named “MTProto”.
While Whatsapp, Facebook and Signal Messenger use the Signal Protocol developed by the Open Whisper Systems, only the Signal Messenger proved to be the most secure application.
This is because it encrypts the metadata as well, and has also denied the intelligence agencies to provide them with any user’s information. Moreover, the protocol is available as open-source code to be used or cross-verified by other developers, which makes it the most trustworthy messaging application.

- Diffie-Hellman Key Exchange Algorithm
Today we will be discussing the Signal Protocol in detail. But before that, we need to be aware of the Diffie-Hellman key exchange mechanism. With simple encryption, the messages are usually encrypted only between the users and the server, making use of some cryptographic keys, hence making data vulnerable at the server. We want these keys only to exist between the users and not the server. But how is this possible? Suppose we have two Clients - Alice and Bob.
- Alice and Bob agree to use two common prime numbers (g & n) provided by the server.
- Now, these are combined using some mathematical calculations with the Private keys of Alice and Bob => a + g = ag and b + g = bg.
- We exchange these Ephemeral/Public Keys ag and bg via server.
- Combine the exchanged keys with the Private keys of Alice and Bob respectively to form a Shared Secret Key => ag+b = agb and bg+a = bga at both ends.
- Now the attacker might be aware of g, n, ag & bg as these are being shared publicly, but not a & b since these are private keys only available to Alice and Bob.
- It is too difficult for any intruder to split up the public components ag and bg.
- Any attacker can combine ag+bg = abgg (extra bit) - too hard to figure out.

Image Source: Diffie Hellman key exchange
This mechanism was developed by Whitfield Diffie andMartin Hellman to derive the cryptographic keys instead of exchanging them completely in public. It is explained using colors since it is not possible to separate colours once mixed. Similarly, it is hard to figure out the secret keys using the only public components, once combined mathematically with the prime numbers provided by the server.
- Problems with Diffie-Hellman Key Exchange
Although the mechanism provides us with a secure way to create cryptographic keys as end-to-end, it does not authorise the users. Hence, we might have some third party pretending to be the intended recipient and he/she will be able to access or modify the messages, by creating another pair of shared secret keys with Alice and Bob respectively. This is usually known as a Man-in-the-middle attack.
To perform authentication, this algorithm is integrated with other algorithms that provide authentication (ECDH) or derived multiple times mathematically (X3DH). That is when RSA came to rescue. The sender not only performs Diffie-Hellman but also shares his/her signature to ensure that only he/she has sent that message.

Source: audible.in
Here is an example of the audible website, where you may see that the security protocols being used are TLS 1.2, ECDHE_RSA, AES, and not DH alone. This is how TLS, VPNs, and HTTP work. However, this algorithm was very slow and didn’t provide perfect forward secrecy. Wait, what is Forward Secrecy now?
- Extended Triple Diffie-Hellman (X3DH)
So we are discussing here X3DH key agreement protocol in detail as it is being used in the Signal Protocol. This is useful in asynchronous communication as well as authentication. For example, Bob has published some information for Alice, but she is currently offline, then the server might temporarily hold the data or send a notification to Alice.
- The Identity keys help in identifying where the message came from.
- The Signed keys verify that only the user can control his/her respective identity key.
- The One-time prekeys make sure that no one can replay-attack the user by sending the whole conversation again later. These are deleted post X3DH.
This algorithm makes use of public components of identity keys (IK), ephemeral key (EK), signed prekey (SPK), and one-time prekey (OPK). The private components are stored at the respective user devices for computation and not shared.

- Bob’s device generates IKB, SPKB, and a set of OPKB for its connections on App Installation (Login in our case of Web Browser).
- The public components of these keys are then sent to the Signal Server and stored temporarily (Local Storage in our case) as a Prekey bundle.
- When Alice installs the app (login in our case), she asks the server/local storage for their prekey bundle of Bob.
- She then performs Diffie-Hellman using the public components of her IKA and EKA (one-use session key) on her device.
- Similarly, Bob performs steps 3 and 4 at his end.
The algorithm performs Diffie-Hellman four times, ensuring mutual authentication (DH1 & DH2) and Forward Secrecy (DH3 & DH4), using a Key Derivation Function or KDF which is quite similar to a hash function.
This produces one master secret key, SK = KDF(DH1 || DH2 || DH3 || DH4) at the client’s respective devices, that can now be used by Alice and Bob to encrypt and decrypt the messages. To prevent man-in-the-middle attack, the Identity public keys are mathematically combined into a Safety Number using a hash function, which only the sender and receiver will have at their respective ends. This can be in the form of a QR code or fingerprint scan.
Still, wondering what Forward Secrecy is? This ensures that future messages shall not be accessed by any third party even when he/she gets access to the public keys. We will discuss this in more detail in the next algorithm.
- Double Ratchet Mechanism
WHY DOUBLE RATCHET? We got end-to-end encryption using X3DH, we also achieved forward secrecy and mutual authentication in asynchronous communication. Now, why does the Signal protocol still need another algorithm? When a user is offline, it gives an attacker a lot of time to find and use public keys available at the server. Since the key is always the same for a long period, it makes the messages vulnerable. You need to update the keys regularly! In messaging applications like Signal and Whatsapp, these keys are updated for every message. For implementing this, the Double Ratchet algorithm came into play.
A ratchet function is a function that can turn one way only, i.e. it cannot move backward. What we will be using here is called a KDF Ratchet, since you cannot go back to figure out what the key was. This function works as follows-
- A KDF key and some input data are taken as input to the KDF Ratchet function.
- This function generates an output key for data and another key for the next KDF Ratchet as input.
- This creates a KDF chain, as presented in the diagram below, with three inputs being processed and producing three output keys.

Source: Signal - Double Ratchet
If the attacker gets one key, he/she will not be able to undo the operation performed by KDF Ratchet to figure out the input data, but he/she will only be able to access future messages. That’s a huge problem.
To ensure future secrecy, we use a Diffie-Hellman Ratchet with the KDF Ratchet function of Alice and Bob, forming a Double Ratchet. In such a session, we have three chains on both ends, i.e. a Root chain, Sending chain, and Receiving chain.
The sending chain of Alice is synchronized with the receiving chain of Bob and vice versa. These start at the same time. In case of any asynchronous event like non-receival of messages or delay or misuse of keys, the receiver keeps a check on the key which is not deleted until all messages are received.
Steps for Double Ratchet mechanism -
- Alice sends a message to Bob by encrypting it using an output key A1 from her sending chain.
- Bob’s receiving chain decrypts this message using A1 and then deletes it later.
- Steps 1 and 2 repeats when Bob sends a message to Alice.
The Diffie-Hellman parameters manipulate the KDF chain to reset the sending and receiving chains of both Alice and Bob by updating their starting positions and making them synchronous again. If someone cracked a key, we can re-establish the secrecy from then on. For example, Bob can send DH public-key (dh2) to Alice’s DH ratchet that will reset the sending and receiving chains on both ends. Moreover, as soon as you decrypt a message using the key, you delete it immediately and carefully. Hence the end-points are also safe from future attacks.
Cryptographic Properties as a result of the Double Ratchet Mechanism -
- Forward Security
- Self-healing due to Diffie-Hellman
- Break-in Recovery
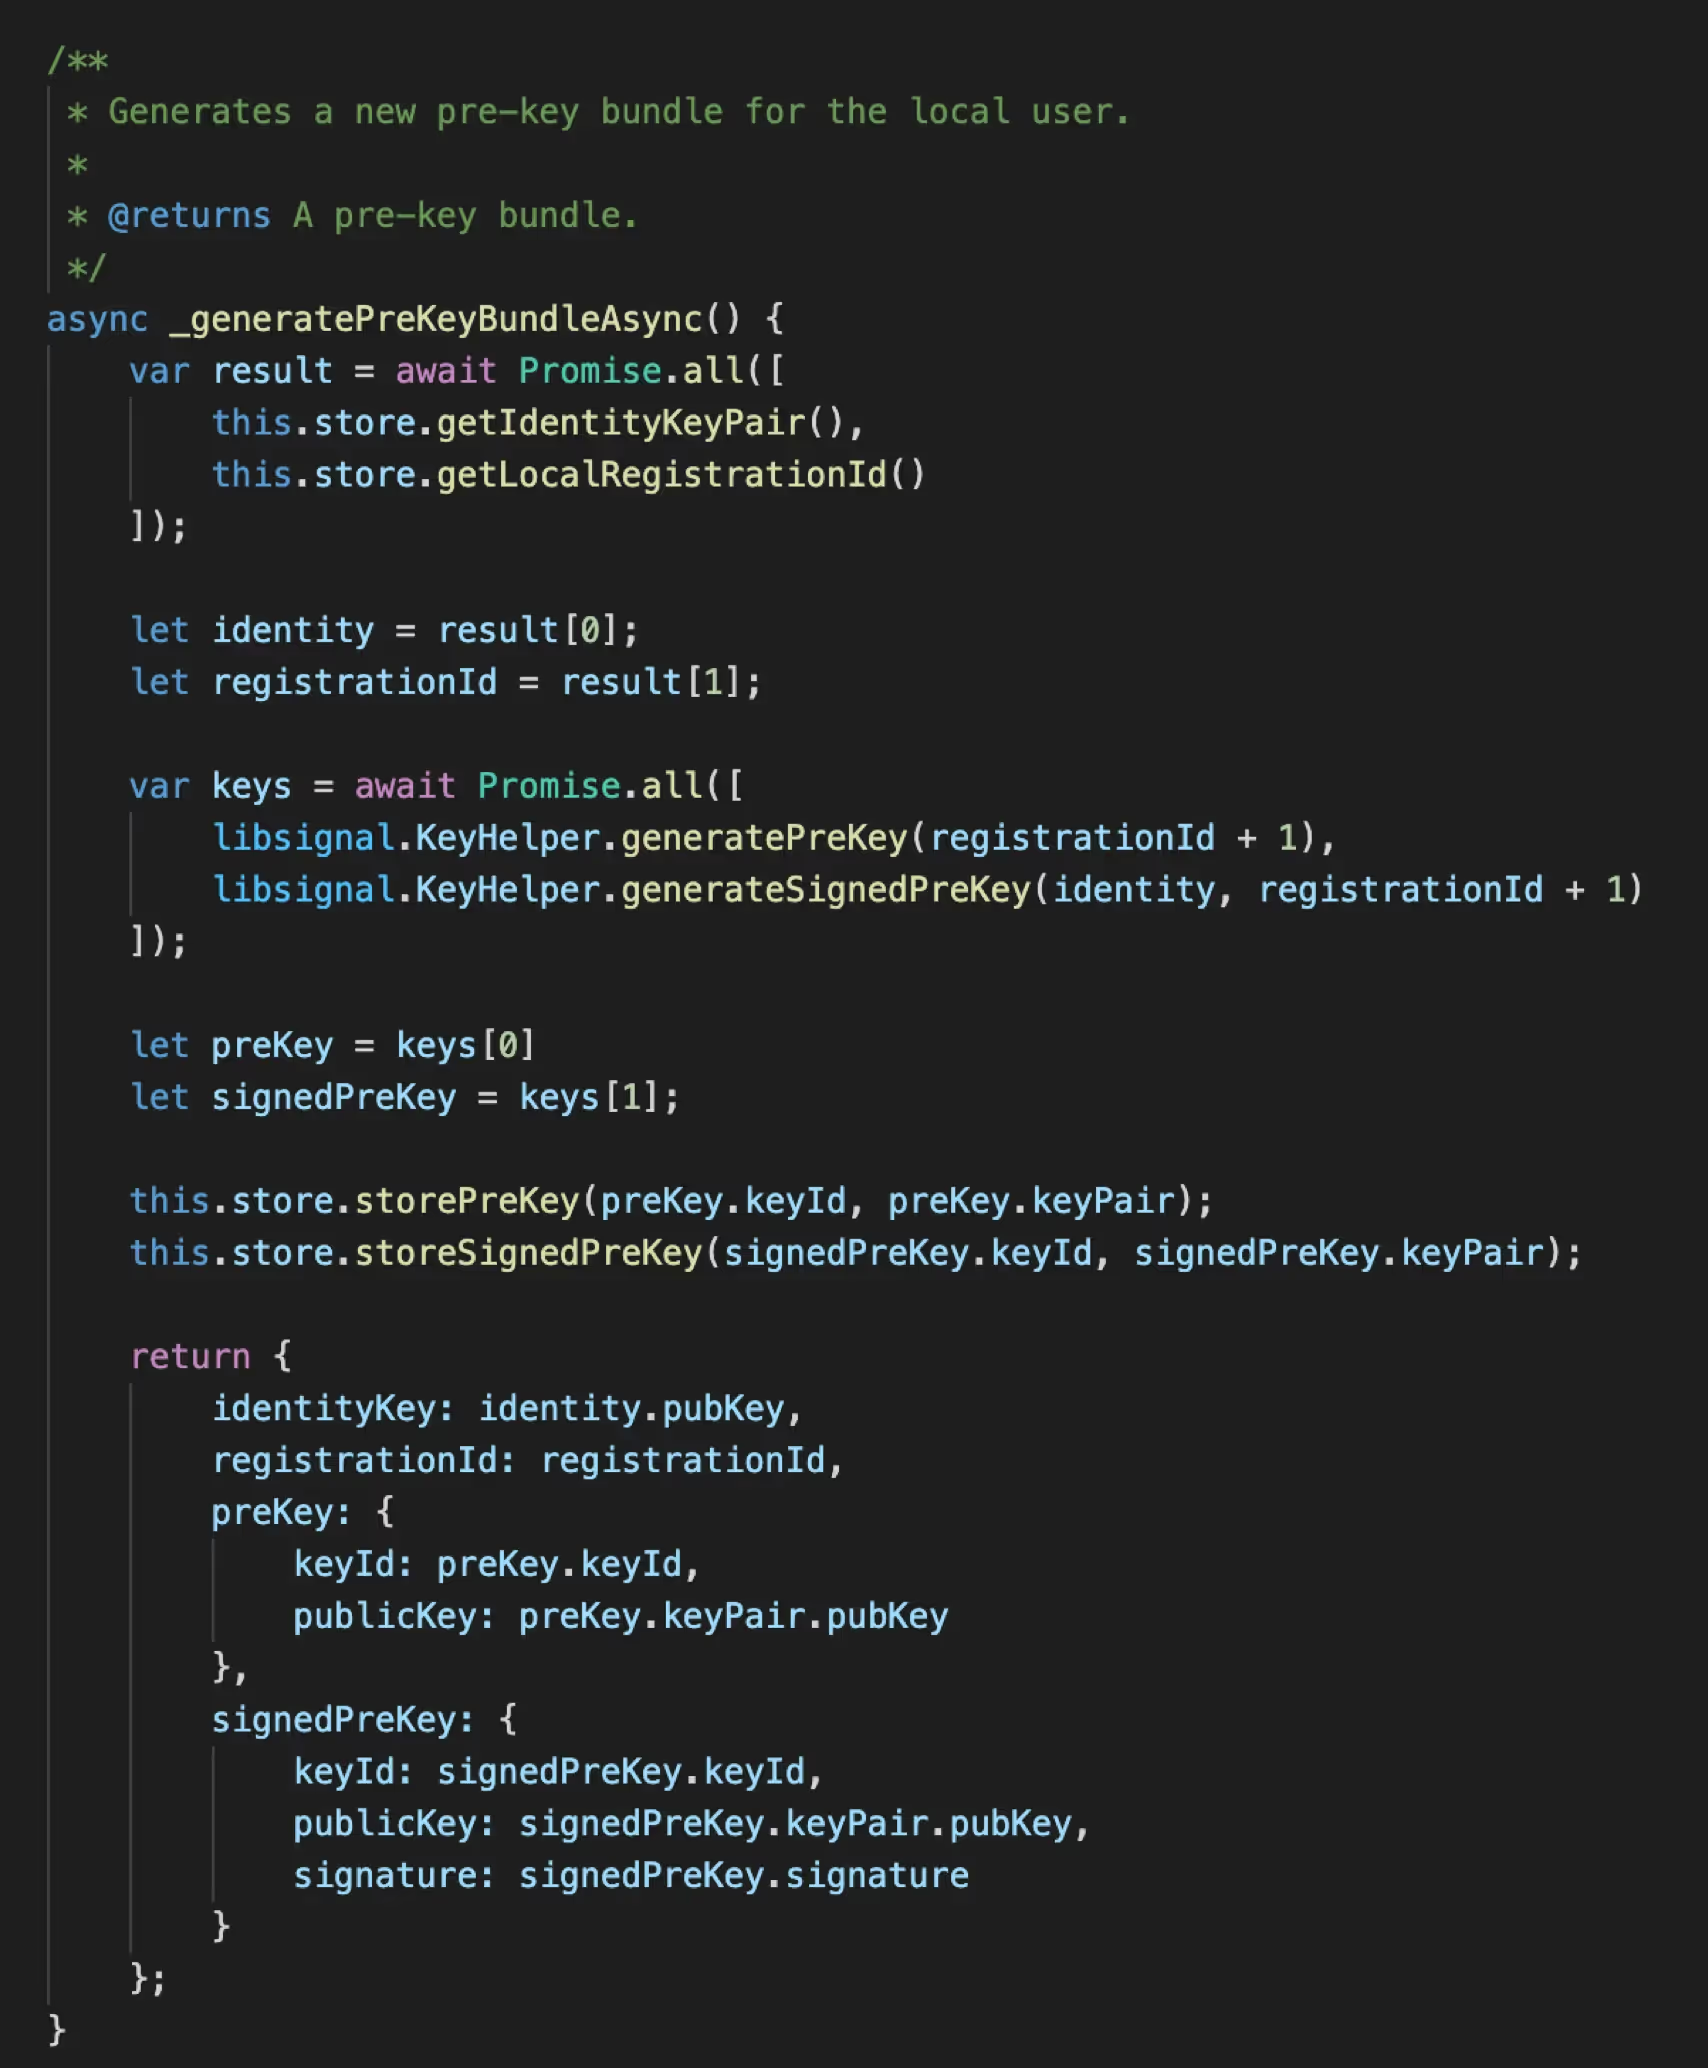
- Setting up the Signal Gateway at Client using the Open Source libsignal-protocol-javascript

Step 1: Add File libsignal-protocol.js to Client
Note: The libsignal-protocol.js is open source, taken from the link mentioned above. It includes all the algorithms which we discussed till now i.e. X3DH and Double Ratchet. These are implemented in the Signal Protocol for the Signal Messenger application for mobile and desktop. And, we will implement this in our Web Browser using LocalStorage.
Initialisation
- Generate Identity Key & Registration ID for each User
- Store these to Signal Protocol Store (SSS) - InMemorySignalProtocolStore.js from Github
- Generate Pre-key & Signed Pre-key using the Identity Key & Registration ID from SPS
- Store these to SPS
- Register as New PreKey bundle to Signal Server Store (SSS) - for each User

Step 2: Create a file SignalGateway.js and initialize a manager for each User

Generate Identity Key & Registration ID for each User
Generate Prekey Bundle on Login (actually done on Application installation)

Storing the New prekey bundle to LocalStorage using setItem()
Note:The utilities are taken from helpers.js of Signal Protocol. Need to convert data format because the keys are stored and processed in the form of Array Buffer in the Signal Protocol.

Initialization of Signal Server Store and Signal Protocol Manager takes place from App.js with the LoggedIn User ID, Name and respective Prekey bundle as parameters

Stored Prekey bundle to LocalStorage of Web Browser for each user (actually stored temporarily at Signal Server using a secure TLS connection)
Encryption
- Load Session Cipher from SPS using Recipient ID
- If no session exists then create a new one using Device ID & the Pre-key bundle from SSS (based on Identity key) & then Store Session to SPS
- Encrypt the Message for the particular Session and Return it as Ciphertext

Calling encryptMessageAsync() of SignalGateway.js from chatWindow.js before sending data to Server

Step 3: Encrypting Messages in SignalGateway.js using the methods of libsignal-protocol.js and InMemoryProtocolStore.js
Fetching Prekey bundle from LocalStorage of Browser using getItem() for Encryption and Decryption
Decryption
- Load Session Cipher from SPS using Sender ID.
- If a session does not exist, decrypt a PreKeyWhisperMessage by first establishing a new session & store to SPS.
- Decrypt a decryptWhisperMessage for existing Session and return the message as Plaintext.

Step 4: Decrypting Messages in SignalGateway.js using the built-in methods of libsignal-protocol.js and InMemoryProtocolStore.js

Calling decryptMessageAsync() of SignalGateway.js from chatWindow.js on “onMessage” event of ws

Asymmetric Encryption Architecture - High-Level Diagram with Integration of the Signal Protocol
- Steps 1-9: These are the same as we discussed during the Web Socket setup.
- Step 3: Additional Step, storing and fetching prekey bundle to/from LocalStorage on user login.
- Integration of Signal Protocol is depicted in the Low-Level diagram mentioned below.

Calling Login API

API to fetch LoggedIn user

User Controller method to fetch LoggedIn user on API call

Calling getContacts API

API to fetch all Contact except the logged-in user with the given role

User Controller method to fetch All contacts from Database

Architecture: Low-Level Diagram of Client (Web Browser)
- Initialize Signal Server Store before login.
- On user Login, Axios calls are made to verify if the user exists, returning Users details as an object.
- The Signal Protocol Manager is then initialized for each logged-in user, at App.js.
- After login, the Chat Window appears, with two sub-components, Contact List and Message Box.
- The Chat Window makes an Axios call to the server, to fetch all contacts except the logged-in one and which are not equal to the role of the logged-in user.
- It then displays the contacts in the Contact List component.
- A user can select a contact to Chat with; then the selected user Id is sent to the chat window to display its messages (if any) in the message box component, and for further communication.
- When a user hits enter to send a message, it is first encrypted using Signal, and then sent to the server using Web Socket.
- On receiving a message, it is checked by the client if it is its message. If no then it is sent to Signal for decryption, else the last message is used.
- The chats in the message box (decrypted) and local storage (encrypted) are updated with new messages.
Limitations in the Current Approach
- There is no reconnect mechanism available in Web Sockets.
- Load Balancing is hard to implement with Web Sockets.
- When it comes to voice/video calls or live streaming, even one-second delay can be an issue using Web sockets for real-time.
- Signal Protocol is not widely used or known.
- E2EE can only be implemented in Mobile and Desktop Applications and not in Web Browsers.
- E2EE messages cannot be permanently stored on the Cloud or the Server.
- The browser is not a trusted client.
- In the case of using web browsers, users might switch to another device. Storing of private keys and messages locally is not feasible in this case.
- Secure private key distribution among a user’s multiple devices is not a good option.
- User may or may not be the owner of the device being used. Issue when using Device Id in the signal.
- Signal Registration process - not logged in.
- We need Chat APIs to store encrypted messages at the Server (temporarily) using MongoDB.
- We also need to store Signal Pre-key Bundle at the Signal Server.
- Cannot Decrypt our message, therefore need to store and update a temporary lastMessage variable every time a message is sent.

Proposed Architecture: High-Level Diagram - Client & Server
- Temporary chats can be stored at the main server database in case of asynchronous messaging.
- We can create a separate server for Web socket functionality called “Push Server” that will send all the messages to clients as Server-Sent Events.
- A separate Signal Server can be created for storing prekey bundles temporarily for the users who have installed the application.
- The transfer of the prekey bundle from the Application to the Signal Server and back can be securely done using TLS.
- Load balancing can be implemented as well.

Example: Signal Messenger Architecture
Watch my session on Developing a real-time secure chat application with NodeJS -
Conclusion & Future Work
We discussed the importance of Web Sockets technology and end-to-end Encryption, and how these are implemented to develop a real-time secure chat application. The signal protocol being the more secure and trustworthy protocol provides its code as open source. We also used REST APIs for login operations and to fetch contacts based on role. We implemented the WebSocket library, one of the many libraries available for implementing Web Sockets API in NodeJS.
However, much more features can be added to our simple chat application. Such as group messages, online-offline features, guaranteed message delivery, temporary message storage at a separate server, load balancing, and much more that we discussed with the proposed architecture. Firebase can also be used for building a real-time chat application, which internally uses the concept of Web sockets.

Resources
- Websockets API
- WebSocket-Node Github
- Signal Protocol in Javascript Github
- X3DH in Signal
- Double Ratchet in Signal
- Sesame Algorithm in Signal
- Telegram Secret Chats
- Comparison of Chat Applications in Terms of Security and Privacy
- Source Code for Current Application
- NodeJS - Backend - Server
- React- Frontend - Client
- White-papers
- Wire Security Whitepaper
- WhatsApp Security Whitepaper
- Zoom E2E Whitepaper
- NodeJS Web Socket libraries
- LocalStorage MDN
- Compromises with end-to-end-encryption in JS web apps
- In depth tutorials for related content

Getting Started with React Native's Animated API
With the changing technological environment and user expectations, the urge to explore and create has grown now more than ever. Animations have come a long way since their inception. Moreover, they feel pleasant to the eyes and give a better user experience. This blog is an attempt to get a basic idea about the working of React Native Animated API. The core idea is to understand how to initialize an animated variable, pass it on to the element and handle it via functions and interpolation.
Getting Started
Following are the things that we will be looking at:
- Animated API methods
- Animated.spring()
- Animated.timing()
- Animated.decay()
- Animated.sequence() and Animated.parallel()
- Interpolating values
Animated API methods
Animated API provides many methods which enable us to perform animations according to our need. Today we will be looking at 5 main methods which are quite popular and commonly used -
1. Animated.spring()
This method performs a basic spring animation
Initializing an animated variable
Initialize the variable in the constructor
Here, the default value given to springVariable is 1 because at the start the default size of the element will be displayed. So, it depends on what kind of animation you want and according to that, you can assign the default value to the variable.
Defining animation handler
In the above function, we need to first reset the value of our variable to the initial value. This enables us to perform animation again and again. If you miss this step then the animation will happen only once as for the second time, the value of animatedValue will be 1 already.
Now, if you look inside Animated.spring(value, config), config is an object which has the following properties:
- toValue - scales the element to the given value.
- friction - it controls the bounciness of the element.
- useNativeDriver - native driver helps us to perform animations on a dedicated UI thread as it sends everything about the animation to native before starting the animation and hence blocking the JS thread doesn’t affect the animation. This helps in making the animations smoother. It is recommended to use it.
Several other properties can be used with spring animation like speed, stiffness, tension, etc. But you can use only one of the similar kinds at a particular time.
You can explore more about spring animation here.
Defining an animated component
Simple native elements don't support animations. We need to define animated components using Animated API to add animations to them. createAnimatedComponent() can be used to make any component animatable. Components like Animated.View, Animated.Text, Animated.Image, etc. are provided out of the box by Animated API and can be used on the go.
Here, an Animated.View component is used and the animated variable is passed on to the transform property of the style attribute. And we are calling our animation handler on click of the button. It is recommended to read a bit about transform property before working on animations as most of the animated variables will be passed on to it.
The output that we will see on DOM will be:

Use Cases
- Can be used to animate the user logo while entering into user setting in the app header.

- Can be used to animate the app's background image on the first load.
2. Animated.timing()
It animates the value over a given period from one value to another. It also uses the Easing module which provides several predefined animation curves which one can use in animation.
Initializing an animated variable
It is the same as Animated.spring() and you can initialize it with default value 0/1 according to the need.
Defining animation handler
It is a bit different from Animated.spring() animation handler. The difference in the config object is as follows:
- duration - defines the duration of the animation in ms.
- easing - this property implements basic easing functions. It conveys the nature of animation. You can read more about it in the official docs.
You can explore other config properties and more about Animated.timing() here.
Defining an animation component
The animation component for this animation is the same as the spring animation.
The output that we will see on DOM will be:

Use Cases
This animation method can be used in a multitude of ways according to the need.
- We can handle the opacity of an element throughout the animation curve.
- We can scale an element to different sizes and with different effects using Easing property.
- Use in combination with other animation methods to add that extra layer of effect to the element.
3. Animated.decay()
It animates a value from a particular velocity to zero i.e the animation gradually comes to halt over a while.
Initializing an animated variable
Like the previous animations, you can initialize the variable with 0/1 according to need. Here, I am initializing it with a value of -200.
This is the value that I will be using for the y position of the element. So initially it is set at -200.
Defining an animation handler
The handler is a bit different from the previous ones. Following are the new properties of the config object:
- velocity - it determines the velocity with which the animation will start.
- deceleration - it determines the deceleration with which the animation will come to a halt.
You can explore other config properties and more about animated.decay() in the official docs.
Defining an animation component
I am using the animated value to move the element along the y-axis that’s why I have used transform: [{ translateY: this.animatedValue }] in the style attribute.
The output that we will see on DOM will be:

As you can see, the animation starts with a certain velocity and decelerates along the way to finally come to a halt.
Use Cases
- We can use this animation method to animate screen text content like moving it from left to right or vice-versa as soon as that particular screen comes into focus during scrolling.
- This animation method can also be used while rendering a list. We can animate the list items by moving them from the bottom of the screen to their actual position on the screen.
- You can get an idea of this type of animation by looking at this website’s landing page.
4. Animated.sequence() and Animated.parallel()
These methods enable us to perform animations in combination with one another. As the name suggests, sequence enables us to perform animations one after the other and in the parallel method, animations run parallel to each other.
Let’s look at a sequence method example:
Defining an animation handler
We have defined timing and a spring animation method inside the sequence method. Firstly, the timing one will be executed and it will be followed by the spring.
Animation Component
Animation component is the same as used in the timing and spring animation.
We will look at an example for the Animated.sequence() method:

I hope you have got an idea of how to run a combination of animations, now try and implement the parallel method on your own. The process is the same as the sequence method.
Apart from sequence and parallel methods, there are other methods as well that let you execute animations in combination. You can explore about them in the official docs under Composing animations.
You can also combine animated values via simple arithmetic operations like addition, subtraction, multiplication etc. You can read more about it in official docs.
Interpolating values
Interpolation means we can derive a particular animation behaviour throughout the animation cycle. We provide an input range of animation cycle completion instances and according to that, we derive an output range of animation behaviour like how the animation should behave at the different instant of the animation curve.
Interpolation is an addition to the already implemented animation method like timing, spring etc. To interpolate an animated variable, we need to declare another variable that will provide us with the interpolated value derived from the input and output range discussed above.
Let’s understand this with an example:
The process is the same as for any other animation method with an extra step added for the interpolation:
Declaring an animated value (as done above in all animation types)
Defining an animation handler
We will use the timing method for this example. I have provided the duration of 400ms for the completion of the animation.
Interpolating the animated value
I have defined interpolatedValue (can be defined inside the render method) which interpolates animatedValue over an input range of the animation curve. Here what it means is, the element to which this interpolatedValue is passed should be at 0 degrees rotation at the beginning of the animation and should rotate to 90 degrees when half of the animation is completed (i.e at 200ms) as we are mapping 90deg with the 0.5 entry of the input range and when the animation is completed (i.e at 400ms) the element should rotate back to 0 degrees. We can provide any number of instances for the input range and accordingly define the output range.
NOTE: The number of input and output entries should be the same and unlike the output range, the input range should always be progressive and can’t go backwards.
Defining an animated component
We pass the interpolatedValue to the rotate property as shown.
Output on DOM:

Use Cases
- This can be used to execute a particular type of behaviour at a particular instant during the animation.
- For e.g, if one needs to execute a particular behaviour say when the 70% of the animation is completed then he/she can provide 0.7 as an entry in the input range and the corresponding value as an entry in the output range and will get the desired result.
This brings us to the end of this blog. This was a simple walkthrough of some of the most common animation methods of the Animated API. There are many other animations and gestures that you can implement using this API.
Check out the Github repo to try these animations yourself.
Keep Learning!
.avif "Modularizing your GraphQL schema code")
Modularizing your GraphQL schema code
As your GraphQL application grows from a demo to an actual application, the complexity of your schema will grow. And it is very difficult to organize the schema in one file. So, to organize your code and schema, you’ll want to split up your schema into multiple files - Modularizing your GraphQL schema code.
Schema
Let’s take a schema example:
Suppose we have a schema of the employee and designation. If the schema is not modularized then it will look complex in a single file:
Here we can see that to identify the schema of a particular collection is difficult, also if the schema increases then the complexity also increases.
Ideally, instead of having everything in one schema definition string, we’d like to place the schema types for Employee and Designation in separate files called employee.ts and designation.ts.
The schema definitions we’ve written are just Strings. In this way, we have a simple way of importing type definitions across different files. Splitting up the string into multiple strings that we can combine later.
employee.ts
designation.ts
schema.ts
Finally, we pull it all together in one file schema.ts
And in the same file, we can build schema like below:
So it is very easy to maintain a schema, and if you want to add a new field or new type in the existing schema, it is very easy.
Conclusion
In this post, we present a straightforward method for modularizing the schema’s built. We can arrange our schema and resolver code in separate files and with just a few simple JavaScript concepts we can build the final schema.
Find the code sample here: graphql-schema-modularize

Handling GraphQL Errors with Status Code
Any application, from simple to complex, can have errors. It is important to handle these errors and report these errors back to your users for information.
The question is - How do we handle errors in GraphQL? How can we do it in a way that’s easy to understand?
Let’s start by running a simple GraphQL query:

Here we can see, we get an error, this error can be found in the errors array.
This is how errors can be found in a GraphQL response. But the error is not very clear and meaningful. Here are some problems with such error representations:
- All errors are treated the same
- It’s difficult to know where the error came from
- It’s tough for the user to understand what exactly the errors talk about
Let’s see how to handle errors with a status code
For this, you need to add customFormatErrorFn that will handle all the errors thrown from your queries and mutations. Let’s see the steps for creating our error response.
How to do it!
- Create a constants file with the error name and the error type: errorConstant.ts

- We will need a function that will search on errorType for the properties of the error, we can create a new file or set it in index.ts file

- When you resolve a query or mutation, and an error occurs, you might throw the error message with the constant that you define in errorConstant.ts file.

- And finally, we update index.js so we can return our custom error. We‘ll add customFormatErrorFn in graphqlExpress when initializing GraphQL within Express.

Let’s see the final error output after implementation:

Here we see the error has the properties message and statusCode also we can add extra values to the error message in resolver.
Conclusion
GraphQL does not describe errors in error handling. It’s up to you to decide what describes your errors.
Click here for the code link gqlErrorHandling

A Guide to React Unit Testing
Today testing has become a crucial part of the application development process. It should pass with all the verifications and validations on every step. Let’s take a look at how Unit Testing is performed on React applications.
What is Unit testing?
Unit testing essentially means that individual modules are tested in isolation. Testing every unit to make sure it works properly without having any dependency. Unit testing is performed to validate if each unit is working as expected and is often done by programmers.
Testing may seem a redundant and time-consuming task but once you start with a test-driven development you will know how important it is for any project to have an error-free and tested code with all possible test cases that it may fail at. We will discuss the importance of testing with some practical examples below.
Let's take a look at the tools widely used for testing React applications:
Jest
Jest is a test runner that will run all your test suite and test cases. Jest is introduced mainly for testing javascript and react applications. We need to call jest from the command line to run our tests cases. We can also have additional configurations to jest for custom setup.
Installation
Jest provides a configuration file to mention your additional configurations. We can provide the file path in our package, JSON file like:
For more details about jest please refer to the official documentation here https://jestjs.io/docs/en/getting-started.
Let us create a jest.config.json file in our root folder and add this script in your package.json file to run tests:
And you have set up a jest environment for your React application!
Enzyme
The enzyme is a library that is used in many full testing libraries along with jest. It is specifically used to render the components and traverse the DOM.
If you are building a React application then jest and enzyme is the best combination for testing React applications. Remember that jest is a test-runner for running our test cases with the assertions whereas the enzyme is a library used along with jest, that provides different rendering techniques like (shallow, mount etc.) for our React component and DOM traverses the rendered output.
Let’s look at the enzyme setup:
Installation
Enzymes provide adapters to work well with different React versions. So let’s install the adapter depending on our React version. Here we are installing React16.
Now we need to set up our enzyme with the adapter we have installed in our jest testing environment. So, let’s create jest.setup.js and add the following code in the file:
Now add this setup file path to our jest.config.json file:
And that’s it! You have set up an enzyme in your jest environment.
It's very important to decide what is necessary to test and what should be omitted from testing.
So, that a lot of unnecessary tests and snapshot files are not left behind, considering the next person who will manage those test cases after you.
For Unit testing each component I will suggest to always start with the smaller and stateless components and then move to complex components. So that if a complex React component involves another smaller already tested component, making the process easier.
However, in a test-driven development (TDD) process you should decide and write the test case first which will fail initially and then eventually develop your functionality considering which test cases to pass. This gives a more clear picture of what you want to achieve and all possible cases where this functionality may fail.
Consider a small example to understand:
1.
2.
- A DisplayName component which receives a name property as props and renders it.
- A User component having a text input as name property validates the user name for its type and sets the error if it finds any.
Note that we have exported the two components and the validation function which we are going to use in our further tests.
Unit Testing the above example
There can be two main approaches to test our React components which are:
- Snapshot testing
- Logical/functional testing
1. Snapshot Testing
Snapshot Test generates a snapshot of your component in the current state when you run the test and stores it in a folder named “__snapshots__”.
So, next time when we change the component or modify it and run the test again; if it fails, a new snapshot is taken which clearly shows the difference between both the snapshots rendered with the output of the same component. In the case, if a test fails you can either accept the change or deny and modify your component accordingly.
How Snapshot Testing is done?
First, we need to install react-test-renderer utility to render the component in our test.
Let’s implement our first snapshot test by writing the below test case in a file UserName.spec.js:
At first, we rendered the component DisplayName, transformed it into a JSON and checked if it matches with the previous snapshot taken. Let’s run the test by the command “npm run test” on cmd and see.
If you run the test for the first time, it will generate the snapshot of components output and store it in the folder “__snapshots__”. You can take a look at the kind of structure it stores.
Now, let's change our DisplayName component and run the test again:

You can see it shows the change in our component and the test fails as it does not match with our previous snapshot. It indicates that either it found a bug in the component to fix or there is an implementation change and you just need to update the snapshots. You can update snapshots using the “-u” option. Similarly, we can also add a snapshot test for our parent component as well.
2. Logical/Functional Testing
For testing, validation functionality lets add some more tests in our code.
Here we have added two test cases :
- Checks if an error message has been set if the user passes a number input for his name.
- Checks if it resets the error message to false if the input box is empty for the name property.
So this covers the possible outcomes where our application may crash in logic that we might have forgotten to handle at the time of development.
Now if we run the tests, should see the following output.
If the validation is incorrect, running tests will inform you, else all the tests will pass. Keeping your logic separate helps a lot in complex code so that it can be tested in all possible cases and also looks more clean way to understand the code.
What did we learn?
- To implement testing, code needs to be less dependent, leading to more modularized and reusable code.
- Having good tests help to verify the changes by failed test cases on every run
- Faster development - HOW?
1. Before moving to code, we first write the tests while considering all possibilities that code may fail at. Which helps us at writing more effective and error-free code.
2. Without tests, we do developer testing as having consoles, breakpoints, debuggers and having a GUI to see where code fails.
3. Unit tests are less costly than developer tests.
4. Before starting development we will be clear about our code requirements through tests which increase our speed while writing the logic rather than finding bugs one by one and then fixing them.

How to use GraphQL Custom Scalar Types in schema design.
The GraphQL schema is the core component of every GraphQL server. It allows us to define object fields and types that represent the data that can be retrieved from the API.
GraphQL Custom Scalar Types
When designing a GraphQL schema using the buildSchema function, we must specify scalar types for each query value. GraphQL supports some predefined scalar types, including Boolean, ID, Int, Float, and String, which can be directly used in the schema.
However, there are common scenarios where we want to use custom scalar types such as DateTime, JSON, or Object. In this post, we will explore how to use these custom scalars in schema design.
To define a custom scalar, simply add it to the schema string using the following notation:
Schema:
Let’s take a look at some scalar types:
DateTime
As mentioned above, there is no DateTime scalar type. Therefore, to build a schema for the DateTime type, we have to use the scalar type String. Let's take a look at the example:
Schema:
When attempting to retrieve data in GraphQL Playground using a simple query, the response will be similar to the following:

The timestamp in the given string represents the number of milliseconds since the epoch (01/01/1970). However, this does not indicate that the returned string is any ordinary string. It is actually an ISO string that represents a date/time value.
We prefer using the ISO format because it is a standard format that is more human-readable. To declare and use a custom scalar type called DateTime, follow the schema given below:
Schema:
The schema in the playground appears as follows:

By doing this, we clarify that the createdAt variable is of type DateTime.
With this information, we can now send a query:

This indicates that the GraphQL response includes an ISO string date.
Object / JSON
In certain queries or mutations, the output is unknown.
For example, when using the aggregation query in GraphQL, the response is not fixed and varies depending on the query, making it difficult to define the schema. Similarly, when updating or deleting a record, the response may be as follows:
To achieve this scenario, we need to define a schema.
Schema:
Here we can see that we need to define the schema for the result type and userInput input, but doing so can be redundant and impractical in many cases. Additionally, what if the response is dynamic, such as in aggregations?
To address these issues, we can use a custom scalar for Object or JSON.
- Object
Schema:


- JSON
Schema:

Custom scalars are a powerful tool in a GraphQL server schema that provides a more meaningful representation of its response while avoiding redundancy in the schema definition. They are essential when the built-in scalar types provided by GraphQL are not sufficient, such as when working with dates and times, or JSON data. With custom scalars, complex data structures can be represented in a way that is easy to understand and work with. To learn more about GraphQL, visit the GraphQL website.
If you have any questions about using custom scalars, GraphQL, or anything in general, reach out to us at business@qed42.com.

Improve performance of media-heavy React applications using Intersection Observer API.
Modern web applications use a lot of animations and media ranging from images, gif, videos to SVG’s to make user experience elegant and engaging. If not handled properly, it can hamper your website’s performance, and these things might not work in your favour. To overcome this issue of over-fetching resources, we need to handle the media on our website more sincerely and display them only when necessary, the jargon for which is lazy loading.
IntersectionObserver API
IntersectionObserver provides a way to asynchronously observe changes in the intersection of a target element with a wrapper element or with a top-level document's viewport.
Earlier, detecting visibility of an element, or the relative visibility of two elements with each other, was a difficult task and one would need event handlers and loops calling methods like Element.getBoundingClientRect().
The IntersectionObserver API provides a callback function that is executed whenever the element we wish to monitor enters or exits another element or the viewport.
Let’s test this thing out.
We will be using React for building the UI; however, the implementation is not React specific.
We will start by creating an IntersectionObserver by calling its constructor.
The constructor requires two arguments:
- callback function
- options
The options argument is an object with values as given below:


The fields of options object are as follows:
- root: The element that is used as the viewport for checking the visibility of the target. If the value is provided as null or not specified, then it will take the browser’s viewport.
- rootMargin: This set of values serves to grow or shrink each side of the root element's bounding box before computing intersections. It accepts values in a similar fashion as CSS e.g. "5px 10px 5px 10px".
- threshold: Either a single number or an array of numbers which indicate at what percentage of the target's visibility, the observer's callback should be executed. Its value ranges from 0 to 1.0, where 0 symbolises that one pixel is visible and 1.0 means every pixel is visible in the viewport.
Now we will select all target elements and observe them.


The next step is to define our callback function.
Whenever the target meets a threshold specified for the IntersectionObserver, the callback is invoked. The callback receives a list of IntersectionObserverEntry objects and the observer:

We will check if the entry(element) is intersecting and then we will replace the data-src attribute’s value with our <img /> tag’s source value.
The next step is to create our UI, which is built in React.

Here is how it will behave, and the images/videos will only be fetched when an element is in the viewport.

The above method we discussed is straightforward and can be implemented at any point in time in your project. Just a few lines of code and you have stopped over-fetching of resources.
I hope this blog was helpful in understanding how to improve the performance of media-heavy React applications using Intersection Observer pattern. If you'd like to improve your application's performance, reach out to business@qed42.com for a free consultation.

Context API in React with Hooks
As per the React documentation "Context provides a way to pass data through the component tree without having to pass props down manually at every level.” But, without diving straight into the definition of what Context API is, let’s try to visualize our problem first.
Prerequisite
Basic understanding of stateful functional components in React.
Consider the example explained in the chart below.
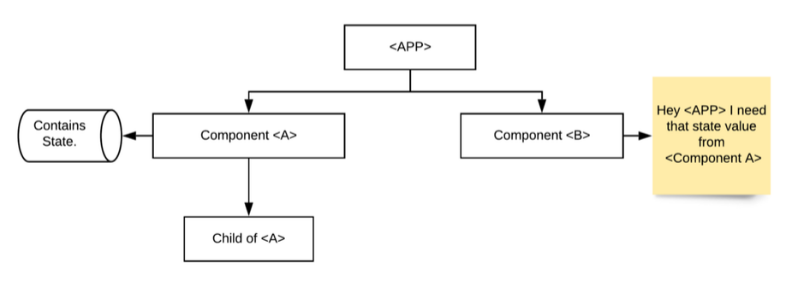
- Both Component A and B are rendered in the main APP component.
- Component B requires some state value from Component A
- This is not possible, right? Because all the state values reside in Component B
The solution to this problem can be uplifting the state to your Parent APP component. Which will look something like this:
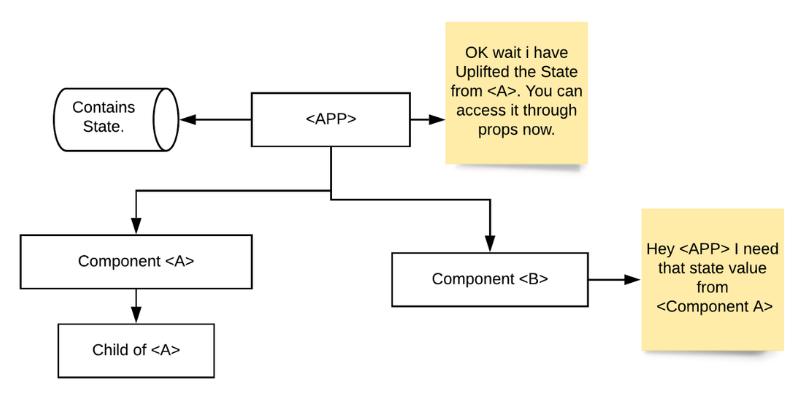
But this is not the ideal solution because as your APP grows larger and larger you can’t keep the state values in your Parent Component. So, what is the solution?
This is where the Context API comes into the picture
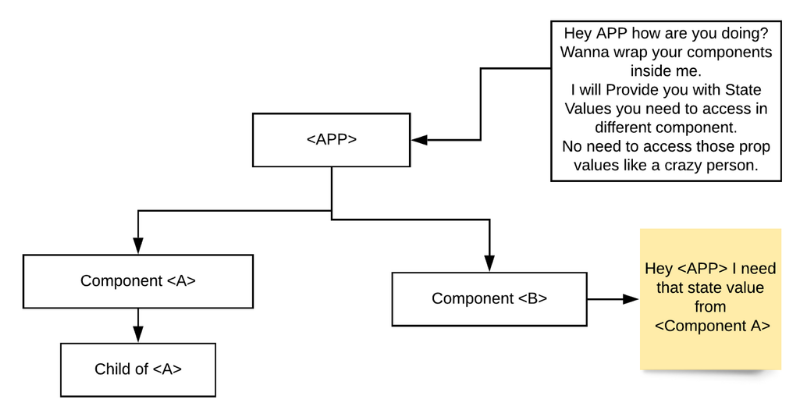
- Context API is the way to create global variables that can be passed around the component tree.
- Context API is an alternative to passing props manually in a component tree. Something that is also called Prop drilling.
- And as per the React documentation: Context is primarily used when some data needs to be accessible by many components at different nesting levels.
Let’s create our Context API
First and foremost, let’s set up our directory structure. Take any basic example that follows the above-mentioned problem.
Our directory structure will look something like the above flowchart.
Your Parent APP component should look something like this:
Step1: Create a Context.js file anywhere in your Component folder.
Add the below piece of code to your file. This will create a context named AppContext
Step 2: Next let’s create our Provider. The Provider is where we provide all our values to the components consuming the context.
Step 3: Wrap your Parent Component with the Provider:
Step 4: Now you can consume the context value anywhere down the AppProvider Component tree. By using the useContext hook:
Things to Remember while using Context
- Context should not be used as a replacement for the state, to avoid prop drilling. Always use the local state over the global state when you can.
- If you want to change something in the context (say if we change the message in the above code by using the SetMessage method), every time you update that state value it will re-render all the components that use the Context.
- Don’t wrap your whole App inside the Context Provider, this can be an overkill. Try to narrow down the component tree to the lowest possible Parent component that can be wrapped within the Provider.
Conclusion
- Use createContext() to create the Context
- Pull the Provider out of Context created from createContext()
- Wrap your Parent component with the Provider
- Consume the context with useContext() hooks
If you are from the redux world and haven't heard of Context API before. Visit /insights/coe/javascript/reacts-context-api-and-how-it-can-replace-redux to know more about Context API and how it can be a replacement over redux for small scale applications.
Hope this blog post was informative. Do send us your queries in the comment section below.

Combating COVID-19 with Digital Health
With COVID-19 all around the news these days, each one of us is concerned about our own safety and health and that of our dear ones too. Despite practising social distancing and quarantine, we will always be in constant threat of infection by coming in contact with a virus carrier until we have the vaccine for COVID-19. We at QED24 took this adversity as an opportunity to help people stay safe during these times and solve the problem through tech. We developed a secure, performance-based digital health mobile platform that comes along with a symptom checker, mapped hotspots, statewide statistics, helpline numbers, and lockdown hacks for physical and mental wellbeing.
Idea
Create an app that serves as a one-stop-shop for viewing relevant information about the pandemic via an engaging interface. The main aim was to encourage people to stay home and let them know if an area is safe to visit or not.

The Plan
Keep it simple, silly.
We wanted to keep the app as simple and minimalistic as possible. With an interactive onboarding experience for the user where the user selects if he/she is experiencing any symptoms of COVID-19 or not, which could be updated later.
Feature 1: Symptom checker

We wanted to keep the sign-up flow as simple as a Whatsapp sign-up. A user enters the name and their mobile number is validated via an OTP. This registers the user in our database and lets them avail the services on our application.
Feature 2: Simple sign-up

Feature 3: COVID-19 tracker
Once the sign-up is done, the user shall be asked for permission to enable the location for this app. The location service will run in the background even if the app is in the background or is killed.

Feature 4: Live hotspots alerts
Based on the symptoms received, we mark the user on the map as a green or red dot. Thus the map view in the application indicates live hotspots of infection in their locality. This keeps them aware of infected locations and take extra precaution while visiting such locations or avoid travel altogether.

Feature 5: Staying up-to-date with interactive dashboards
Along with the information about the local hotspots, the user shall also be able to view reports of active COVID-19 cases from all the States too.

Feature 6: Lockdown hacks
The app would also have a section which helps the user get along with the day to day activities in order to maintain excellent physical and mental health.

Feature 7: Help centres
User can always take the symptom test similar to the one at the onboarding screen and if he is in need of medical help, the Help centres section lists down all the COVID-19 helpline numbers.

The user can revoke the location permission form the app settings whenever he feels like. The user should also be able to sync their contact with the application in order to know if people in their contact list are in safe zones and are well. This information is shared with their contacts only if the user grants permission to do so on a ‘One to One’ basis. This feature helps create an ecosystem for the users with their know ones like family and friends and their mutual friends if permitted by the users.
Security concerns
- We intend to save the user’s current location only and not keeping a trace of its geolocation.
- We don’t seek permission for anything else than geolocation, contacts and notifications.
- We don’t run any malicious activities in the background assuring the user’s privacy is intact.
MVP
As a part of MVP, we aimed at delivering the app with the following features
- Onboarding
- Signup
- Map view
- Statistics from all States
- Lockdown hacks
- Helpline centres
Other features, as discussed in the plans, will be incrementally added to the build.
Design discovery
Design is as crucial for a product to be successful as technology, especially for mobile apps.
As a process of discovery, we went into multiple iterations of ‘Tech + design workshops’ and had a rough vision of what we wanted to have on the table.
Not to mention, this was all done remotely. In a compact timeframe, we produced minimalistic designs that perfectly serves our purpose and is also interactive and intuitive enough for the user to get along with the application in no time.
The Execution
Building this application under such tight timeframe was a totally different experience at all stages of the PDLC. To deliver a product as quickly as possible we went for the tech stack we love the most - React Native and NodeJS
Instead of having a conventional sprint of two weeks, we went for the feature-driven milestones run in parallel. We had 3 developers working the mobile application and one developer working on the APIs. All at the same time. Having a clear vision of the application from the initial ‘Tech + Design’ workshop helped us work upon dependent features on different platforms in parallel.
Eventually, we had all the pieces of the app intact and had iterations of a closed group of beta testing internally in the organization.
Challenges
Running geolocation services in the background was the major technical challenge we faced during the development phase. This feature was the soul of the entire application.
Technical Solution
We have documented our solution in a blog, please have a look - /insights/coe/javascript/react-native-endless-background-process
Alas! We couldn’t launch it
As we approached towards the application delivery, Google Playstore and AppStore announced they won’t allow any application related to COVID-19 to go live (check the hyperlinks for detailed info). A handful of applications that were already published were also pulled down from the store. Yet we did publish the app which later got rejected due to the current situation. The app never came to the users, but what did come to us is the experience to deliver a quality application in of a couple of weeks.
Here's a sneak peek into the app

Querying Static vs Dynamic Data in Gatsby
Gatsby uses different kinds of plugins to pull data from different data sources into Gatsby. Once it gets the desired data, it uses GraphQL to query that data. Now, why does it use GraphQL is a topic for another day. Today we will focus on what are the different ways of querying data, and what kind of data needs to be queried where.
When I started learning Gatsby I had an impression that we can only build static sites with Gatsby, like a blog site where you just pull all the data from a source, bundle it together, deploy and let the browser handle the rest. But that is not it! Once the Gatsby site hits the browser we can rehydrate it into a React app and utilize all the benefits of a React App. Which means we can say that it is not just a static site generator but a progressive app generator. Where you can leverage all the static functionality and still be able to query the dynamic data.
Essentially there are two parts to any web app
- Static
- Dynamic
Static Data
Static data is the data/content that does not change as per user interaction. Think of a product detail page. You don’t change product images or product attributes every few minutes, right? This would be considered as static Data and we can query this type of data with two types of queries in Gatsby.
- Page Query
- Static Query
Depending on the use case, if we want to query data for specific pages we generally opt for Page Query whereas Static Query is used to querying data inside a component.
The main difference between the two is that Page Query accepts query variables during build time. While that is not possible for Static Queries.
1. Page Query
Generally, we use Page Queries to dynamically generate templates/pages. For example, think of the product detail pages on a website, a thousand products mean a thousand pages. We can do this by using createPages hook in our gatsby-node.js file. All we need is a path and a unique identifier for each Product.
Take a look at the above code. All we are doing is fetching a unique ID related to each product and it’s path alias for each product a from data source which in our case is Drupal. Then we are passing this data to our template file as a context value.
We can access this value at /src/templates/ProductDetail.js. Now in our ProductDetail template, we can use the unique ID to query data for each product. Take a look at the code below.
Gatsby uses the variable value at build time to generate the Product details for each product. To learn more about page queries visit this link.
2. Static Query
Static Query is quite simple. We can also call it as a Dumb query more like dumb components in React which are not dependent on an external value to fetch the data. We can use them anywhere, including in the pages. Here is an example of a static query.
To learn more about Static Queries. Follow this link.
Dynamic Data
Think about a cart in an e-commerce decoupled site. The cart data keeps changing every time the user adds something to their cart, which means the user is going to interact with your site backend every time they add something to their cart. Which implies that this piece of data cannot be static. So in other terms, we can identify the dynamic part of our app as the data that keeps changing during runtime.
Here one can draw an equivalent of this particular use case of our cart to that of a classic server-side rendered app. And how do we solve this problem? I addressed at the beginning that we can rehydrate a Gatsby app into a React app and utilize all the benefits of a React app. So we can fetch data during runtime in Gatsby, as we would generally do in a React app which is through API calls like a Rest API, GraphQL API, or anything else.
For an example here is a runtime GraphQL query which uses an apollo-client. We also call it a GQL query.
Nothing fancy happening here. Just passing query parameters to the GQL during runtime and it fetches the data accordingly. If you are in a Class component you can do this in the ComponentDidMount lifecycle method and in a functional component, we can use useEffect to render our data as per the state change.
That is it. Hope you got what you were looking for.
P.S - If you have any queries kindly mention them in the comments section. Happy to answer!