

Welcome to this comprehensive guide to automated testing with GitHub Actions. Whether you're a QA Engineer moving into automation, a team setting up CI/CD pipelines, or a manual tester exploring GitHub Actions, this guide is designed for you. Even if you're just curious about automated testing, there's plenty here to learn.
You'll discover how to create and manage GitHub Actions workflows, set up test automation via package.json, run tests automatically, generate and manage reports, handle errors, debug with clarity, and optimise performance.
Before you begin, make sure you’re familiar with basic testing concepts, have a GitHub account, and know your way around the command line. With that in place, you're all set to strengthen your automation skills and streamline your testing workflow.
Getting started with GitHub actions
GitHub Actions is a continuous integration and continuous delivery (CI/CD) platform that allows you to automate your build, test, and deployment pipeline. Let's create our first workflow.
We will use the Cypress automation framework to understand github workflow.
1. Understanding GitHub actions basics
GitHub Actions workflows are defined using YAML files located in your repository. Let’s start by breaking down the key components:
Workflow file location
All workflows are stored in the .github/workflows/ directory in your repository. Each workflow is a .yml file.
Basic workflow structure
A workflow comprises the following elements:
- Name: Provides a human-readable identifier for the workflow.
- Triggers (on): Specifies when the workflow should run.
- Jobs: Define the tasks to execute.
- Steps: Detail the specific commands or actions to perform within a job.
2. Key workflow triggers
Triggers define when your workflow runs. GitHub Actions supports multiple types of triggers:
Trigger syntax example
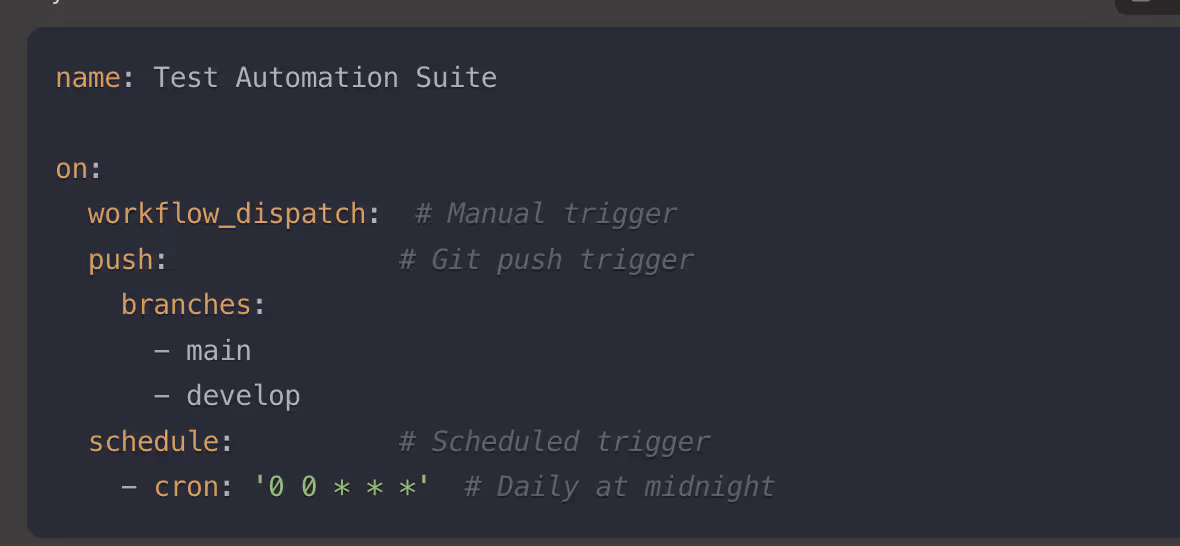
How triggers work
- workflow_dispatch: Adds a manual trigger button in the GitHub Actions UI.
- push: Executes workflows when changes are pushed to specified branches.
- schedule: Uses cron syntax to run workflows at regular intervals.
3. Writing your first workflow
Here’s a simple workflow to get started:
Full example Syntax
name: My First Test Workflow

on:
  workflow_dispatch:  # Manual trigger
  push:               # Trigger on code changes
    branches:
      - main
      - develop

jobs:
  test:
    runs-on: ubuntu-latest

    steps:
      - name: Checkout code
        uses: actions/checkout@v2

      - name: Run a simple test
        run: echo "Hello, GitHub Actions!"
Explanation
- Name: "My First Test Workflow" is the workflow's identifier.
- Triggers (on): The workflow runs on manual triggers or pushes to the main or develop branches.
- Jobs:
- test: Specifies a job running on ubuntu-latest.
- Steps:
- Check out the repository code using a predefined GitHub action.
- Print "Hello, GitHub Actions!" to demonstrate a simple test.
4. Configuring Jobs
Jobs define the tasks to run as part of your workflow.
Example Syntax
jobs:
  test-execution:
    runs-on: ubuntu-latest
    environment: production
    concurrency:
      group: ${{ github.workflow }}-${{ github.ref }}
Key features
- runs-on: Specifies the operating system (e.g., ubuntu-latest, windows-latest).
- environment: Sets the target environment, such as production or staging.
- Concurrency: Prevents duplicate runs for the same workflow and branch combination.
5. Extending your workflow
Once you’ve created your first workflow, you can expand it with additional jobs, steps, or triggers, such as:
- Adding test automation tools like Jest or Cypress.
- Integrating deployment pipelines.
- Generating reports for test results.
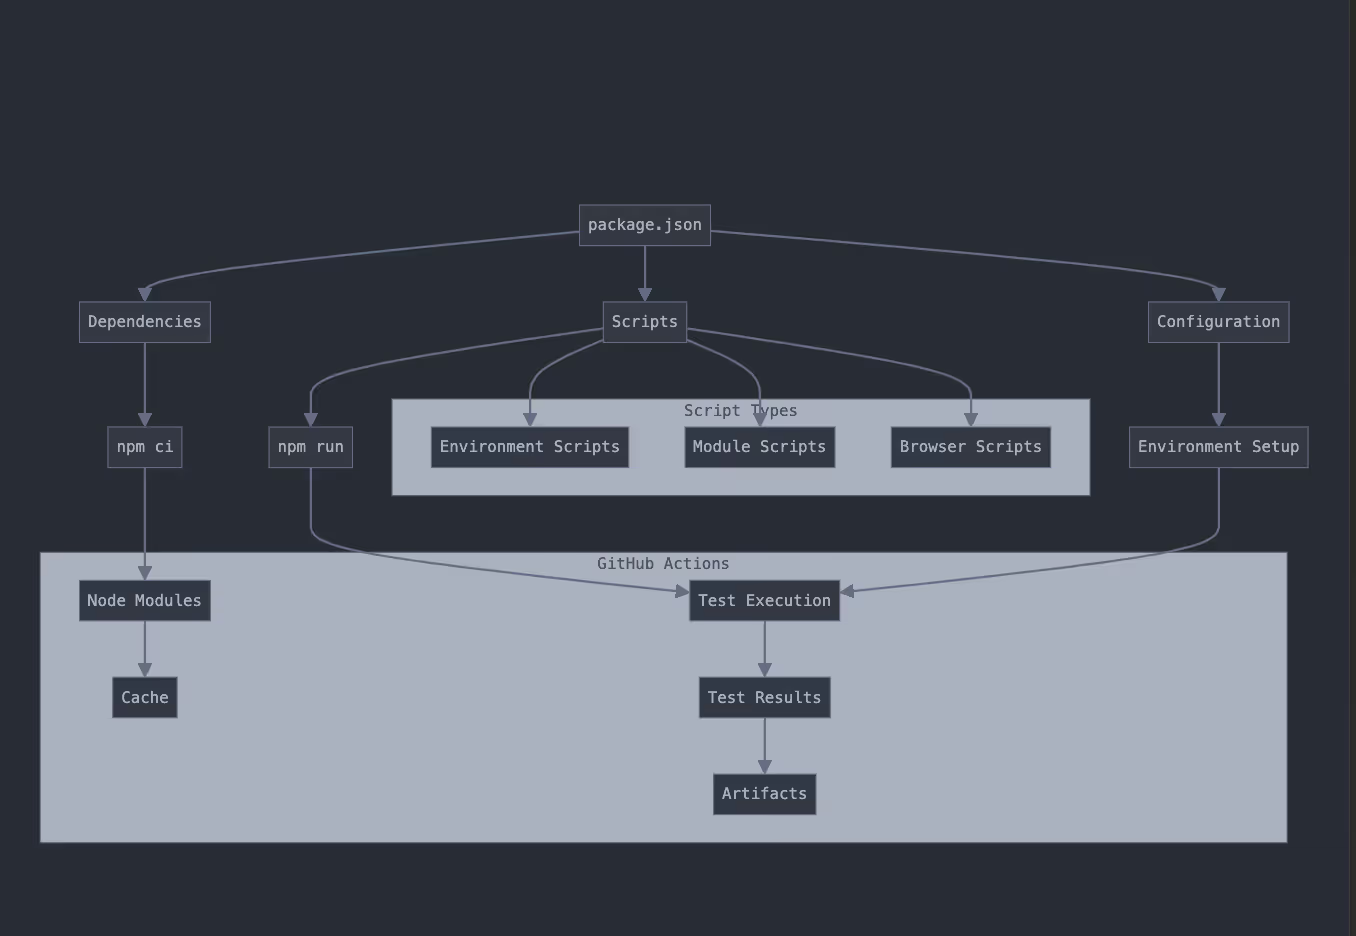
Package.json management
Dependencies structure
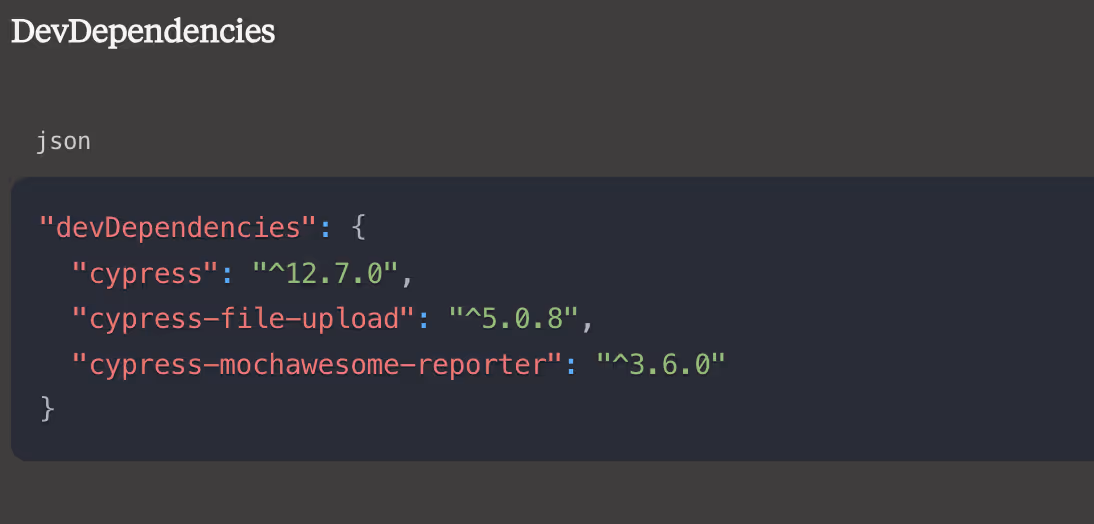
How it works in GitHub Actions
- Cypress: Main testing framework
- ^12.7.0 means it will accept patches and minor updates (12.7.1, 12.8.0, etc.)
- Used by GitHub Actions during npm install
- cypress-mochawesome-reporter: For test reporting
- Generates HTML reports that can be uploaded as artefacts
- Automatically integrated when tests run
Usage in CI/CD
- These are required at runtime
- GitHub Actions installs these using npm install
- Available during test execution
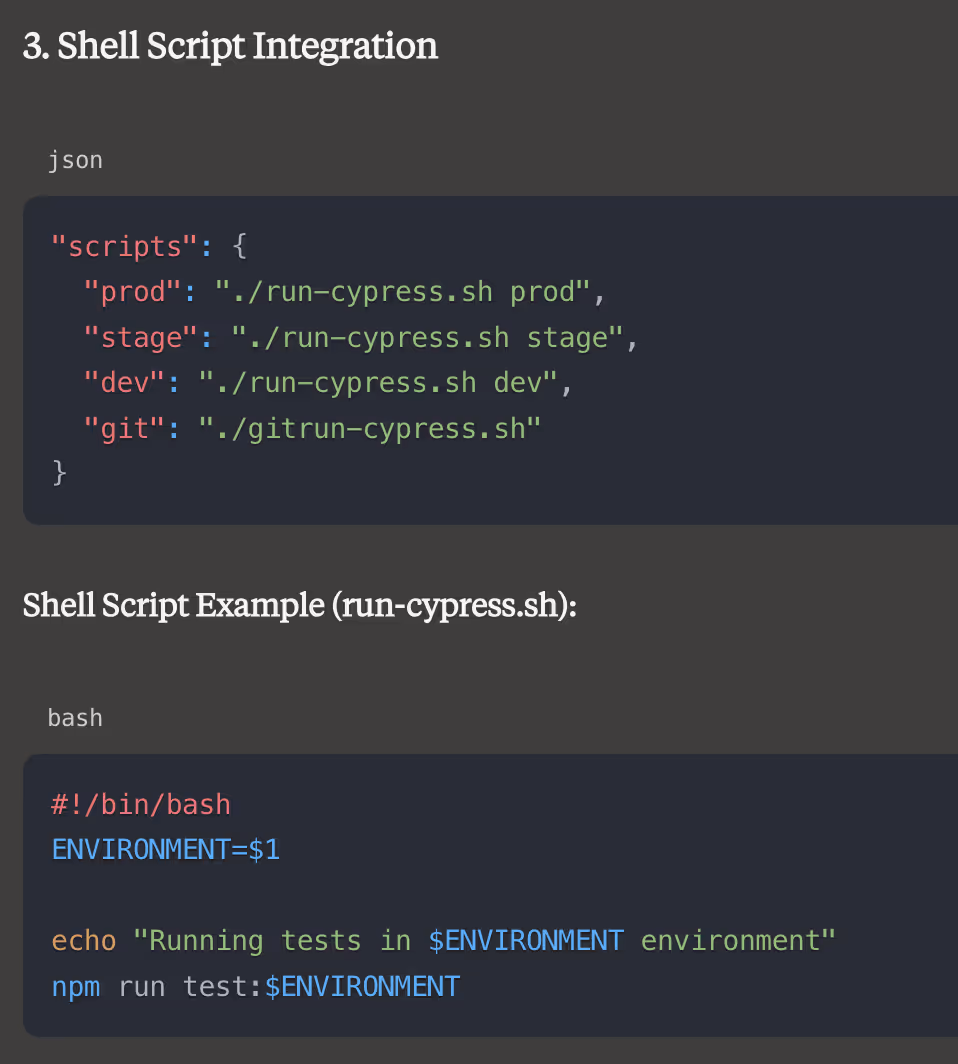
Scripts configuration
Environment-based scripts
Syntax:
"scripts": {

  "test:dev": "cypress run --env environment=dev",

  "test:stage": "cypress run --env environment=stage",

  "test:prod": "cypress run --env environment=prod",

  "test:mobile": "cypress run --config viewportWidth=375,viewportHeight=667",

  "test:ci": "cypress run --headless --record"

}
Environment configuration scripts
Syntax:
{
  "scripts": {


 "cypress:open:dev":
           "cypress open --config-file cypress/config/development.json",


"cypress:open:stage":
               "cypress open --config-file cypress/config/staging.json",


"cypress:open:prod":
         "cypress open --config-file cypress/config/production.json"


  }
}
Usage with environment variables
Add to your GitHub Actions workflow file (.github/workflows/cypress.yml):
Syntax:
steps:
  - name: Set Environment
    run: |
      ENV=${{ github.event.inputs.environment }}
      npm run cypress:open:$ENV

Module-specific test scripts
This should be structured in your package.json:
Syntax:
{
  "scripts": {
    "run:e2e:categoryFilters": "cypress run --spec cypress/e2e/default/e2e/category/categoryTests/**/*.cy.js",


    "run:e2e:salesforce": "cypress run --spec project/tests/cypress/e2e/default/e2e/salesforce/salesforceTests/*.cy.js"
  }
}
Test automation setup
Before running automated tests, you need to configure the testing environment. This involves setting environment variables required for your tests to execute successfully.
steps:
  - name: Setup Environment
    run: |
      echo "NODE_ENV=production" >> $GITHUB_ENV
      echo "CYPRESS_BASE_URL=${{ secrets.BASE_URL }}" >> $GITHUB_ENV
Explanation
- NODE_ENV: Specifies the environment (e.g., production, staging, or development).
- CYPRESS_BASE_URL: Fetches a secure base URL from GitHub secrets to use during test execution.
This ensures your tests run in the correct environment and against the appropriate endpoint.
Dependency management
Efficiently managing dependencies helps streamline test execution and reduce unnecessary downloads during workflows.
- name: Cache dependencies
  uses: actions/cache@v3
  with:
    path: |
      ~/.npm
      ~/.cache/Cypress
    key: ${{ runner.os }}-node-${{ hashFiles('**/package-lock.json') }}
Explanation
- actions/cache@v3: A GitHub-provided action to cache dependencies.
- path: Directories to cache, such as ~/.npm for Node modules and ~/.cache/Cypress for Cypress files.
- key: Identifies the cache based on the OS, Node.js version, and a hash of the package-lock.json file to ensure consistency.
By caching dependencies, workflows can skip redundant installations, significantly reducing build times.
Test optimisation and state management
Efficient tests save time and reduce flakiness. Below are strategies to optimise test execution and manage state effectively.
Reducing test execution time
Replace arbitrary delays (cy.wait) with dynamic and condition-based waits:
Bad practice
cy.wait(5000) // Arbitrary wait time
Good practices
Wait for specific conditions:
cy.get('button').should('be.enabled');
Use API intercepts:
cy.intercept('GET', '/api/data').as('getData');
cy.wait('@getData');  // Wait for specific XHR request
Create custom commands for reusable logic:
Cypress.Commands.add('waitForLoader', () => {
  cy.get('.loader', { timeout: 10000 }).should('not.exist');
});
Language and localisation Testing
For applications supporting multiple languages, ensure tests adapt to the preferred locale.
Example Syntax
Set default language:
beforeEach(() => {
  cy.setCookie('preferredLanguage', 'en');
  cy.request('POST', '/api/settings', { language: 'en' });
});
Handle multi-language content:
const translations = {
  en: {
    welcomeText: 'Welcome',
    loginButton: 'Login',
  },
};
cy.get('button').should('contain', translations.en.loginButton);
By dynamically adapting to localisation requirements, you ensure comprehensive testing across all supported languages.
Real-world example: complete E2E test suite
Below is a detailed workflow for running Cypress E2E tests in a real-world scenario. This setup covers:
- Dynamic environment and module selection.
- Pre-test system checks.
- Test execution and reporting.
Workflow Syntax example
name: Cypress E2E Test Suite

on:
  workflow_dispatch:
    inputs:
      environment:
        description: 'Test environment'
        required: true
        default: 'staging'
      module:
        description: 'Test module'
        required: true
        type: choice
        options:
          - login
          - orders
          - statement

jobs:
  system-check:
    runs-on: ubuntu-latest
    steps:
      - name: Check System Status
        uses: actions/checkout@v2

      - name: Verify System State
        run: ./scripts/check-system-status.sh

  test:
    needs: system-check
    runs-on: ubuntu-latest
    steps:
      - uses: actions/checkout@v2

      - name: Setup Node.js
        uses: actions/setup-node@v4
        with:
          node-version: '20'
          cache: 'npm'

      - name: Install Dependencies
        run: npm ci

      - name: Run Tests
        run: |
          npm run test:${{ github.event.inputs.module }}
        env:
          TEST_ENV: ${{ github.event.inputs.environment }}

      - name: Upload Reports
        if: always()
        uses: actions/upload-artifact@v3
        with:
          name: test-reports
          path: cypress/reports
Conclusion
A reliable testing pipeline is built on consistency, clarity, and control. Verifying system state ensures stable test conditions. Dependency management keeps environments predictable. Smart retry strategies reduce noise from intermittent issues, while resource monitoring helps maintain performance and prevent slowdowns. With robust error handling in place, the entire process becomes smoother and more dependable. These practices work together to create a testing pipeline that supports faster development, meaningful insights, and confident releases.