

We are living in the age of data and to thrive in this era we need to turn this data into knowledge. Data in an organization is scattered over lots of different mediums, whether in an email, dropbox, or on your Slack. In an attempt to create value from our data, we experimented with QED42’s Slack public data and transformed it into an intelligent model using Machine Learning.
QED42 and Slack
QED42 relies on Slack for the day to day interactions between our employees. Since remote work/flexible work timings have always been a part of our work culture, we introduced an ‘Update Message’ channel on Slack. The purpose of this public Slack channel is to help employees keep a track of their teammates' availability.
Here are some examples of the update statuses added regularly by our teams:
- Whether he/she is working from home (WFH)
- Taking a short break (AFK)
- Leaving for the day (LFD)
Our Project
This public Slack channel carries an enormous pool of data coming from multiple users that span over months or even a year! And so, we thought of experimenting with the Slack data at hand! The purpose of applying Machine Learning on our Slack public channel was to offer a better way to listen, learn and engage with the team.
The model was built with an intent to understand how things are evolving with us working 100% remotely with distributed teams and taking a data-driven approach to optimizing our communication. Although this approach was taken towards an experimental project, the same model has also seen its use in various other classification or predictions like ham or spam messages, sentimental analysis of the messages, etc. When it comes to feature extraction we have tagged the data with time. This method can be used to represent various time-series data like climate analysis, appointment no-shows, etc.
Our Objective
The sole objective of this project was to visualize how employees communicate to identify patterns and optimize communication. We made sure that this implementation is 100% non-intrusive (we did not monitor private channels, groups, and direct messages).
Our objective was to create a dashboard that displays the status updates of any employee for a given date. Moving forward, we also wanted to go beyond just fetching and displaying data from Slack, we aspired to predict a person’s status! Now, isn’t that interesting?
Before we jump to the prediction mechanism, this is how we calibrated the data for our learning algorithm.
Sniffing Data from Slack
To launch our experiment, we had to retrieve the update channel messages from our Slack channel so that we could categorize the data into different buckets like AFK, WFH, LFD, etc. This can be achieved using any of the following methods:
Method 1: The CRON Job
This code snippet will regularly ask Slack to provide all messages in its history between a fixed timeline provided by the user. For this, we need to have an auth token (this token can belong to a Bot or a user). This code is implemented in Python 3.0 and we need the Slacker package for Python to perform this request.
However, there is one drawback with this method – we need to set this as a Cron job. An alternative to this is that Slack allows us to perform this function on a real-time basis which can be achieved using method 2.
Method 2: Real-Time Monitoring Messages (Event handler)
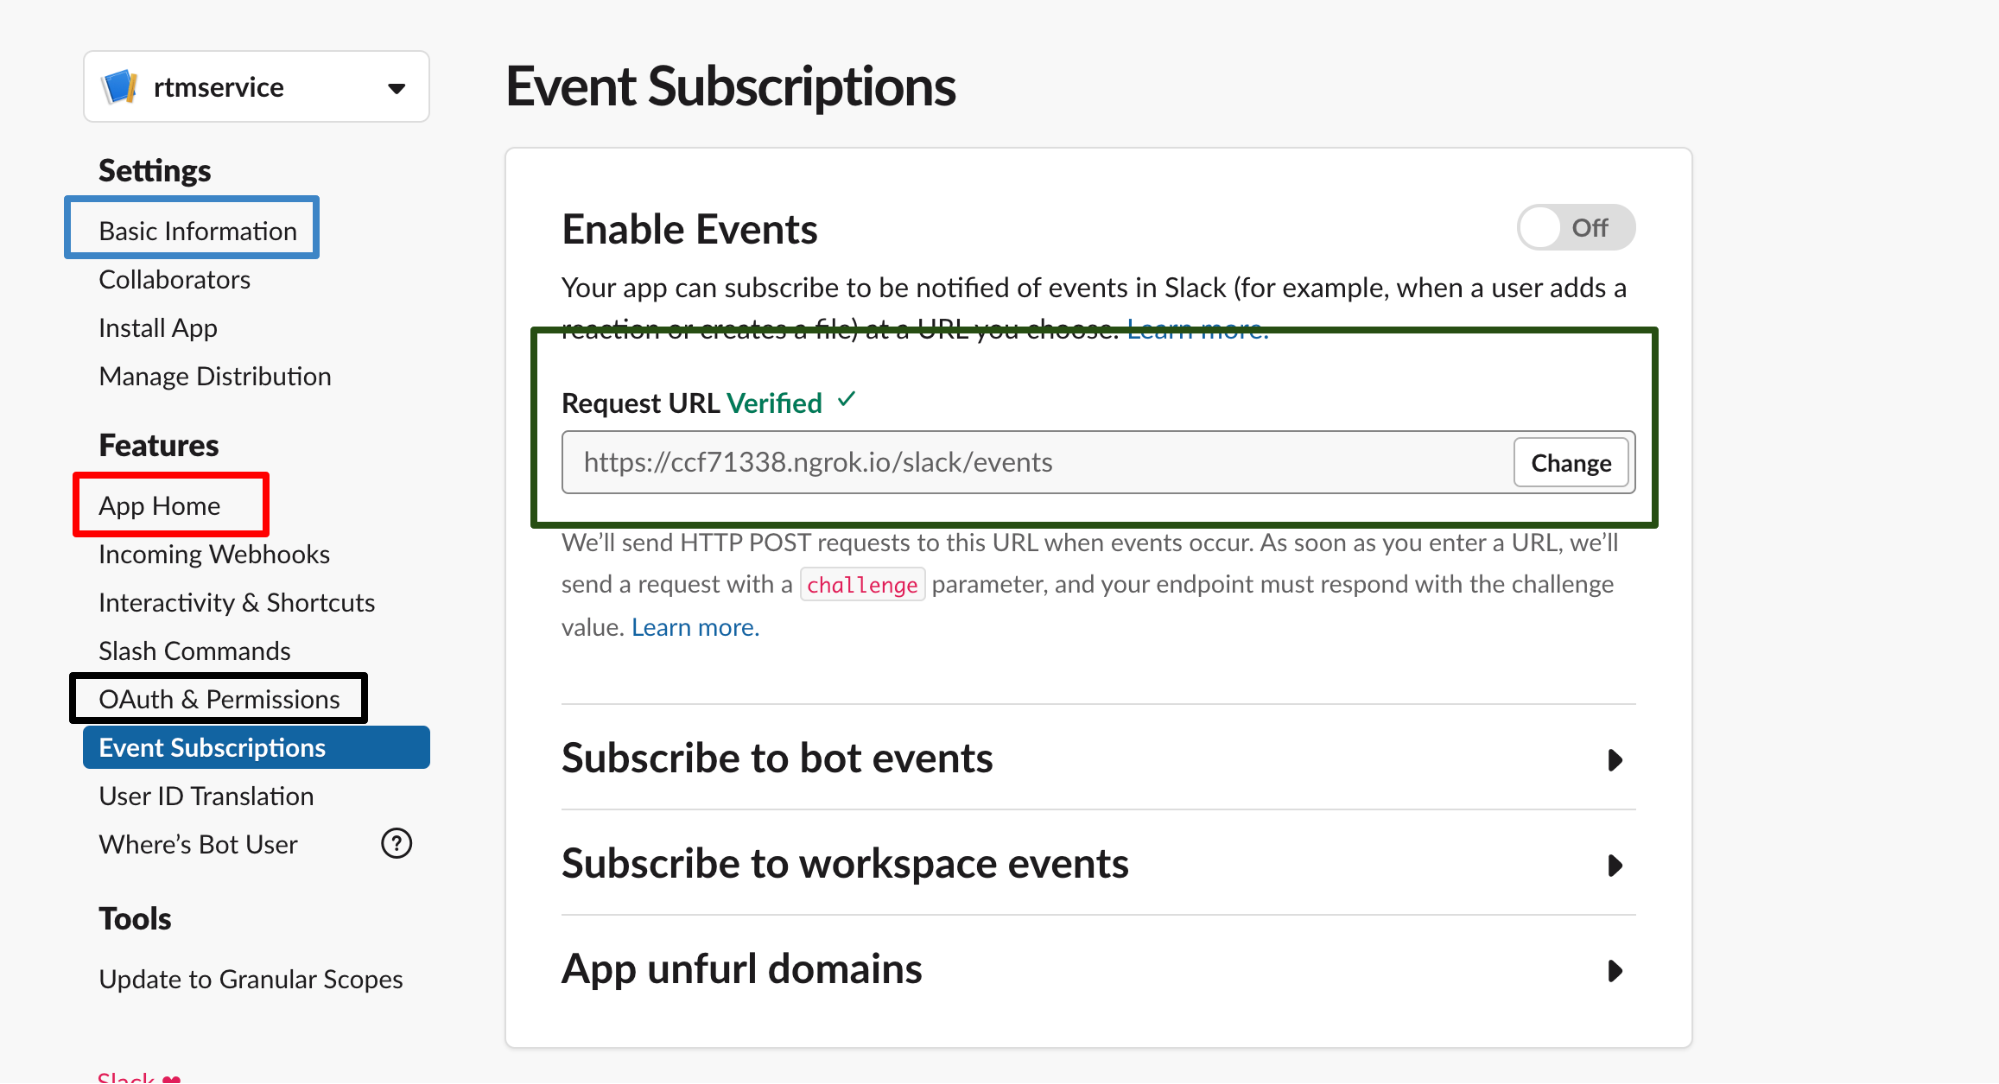
Fig 2.1
Building an event handler is an apt way of handling this situation, but the configuration might take longer than our first method.
This method will help you interact with the end-user in real-time. For this, you need to create a Slack app and assign it to the team. Also, you need to add a bot user (you can find it in Fig 2.1 red box) for the app. The main purpose of this bot is to interact with people since we are categorising the messages into specified buckets. It is common for users to add random messages on this channel and the purpose of the bot is to discourage people from doing so.
Something like this:
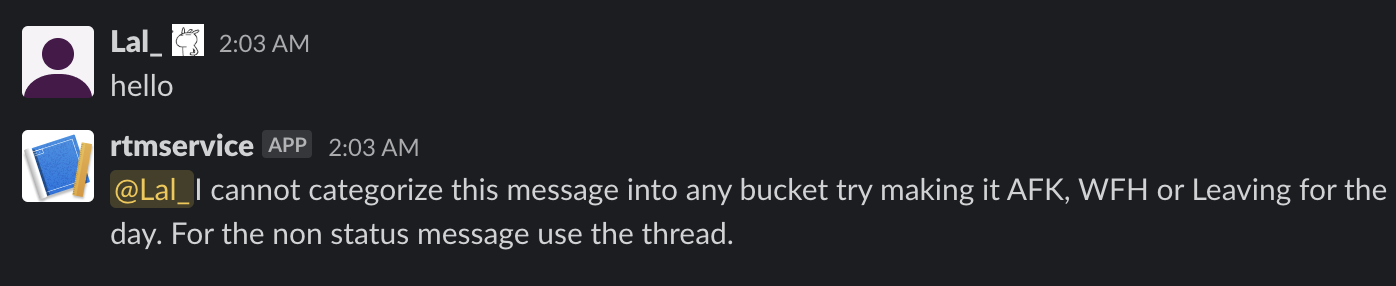
Fig 2.2
Enabling Event subscription:
- To enable event subscription, you need an HTTPS URL for the post (basically the Slack will hit this URL if an event has occurred).
- If you are using it for development purposes you need to run a tunnel-like ngrok proxy tool. Get the base URL using the tool, append ‘/slack/event’ and paste on the field (field green box in fig 2.1).
- Go to OAuth and Permission tab(black box fig 2.2) get the Bot User OAuth Access Token.
- After that you need a Signing Secret for authentication, you can find this inside the Basic information session (blue box inside fig 2.1) Also, don’t forget to install the app in the workspace.
Categorizing messages into buckets
Once the messages are collected, the next step is to categorise them into different states like WFH, AFK, LFD. The only way to achieve it is by going through the words, here is where the Natural Language Process (NLP) comes into play.
Once we get the text we tokenize the text and search for the keywords. For example, if an employee wants to avail work from home he/she might send the message like ‘WFH’ or ‘work from home’ similar pattern implies for the other buckets too. The idea is to distinguish the messages using these keywords.
PS: Although in the above sample, it made sense to use some specific keywords for classification, one can resort to NLP & Artificial Intelligence for classification as well. A couple of standard ways in which it can be done for more complex scenarios where we need to extract the intent from a statement are:
- Document similarity: This NLP based technique finds out the similarity between two documents by converting them into keyword word-count vectors and computing the distance between them using the cosine similarity function.
- AI-based classification: Pre-trained ML/AI models are used to classify the messages into buckets.
Predicting the state
Assigning a state to these messages is pretty straightforward, but the fun lies in taking things to the next level!
Availing work from home or taking a short break, completely depends on a particular person and his/her mood, but what if there is a pattern to it?
For example, let’s say I am a person who takes my lunch break around 2 PM almost every day. Voila! There lies the pattern (I will be AFK at 2 PM). There could be similar patterns visible in other employees too.
Modelling the data
The data collected from Slack cannot be fed directly to any learning algorithm. We need to first understand the data itself. Let’s consider a couple of scenarios:
- In the case of work from home, it is the date that we should be concerned about
- For AFK and leaving for the day, it will be both the time and date
- While constructing the datasets for WFH, we should also keep in mind the WFO (work from the office). If a person is not working from home on a particular date the entry for the data should be WFO the same applies to AFK.
- For date, we need to consider a lot of specifications like a date with respect to the year, date with respect to the month, etc.

Since there is no interdependence among the employees we should build different models for each person.
Algorithm
The final step was to wrap this data inside an algorithm. For that we have to go back to the data, with an initial look one can easily conclude that this data is inconsistent. This is obvious, considering that a person would mostly work for 100 days while he/she might avail work from home only for 10 days.
Another factor that must be considered is overfitting. Most trivial machine learning algorithms like linear regression may be easy to understand and implement but are prone to overfitting. Gladly there are a ton of algorithms available to prevent overfitting. One of them is LASSO (Least Absolute Shrinkage and Selection Operator) regression.
With the help of the LASSO regression, we can reduce overfitting by shrinking large regression coefficients similar to Ridge regression. It also has the added benefit of variable selection i.e. removing the unimportant variable by keeping their coefficient zero. This, in turn, removes the corresponding feature from the model.
A tuning parameter named λ is used to control the strength of the penalty, resulting in the number of variables selected and their contribution to the model.
As the value of λ increases few coefficients are selected. Unfortunately, this process failed in our scenario, giving a negative R2 score.
This means that our system performed worse than a model which predicts the result based on the probability determined directly by the number of WHFs and WFOs in the data. But, why? One possible reason could be that the data is not linearly separable. Another reason could be the imbalance, which might have led to the model eventually ignoring most of the least represented class.
Before going further let us plot the data, here we are going to plot the field from the dataset using matplotlib. The graph will look like this:
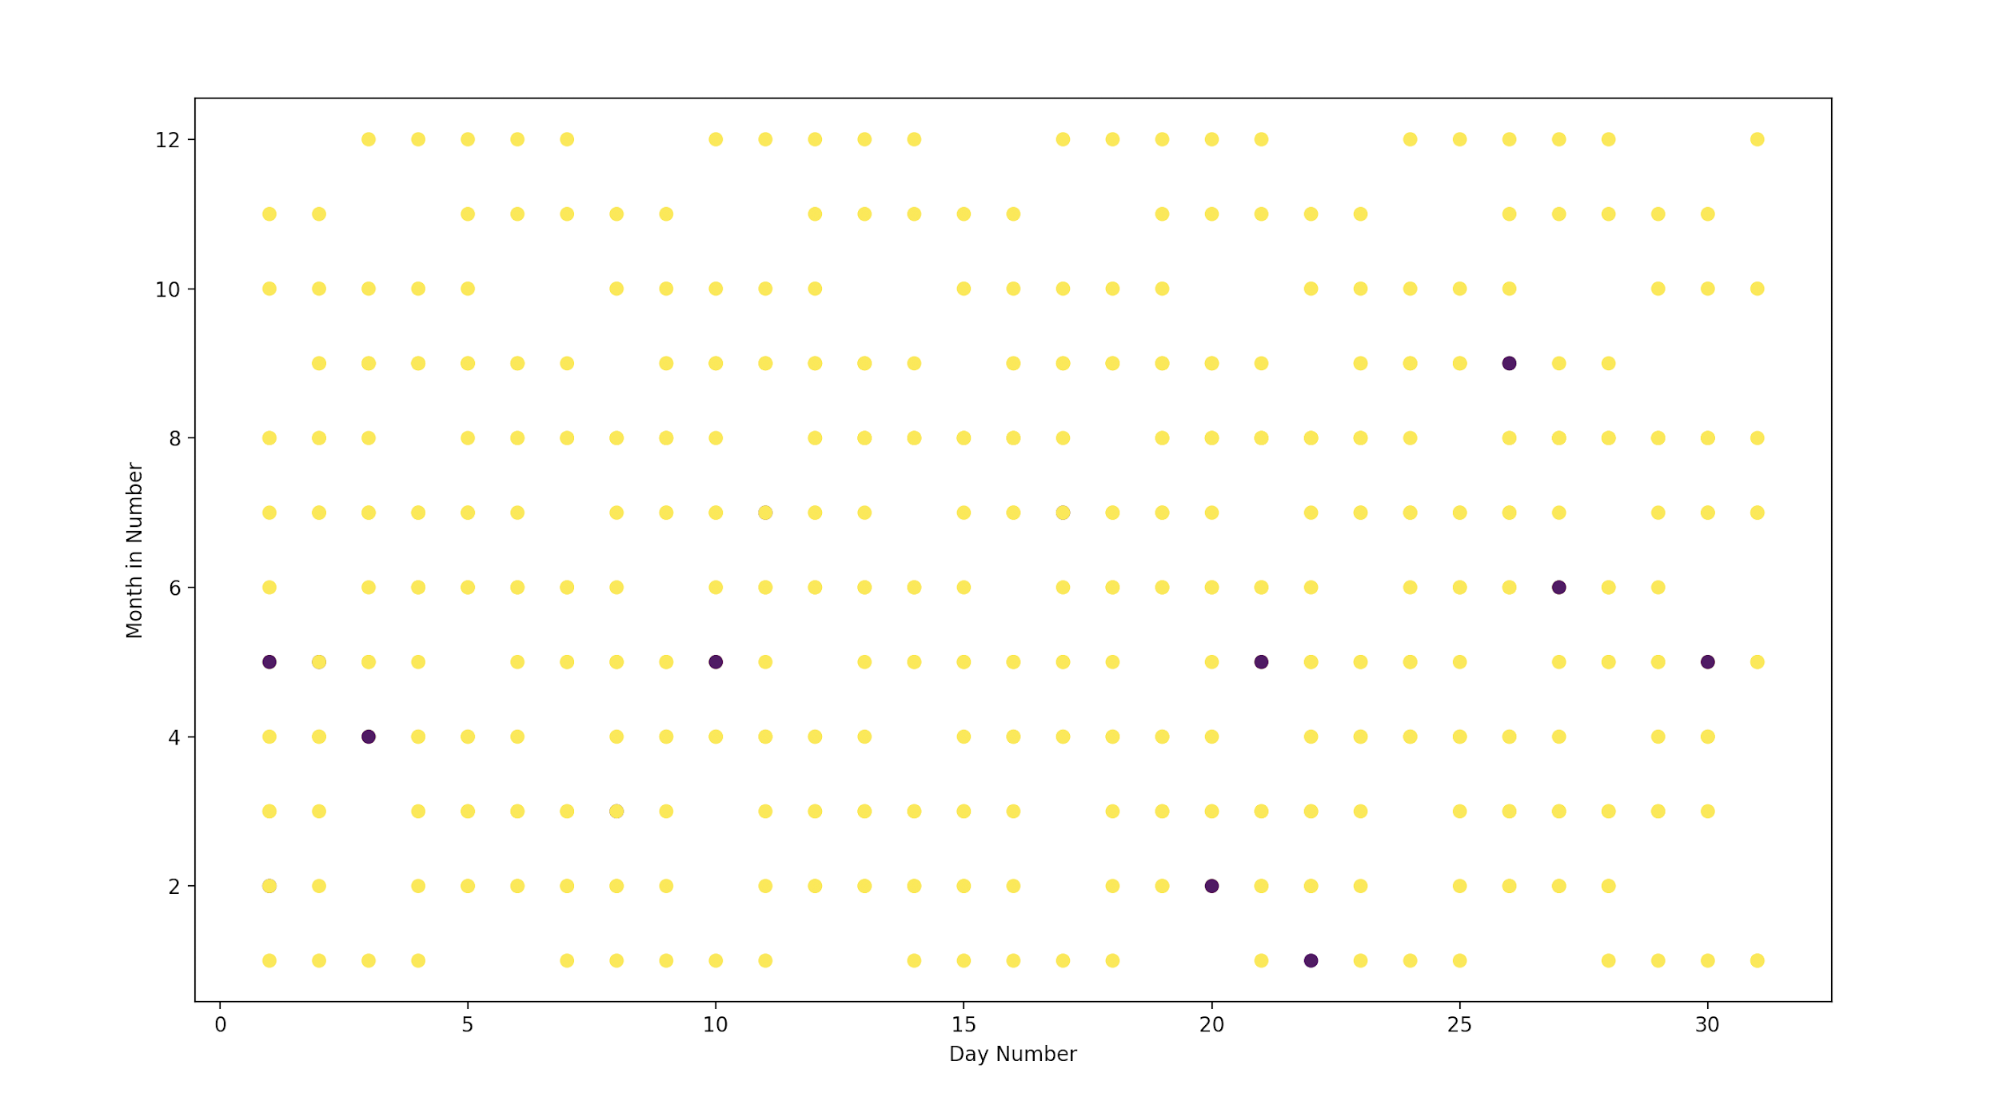
Here the blue dots signify WFH and the yellow dots are WFO. The basic idea of Lasso or Ridge regression is to find a line that can be drawn across this graph and can separate the classes. But look how scattered the points are, it is difficult to separate with a single line.
This problem urged us to think about other algorithms and we came up with the most common and yet one of the strongest algorithms of all - the Random forest. Random forest or Random decision forest processes its learning by building multiple decision trees. Decision trees are good for working with non linearly separable data. But, we can’t rely on a single decision tree to do this job because it is highly prone to overfitting.
Random Forest will construct different decision trees and train them with a few of the samples from our dataset. The outcome is determined by tallying the individual outcomes or probability determined by the decision trees. Here too we faced the same demon which is the imbalance in the data.
For example, the ratio between WFH and WFO (Work from the office) might be 1:20, which weakens our model for detecting the less represented class (in this case WFH). We can build a workaround by keeping the threshold for classifying work from the office as high.
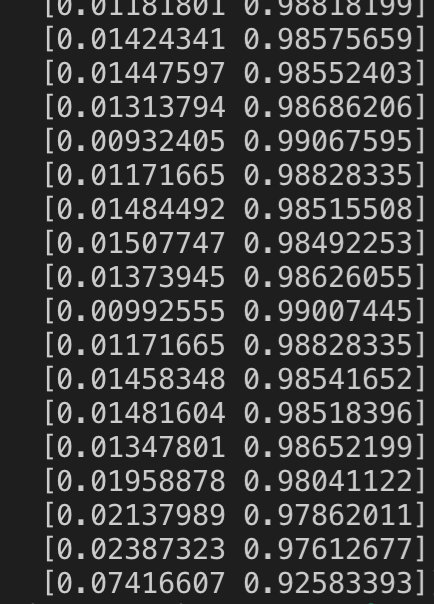
(LHS the probability of the WFH and RHS the probability of the WFO, you can in the last the probability for the WFO is less than the threshold and thereby the WFH will be triggered)
Obtaining the threshold
With a glance at the above image, one can understand that the probability of WFO is always higher than the WFH. The cause of this problem is because the samples of WFO are much higher than the WFH. Our next step was to determine the threshold value used to determine whether the given probability should be considered as WFH or WFO. We had a few tricks under our sleeves to determine the threshold value. One was to create a formula that would give us the threshold point and the other one was to train a different ML model using the probability data.
The formula that we developed computes the average WFH probability from using both WFH and WFO probabilities. The value thus computed is used as the threshold. To check which one will be better, we had to try them all and consider the one with more accuracy. We executed these methods with a selected group of people (with different WFH numbers) and built an analysis sheet out of it.
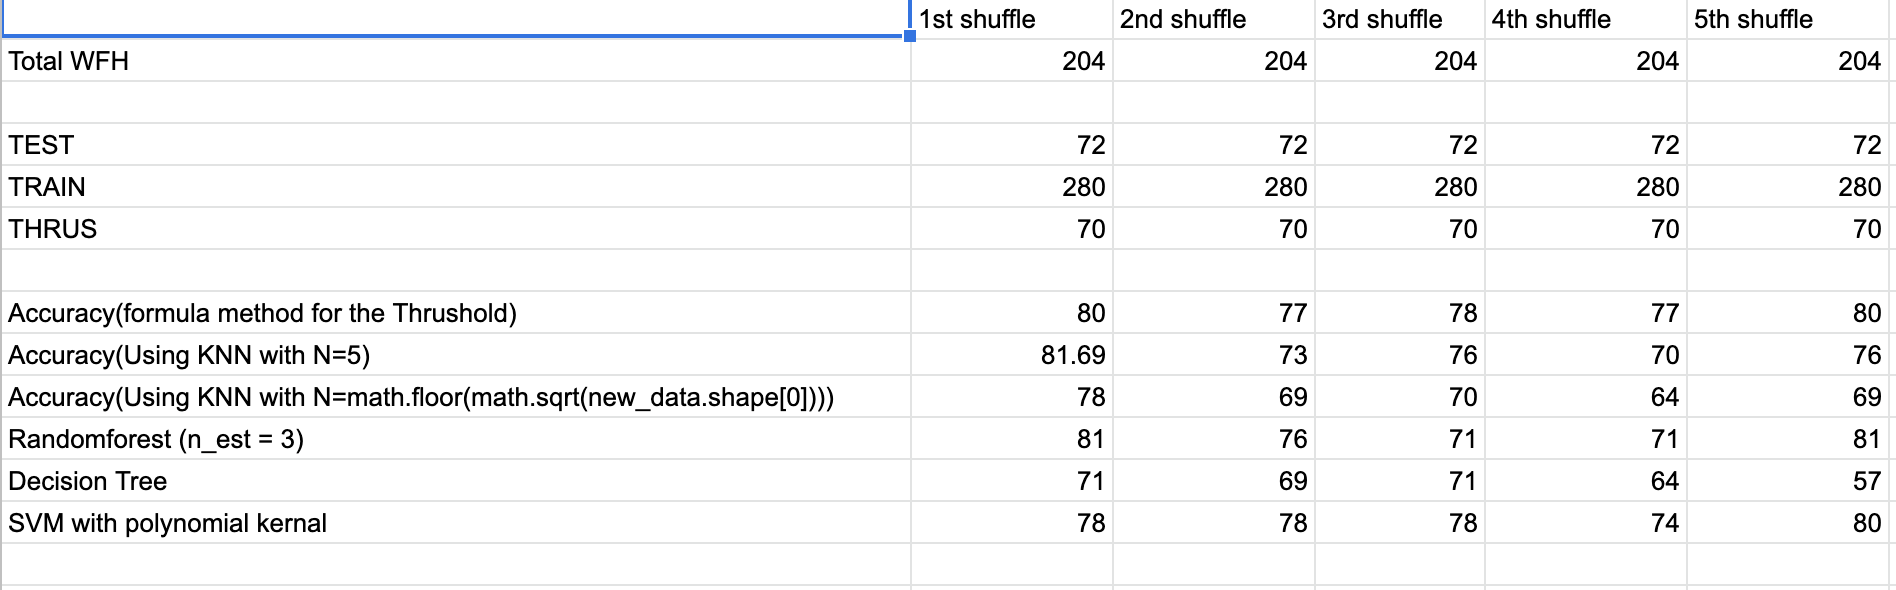
Even though the formula proved to yield promising results in terms of accuracy when it came to the statistics of True positive and True negative it turned out to be least effective. This forced us to put the data again through the ML algorithm (Random Forest).
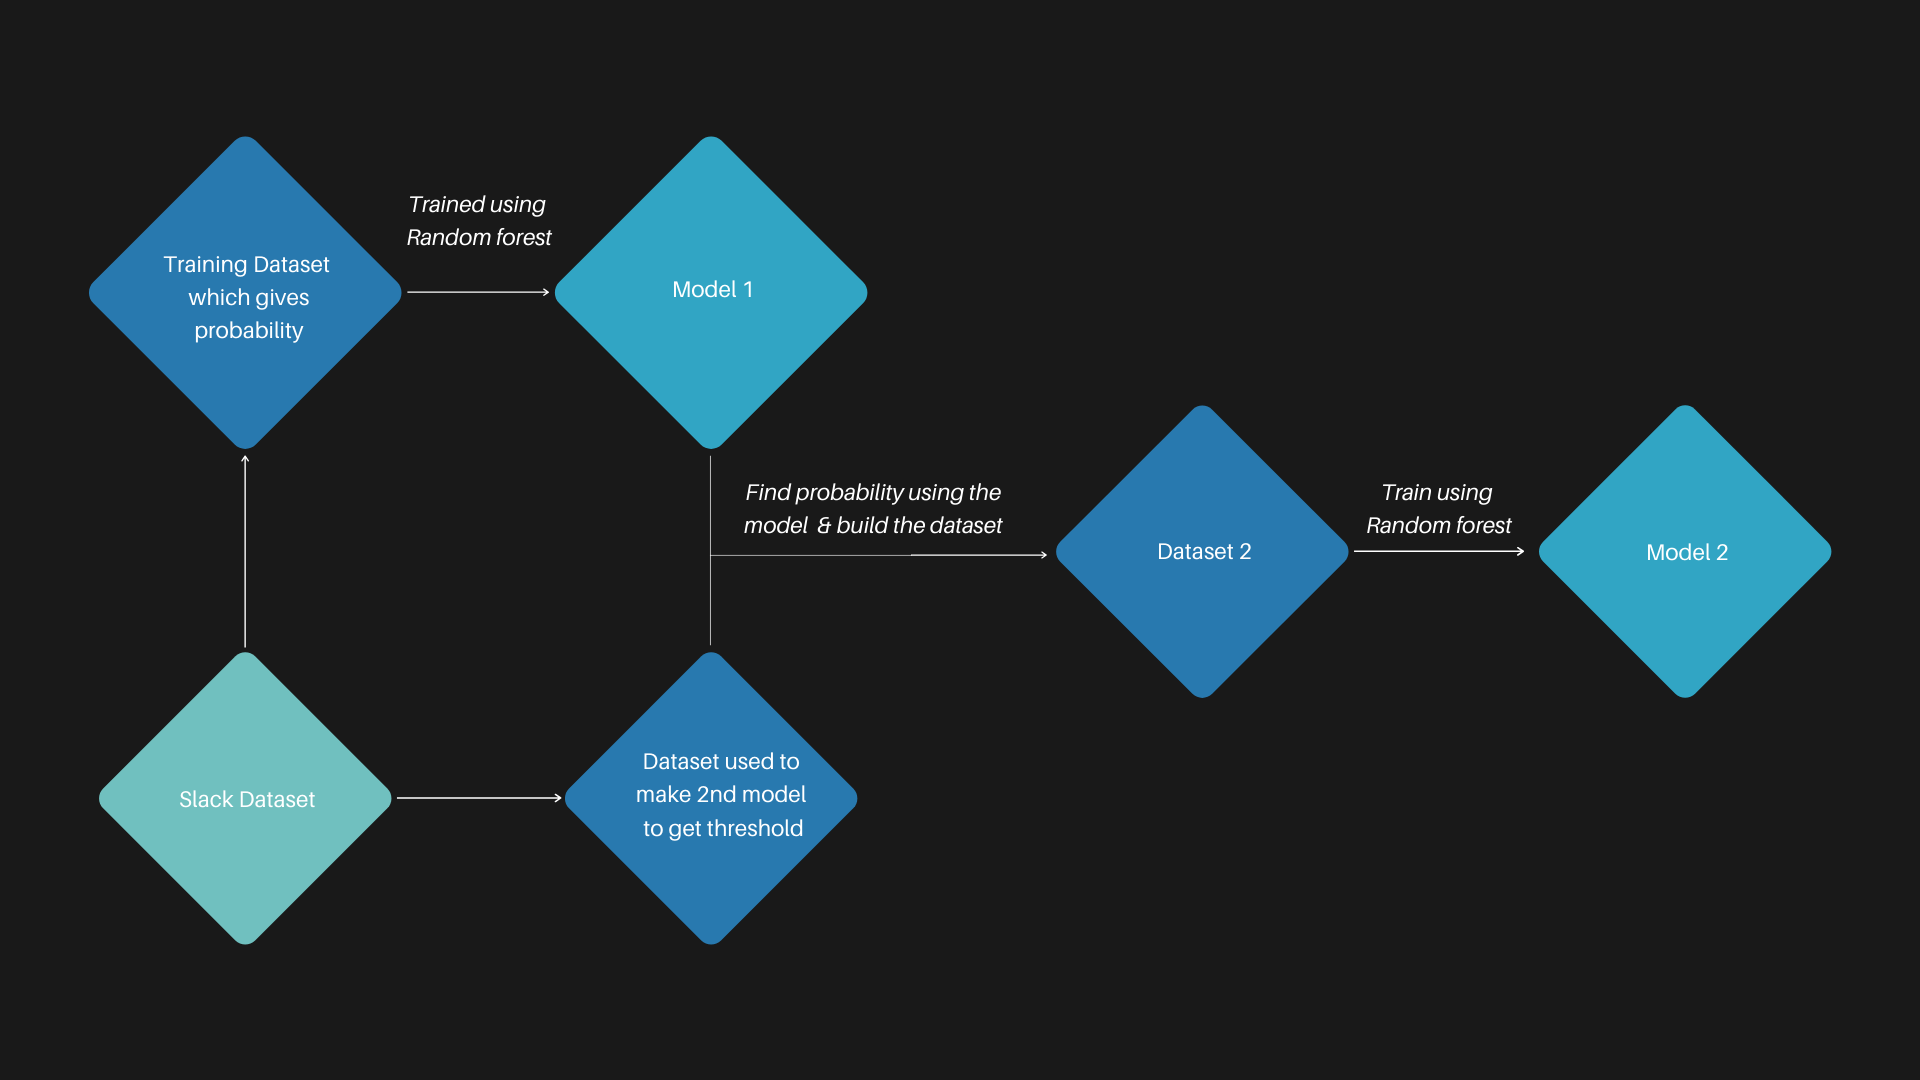
High-Level working of the model
Conclusion
Machine learning algorithms find patterns in data that humans cannot. The purpose of this application was to wrap our head around the ideology of creating automated solutions with Machine learning models and generate valuable statistics with the data in hand.
Coming back to the application, we can’t conclude without exposing it to the real-time data even though the application gave a minimum accuracy of 70%. We planned to test out this application with our employee for around 6 months but things panned out differently due to the current pandemic situation. Currently, our application only evaluates WFH prediction and we plan to extend the module to now predict other statuses like AFK or leaving for the day.
Future Works
Apart from extending the module to predict update status like AFK and leaving for the day. We can also introduce the concept of reinforcement learning to help models adapt to changes over time and improve their performance.