

AI in Drupal has come a long way in a short time. With version 1.1 of the AI Agents module, it's now much simpler to create your AI agents right from the admin interface. No coding is needed, and setup is quick.
These agents can do more than just chat. They can help users find content, assist with form submissions, or support your editorial team with routine tasks.
For example, you could build an agent that guides visitors through your blog, finds related articles, and summarises content so readers get the main points faster.
In this blog, we’ll walk through how to create your own AI agents in Drupal and show what they can do to make your site more helpful and efficient.
Install modules and configure your AI provider
First, you'll need to install and enable the required modules, which are
- AI Agents
- AI Agents Explorer
- AI API Explorer
- AI Provider OpenAI (Or any other provider that supports Tool calling)
Next, you'll need to set up the AI Provider OpenAI module. The best place to find the latest instructions for this is on the module's project page.
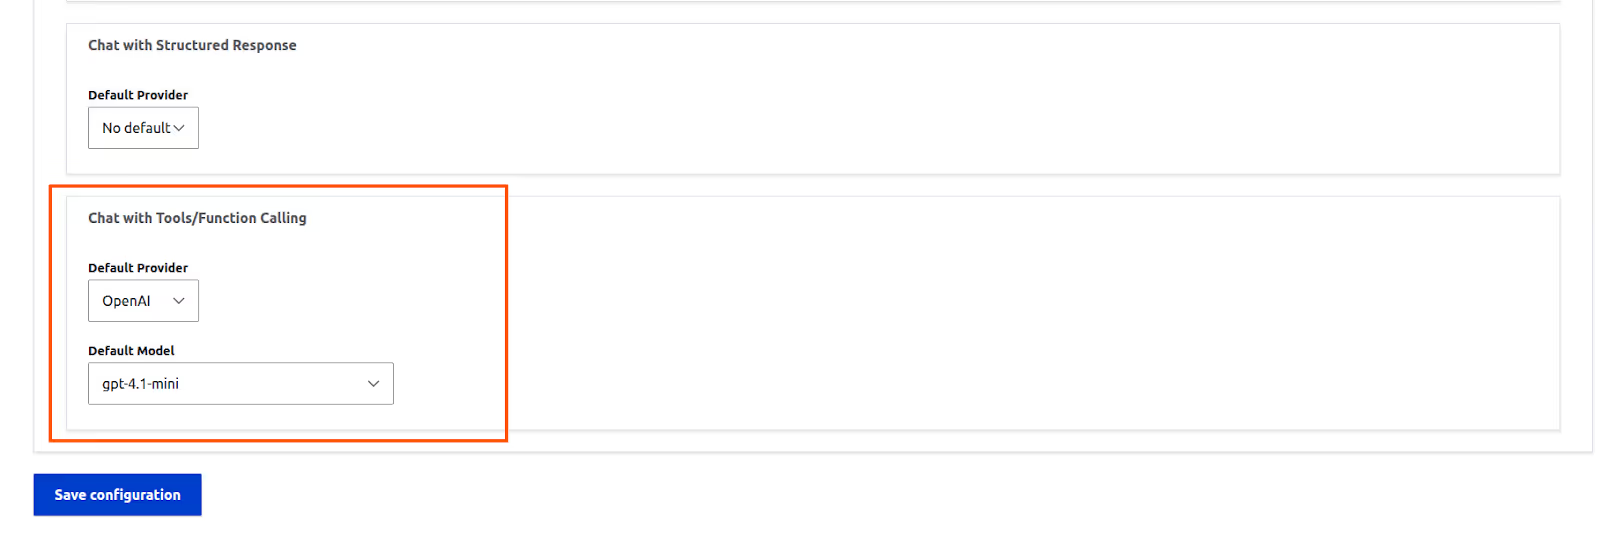
Finally, navigate to Configuration -> AI -> AI Default Settings. Here, you need to select a model for the ‘Chat with Tools/Function Calling’ operation.
Creating our first AI Agent
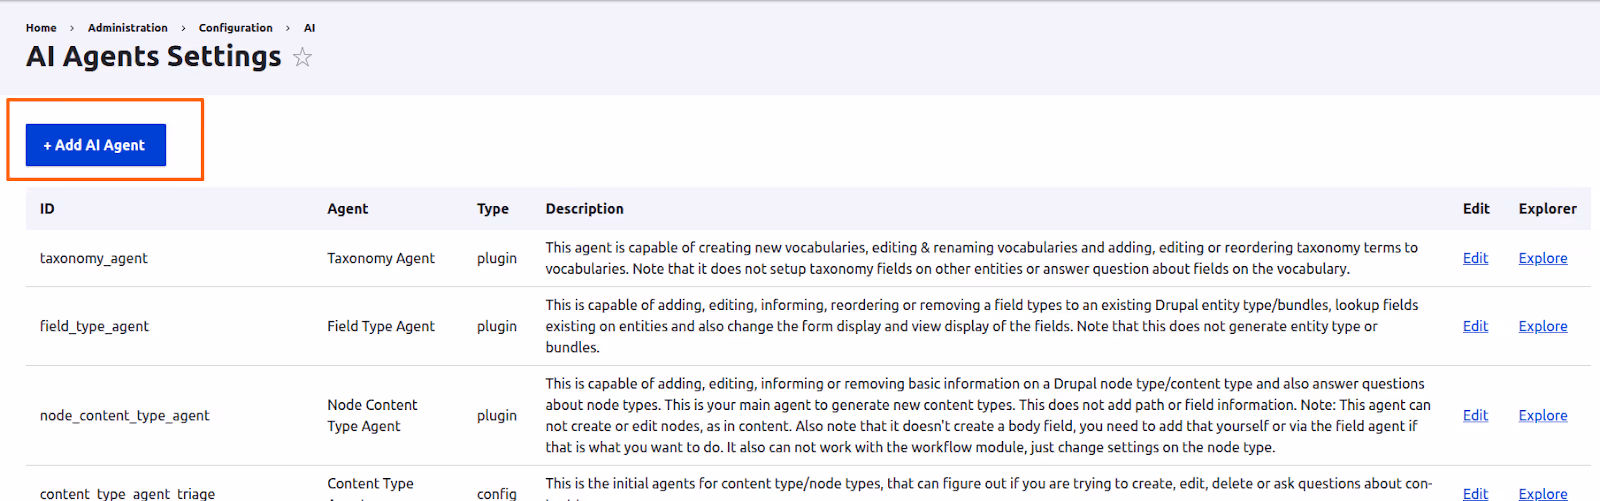
- Go to Configuration -> AI -> AI Agents Settings
- Click on ‘Add AI Agent’
We'll begin with a simple agent designed to suggest five taxonomy terms for any given topic. To set this up, you just need to add the following details:
- Label: Taxonomy term generator
- Description: This agent suggests 5 taxonomy terms for a given topic.
- Swarm orchestration agent / Project manager agent: Leave both of these options unchecked for now.
- Max loops: Change this to 1.
Now for the most important part: the instructions. Under the Usage details section, paste the following prompt into the Agent instructions field.
“You are a smart AI assistant integrated with a Drupal website. Suggest 5 taxonomy terms that are specific instances or subtypes of the given topic. Prioritise concrete examples commonly used for categorisation, not abstract concepts or related fields. Return ONLY comma-separated terms (no explanations, numbering, or extra text).”
Once you're done, click Save.
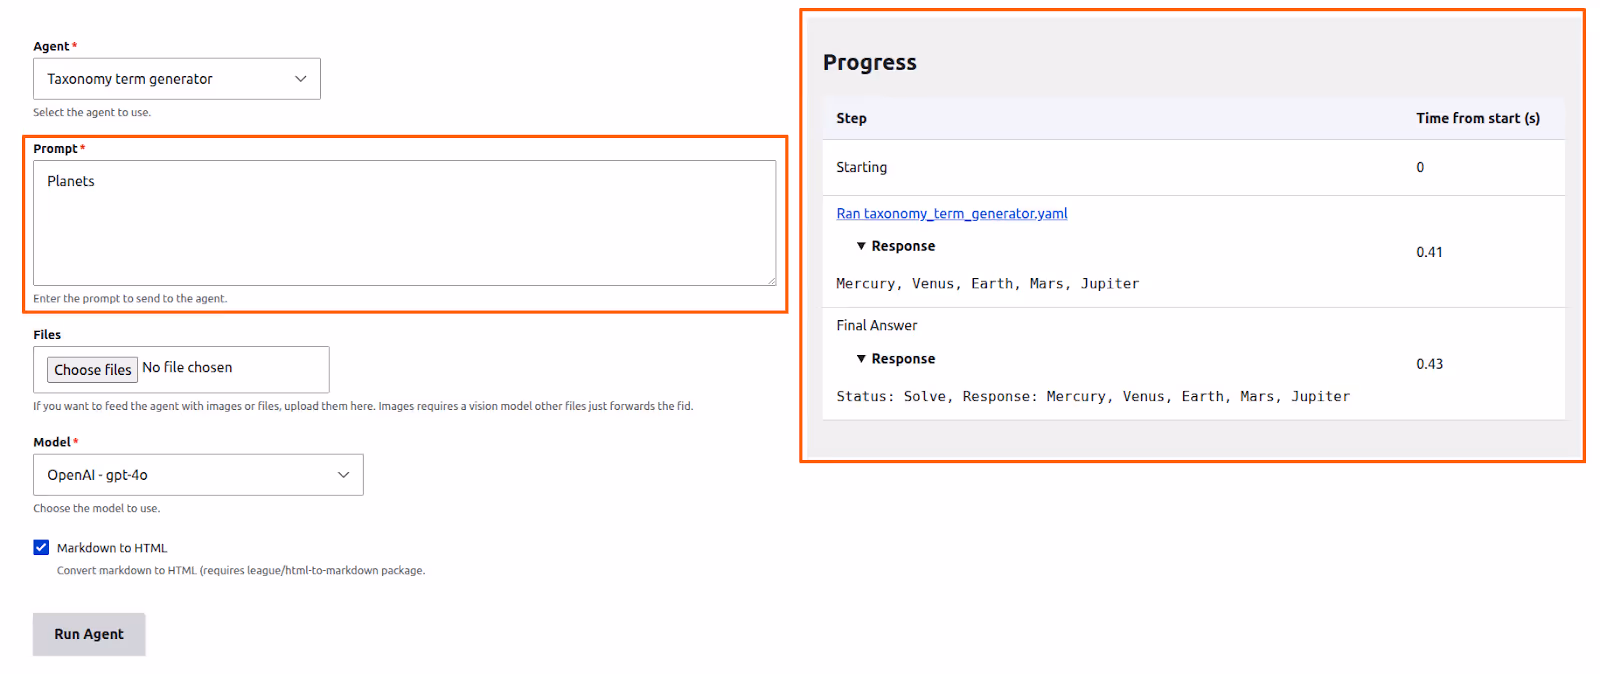
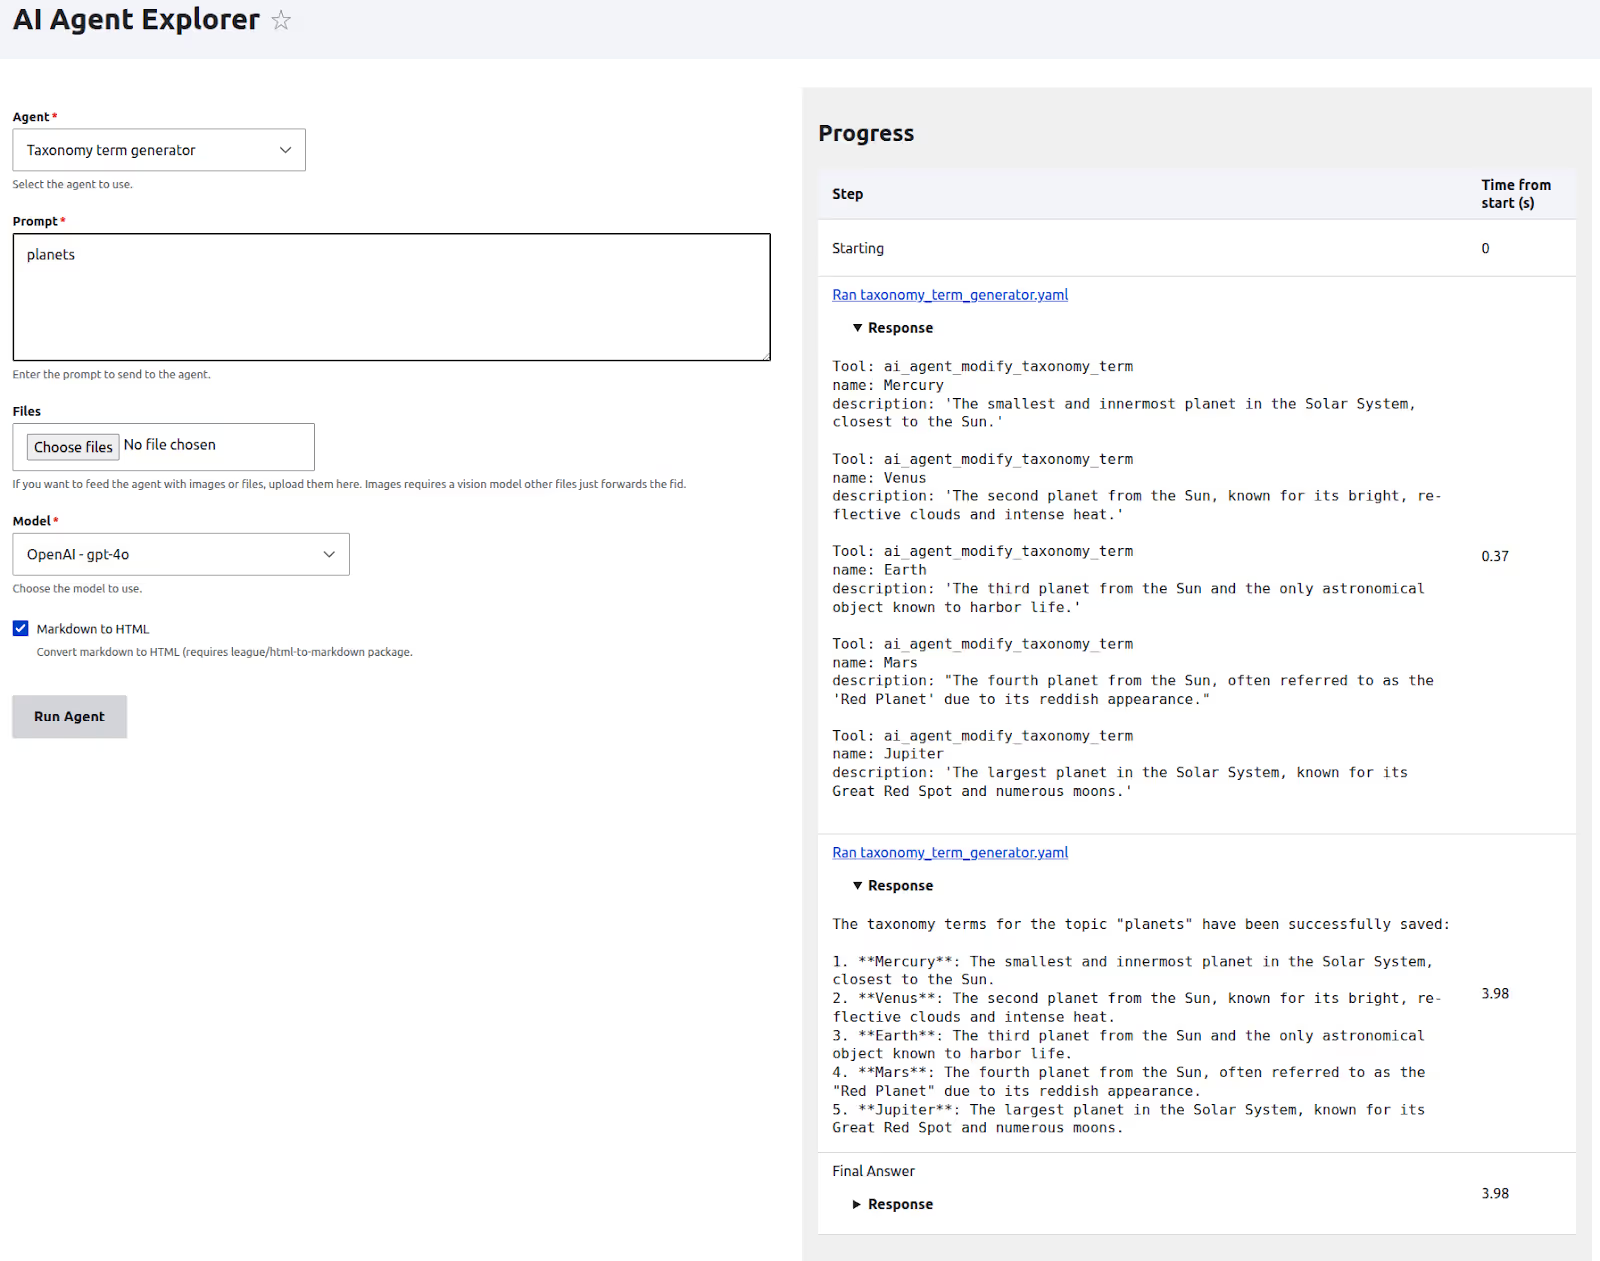
To see our new agent in action, go back to the agent settings page (config/ai/agents) and click the Explore link next to your "Taxonomy term generator" agent. (Note: this link will only be visible if you have the AI Agents Explorer module installed).

In the explorer interface, type any topic into the prompt field and click Run agent. You'll see the output appear in the Progress section.
Congratulations! You've just built your first AI Agent!
Tools: the infinity stones of Agents
Tools are what give agents their real power. They are specific functions that help an agent perform actions beyond just generating text. A tool can be:
- Another AI agent (known as a sub-agent)
- A Drupal Core Action
- An AIFunctionCall Plugin (allowing you to write custom tools with code)
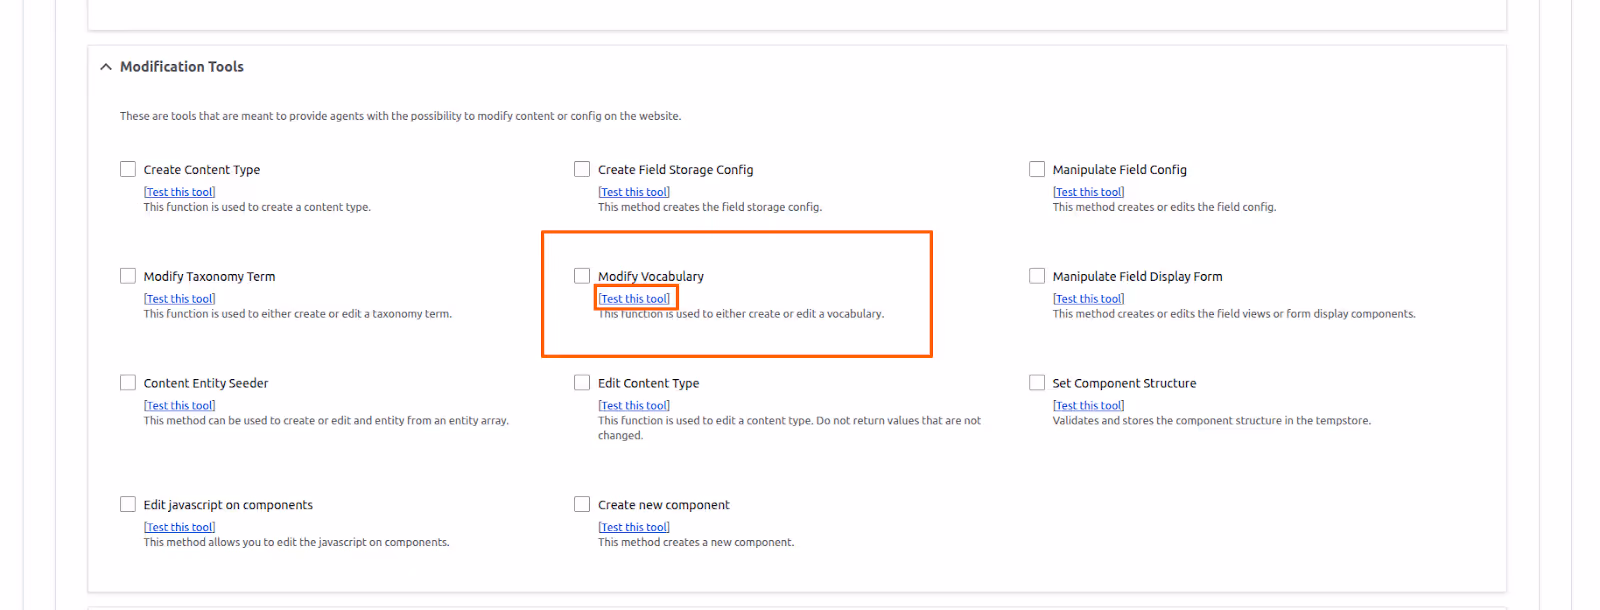
Let's see how an AI agent can use tools. The AI Agents module provides a built-in tool named Modify taxonomy term, which can be used to create or edit taxonomy terms. We're going to update our "Taxonomy term generator" agent to use this tool, automatically saving the suggested terms into our "Tags" vocabulary.
But first, let's test the tool on its own. Edit the "Taxonomy term generator" agent you just created, find the "Modify Vocabulary" tool in the list and click the Test this tool option. You'll need to have the AI API Explorer module enabled to see this option.
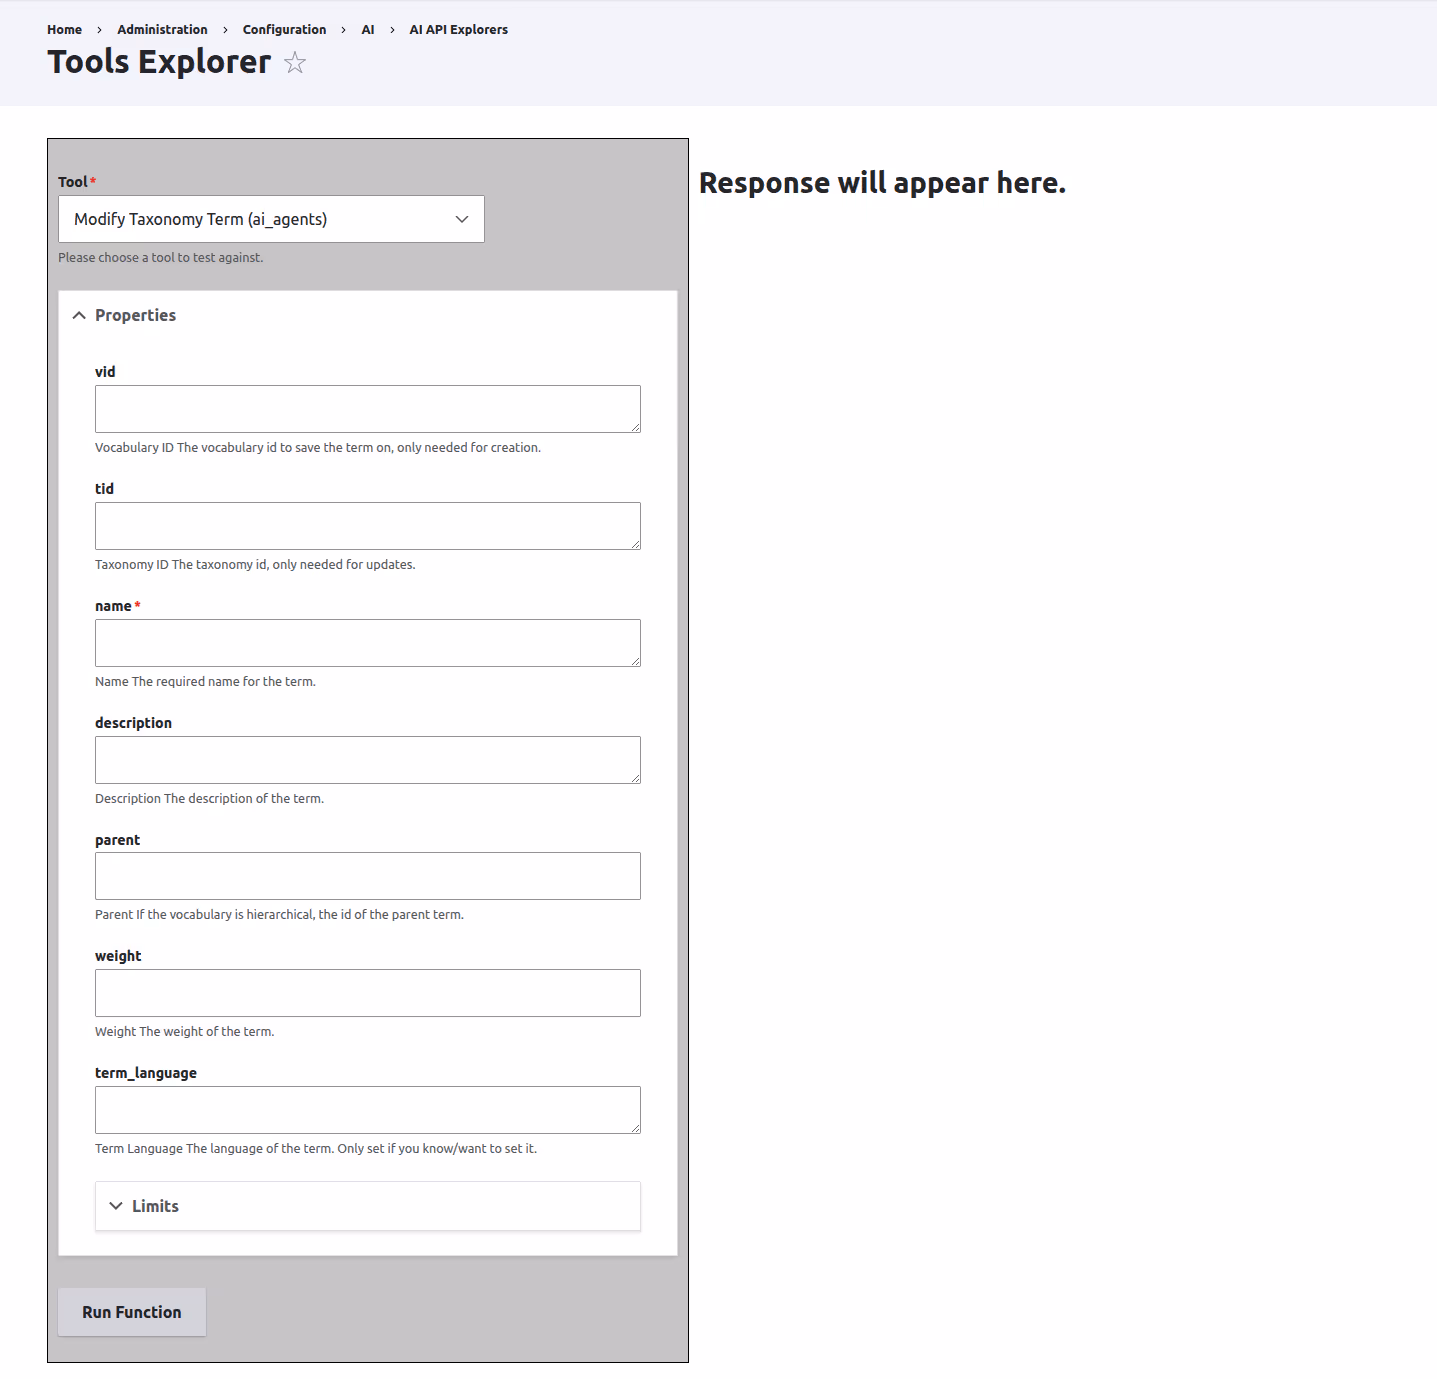
The tool requires several arguments, like vid, tid, and name. Let's give it a try:
- For vid, enter tags.
- For name, enter Earth.
- Click Run Function.
You should see a message like, "The term Earth was successfully created/edited," and you'll find the new term in your "Tags" vocabulary.
If you were to look at the source code for this tool, you'd see it's just a standard function for creating a taxonomy term. There's no "AI" inside the tool itself. The magic is that our agent can figure out how to call this tool with the correct arguments. The tool does the work and returns a success or error message back to the agent. That, in a nutshell, is how tool calling works
Adding the tool to our Agent
Replace the prompt of the ‘Taxonomy term generator’ agent with the following
“You are a smart AI assistant integrated with a Drupal Website. Your task is to suggest 5 taxonomy terms that are specific instances or subtypes of the given topic. Prioritise concrete examples commonly used for categorisation, rather than abstract concepts or related domains. Once the terms are identified, use the modify_taxonomy_term tool to save them.”
Next, scroll down to the Tools section and select the Modify taxonomy terms tool. Once you select it, a new Detailed tool usage section will appear on the form. Expand the Property restrictions element to see the options.
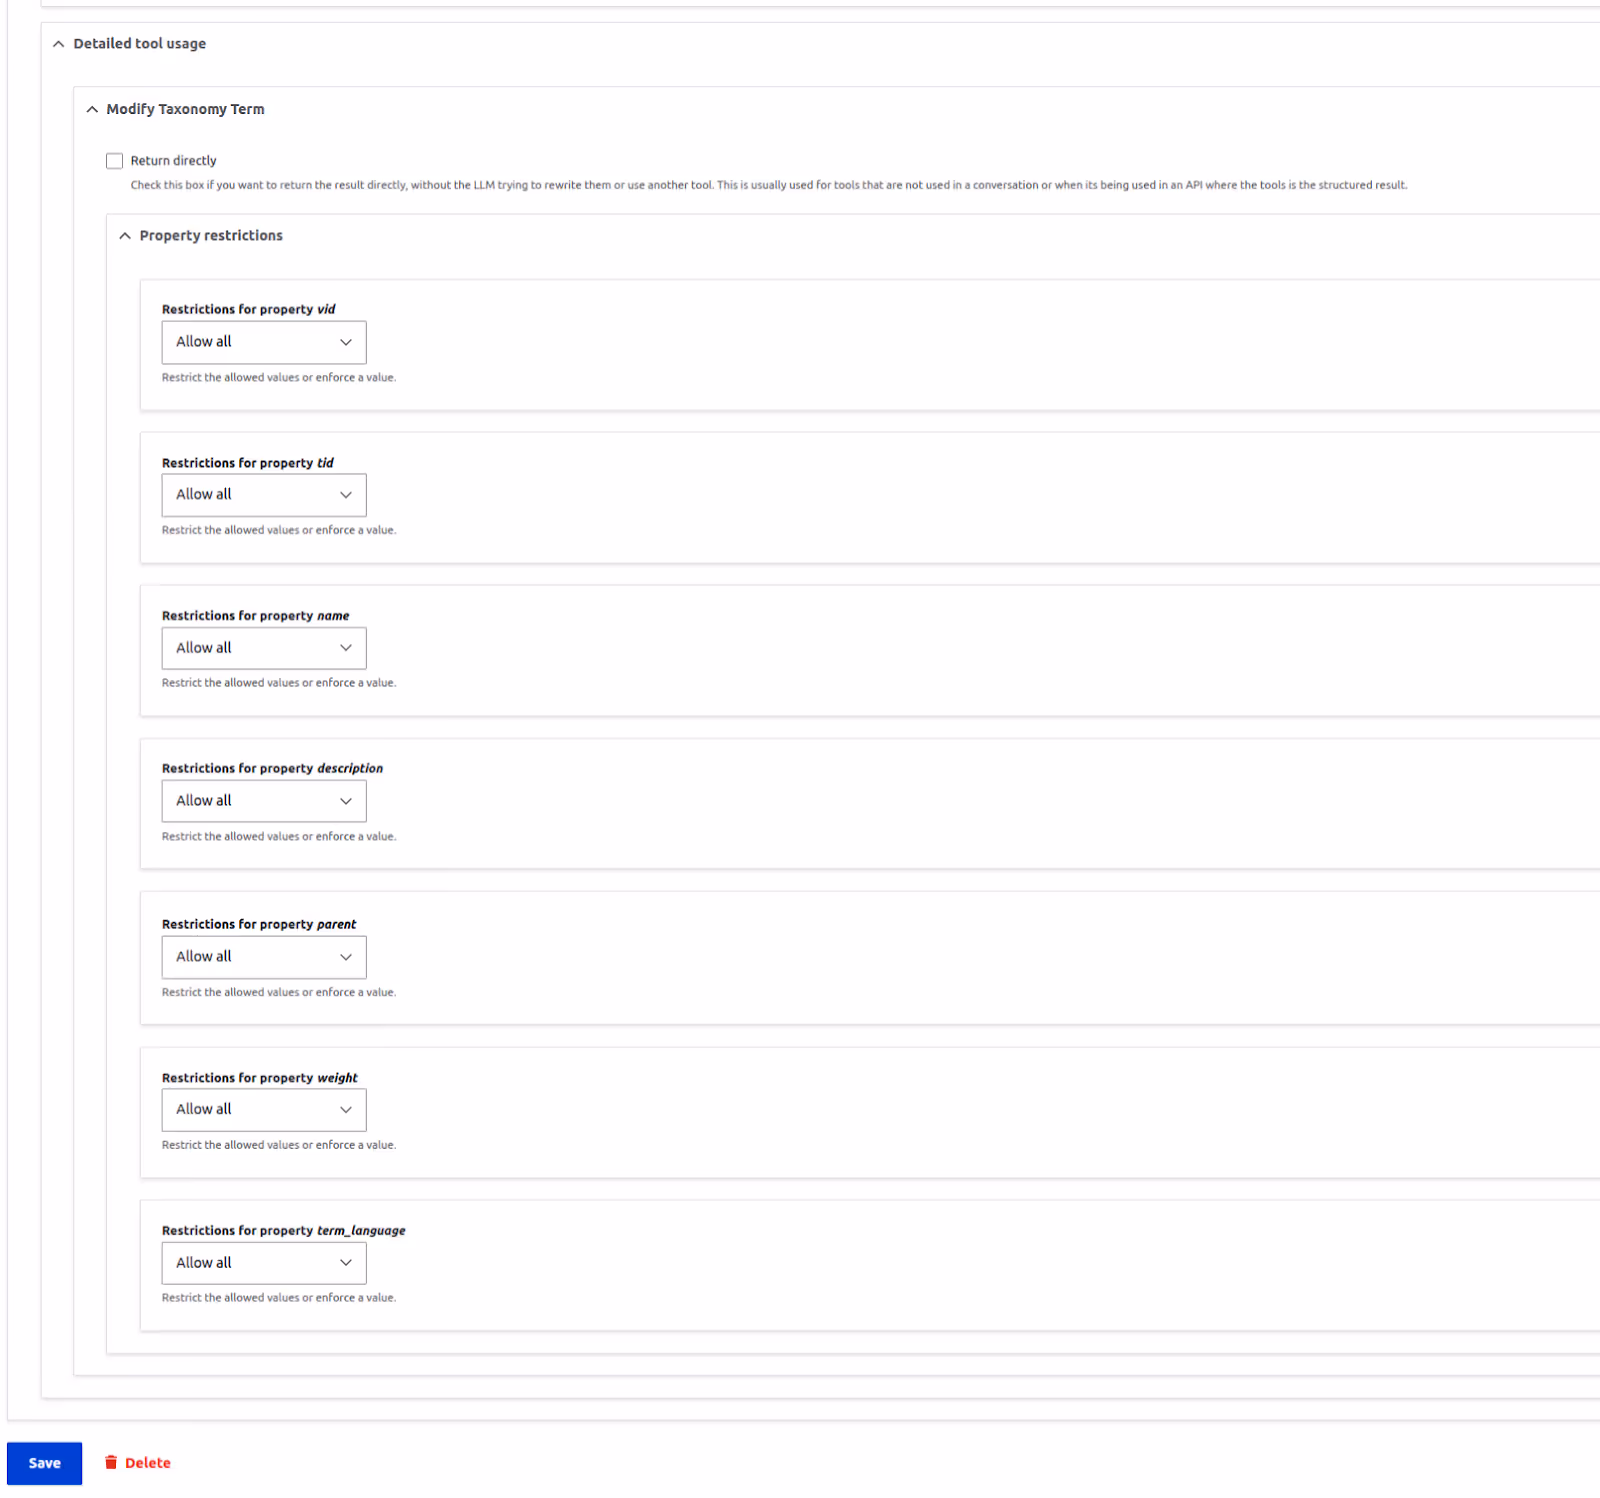
This is where we can control the arguments passed to the tool. For example, our agent should add the taxonomy terms only to the ‘tags’ vocabulary. One way to enforce this is to add something like the following to the agent instructions.
"When using the modify_taxonomy_term tool, always use 'tags' as the value for the 'vid' parameter."
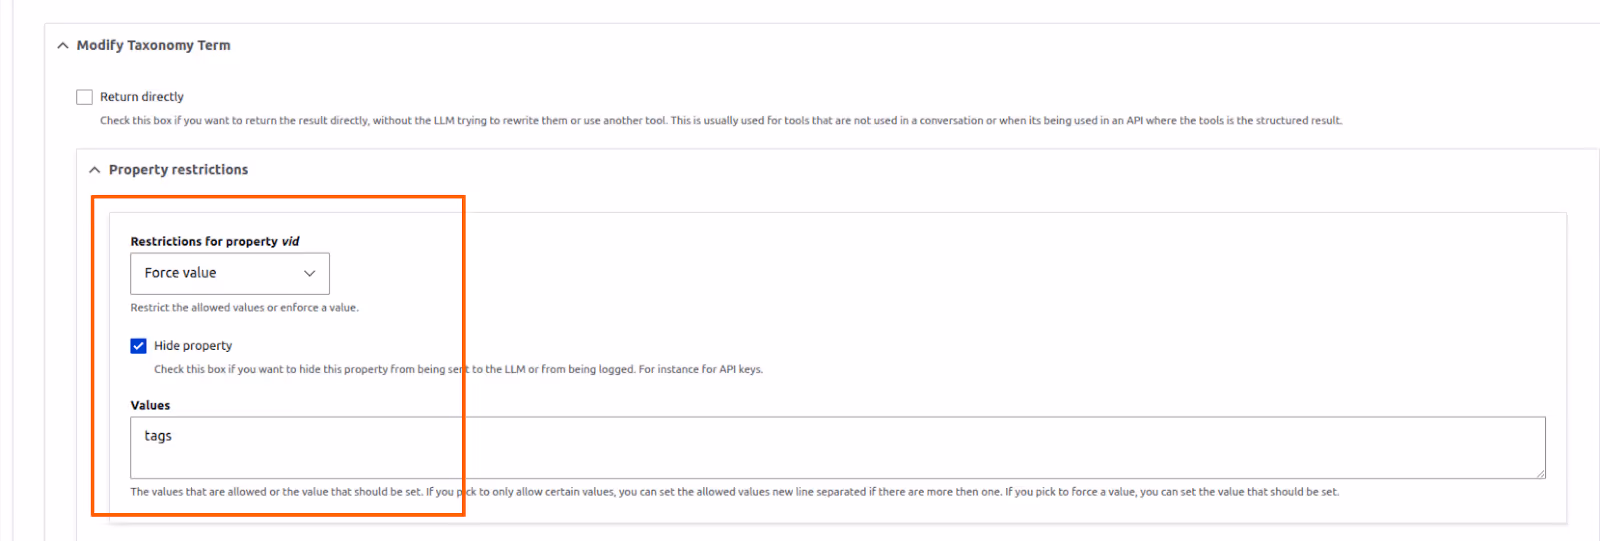
While this would probably work, a better and more reliable method is to enforce the value using the ‘Restrictions for property vid’ field. The default value for this section is ‘Allow all’. Change that to ‘Force value’ and enter ‘tags’ in the ‘values’ field.
If you select ‘Force value’, an additional checkbox, ‘Hide property’, will become available. This feature prevents the property from being sent to the LLM altogether, which is ideal for fields that store sensitive information like API keys.
Now, save the agent and click the Explore button again to test our changes.
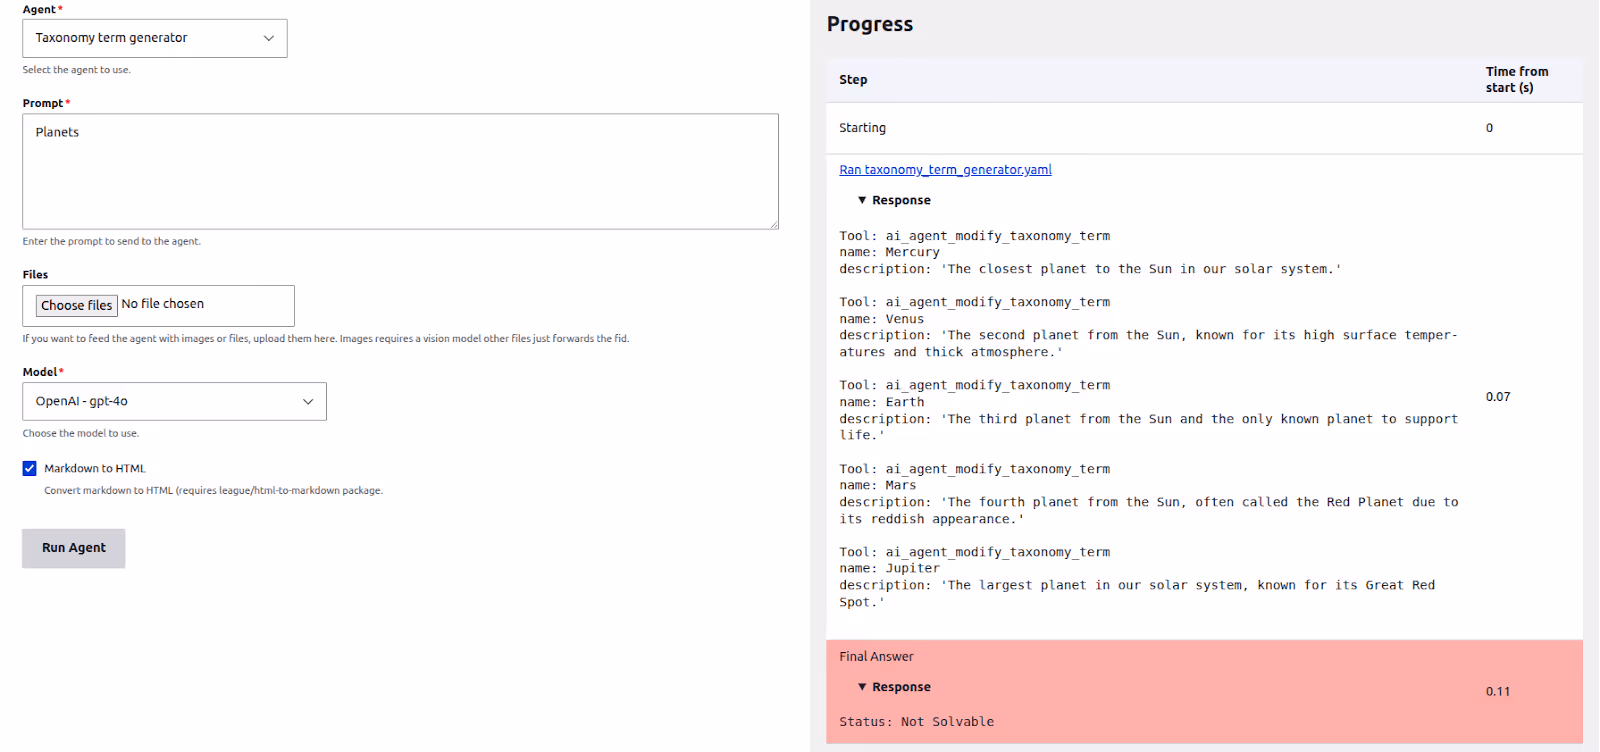
You'll probably see something interesting. The agent tries to call the tool, but the final response says ‘Not solvable’. And if you check your "Tags" vocabulary, you'll see the new terms haven't been created.
So what's going on? This happens because of the Max loops setting. Remember how we set it to 1 earlier? With a max loop of 1, the agent can only communicate with the LLM once. In that single step, the LLM decides which tool to use and what arguments to pass. But agent doesn't have a chance to actually run the tool and confirm the result. For that, it needs a second loop.
Go back and edit the agent, change Max loops to 2, save it, and try again. This time, it should work perfectly! The agent will use the tool, and the new terms will appear in your vocabulary.
Adding multiple tools
Let's try to improve the functionality of our taxonomy generator agent. Instead of adding all the terms to the "Tags" vocabulary, our agent should be able to create vocabularies that don't exist yet (like "Planets" or "Fruits") and then add terms to them. To do this, we'll need to give it a few more tools:
- List bundles: To check the currently available vocabulary names.
- List taxonomy term: To get the terms that already exist in a vocabulary (useful for preventing duplicates).
- Modify vocabularies: To create new vocabularies if they don't exist.
- Modify taxonomy term: The tool we used before to create or edit terms.
Update the prompt of our agent as follows
You are a taxonomy manager agent integrated into a Drupal 11 website. You help to provide information about existing vocabularies and terms, as well as adding new terms and vocabularies. You are a looping agent, meaning you can run multiple times till the task is completed.
You have the following tools available
1. list_bundles: Provides the information about currently existing vocabularies.
2. modify_vocabulary: Can be used to create new vocabularies.
3. list_taxonomy_term: Can give the existing terms present in a vocabulary
4. manage_taxonomy_term: Can be used to add new terms to a vocabulary/modify existing terms.
Before adding terms, make sure that the vocabulary exists. Also, make sure you do not add any existing terms to any vocabulary, unless explicitly requested by the user
Next, you'll need to configure the agent to use these new tools.
- In the Tools section, select all four of the tools listed above.
- Remove the hardcoded tag value from the ‘Detailed tool usage’ section that we set up earlier.
- For the ‘List bundles’ tool, find the ‘Restrictions for property entity_type’ field and set taxonomy_term as the forced value.
- Finally, before saving, change the ‘Max loops’ value to 10. This gives the agent enough attempts to check for a vocabulary, create it if needed, and then add the terms.
Once you've saved the agent, test it again with a prompt like: Create a fruits vocabulary and add 4 terms.’
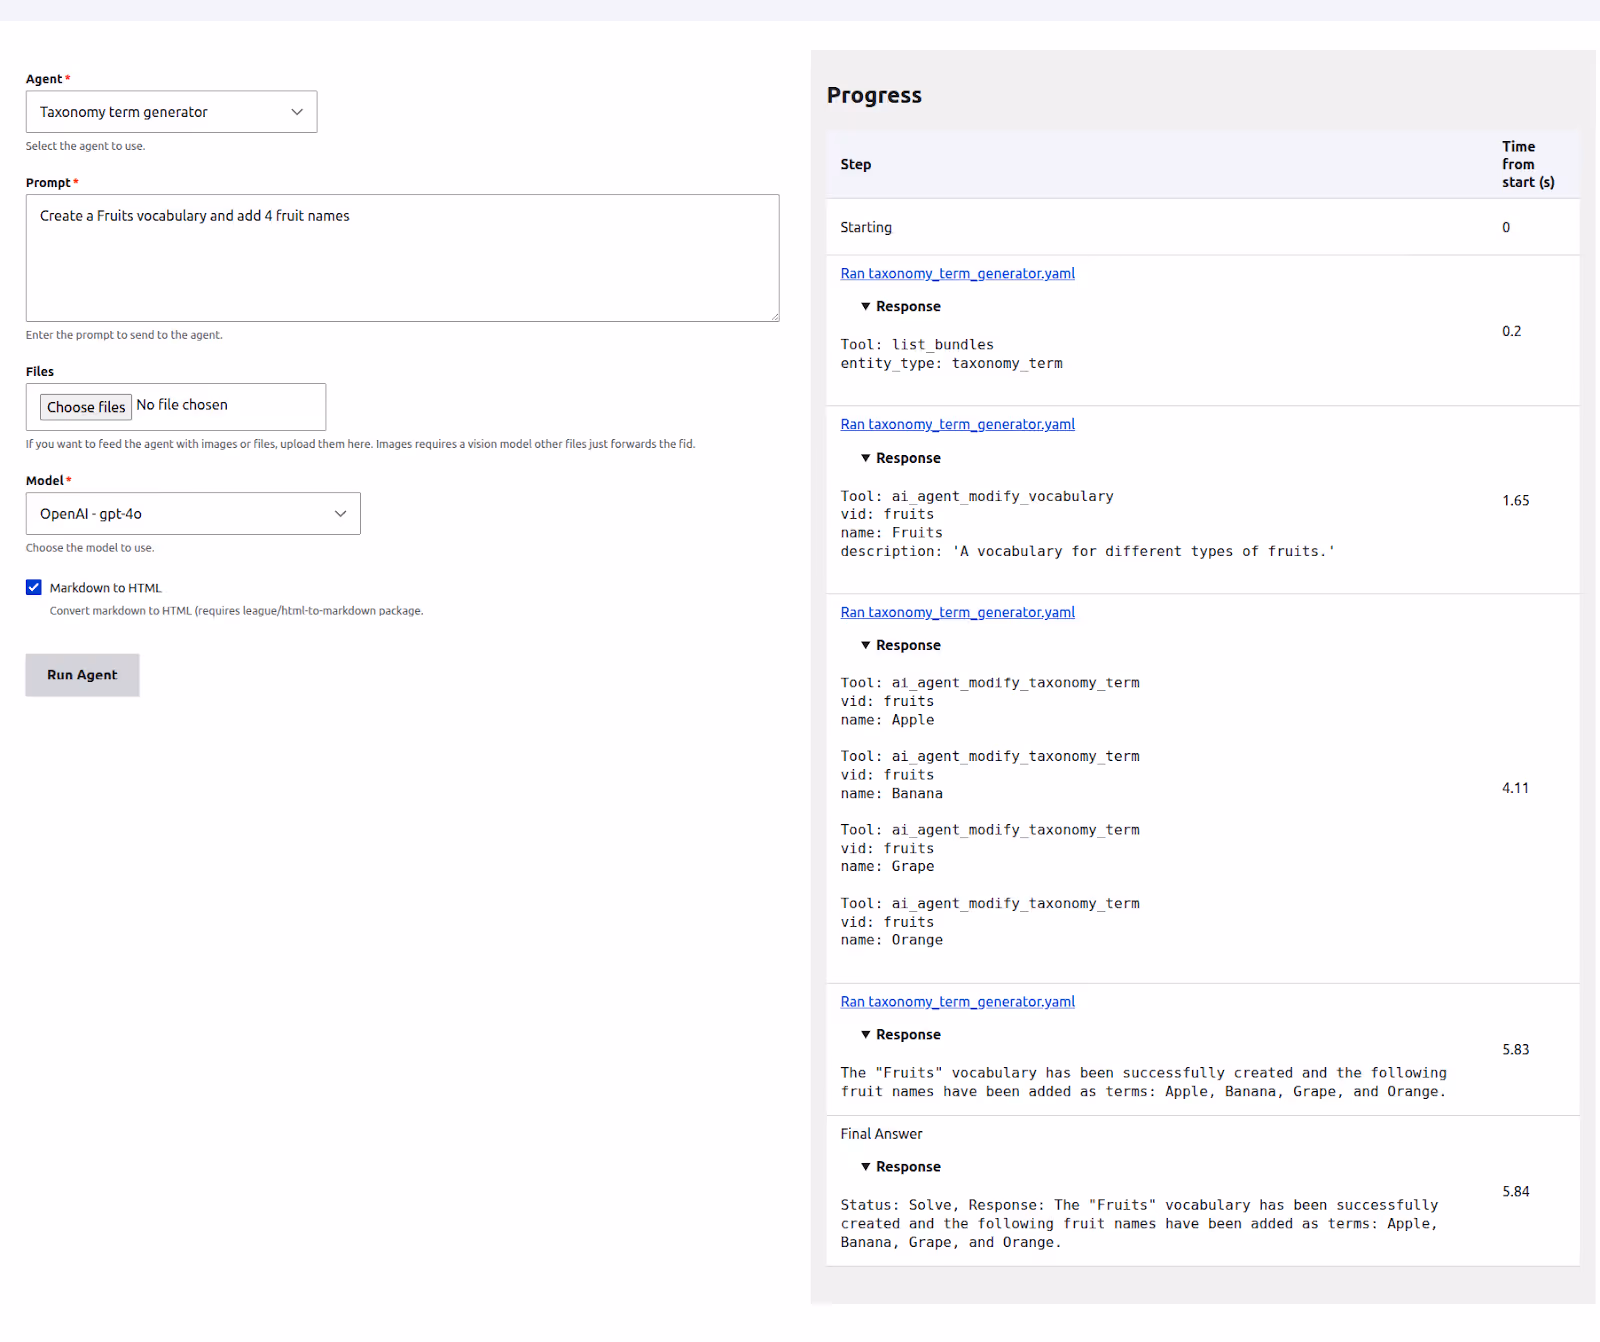
Our agent is now smart enough to use its full suite of tools to handle the entire request.
Default information tools
In our previous example, you might have noticed that our agent ran multiple times, perhaps 4 loops, just to create the "Fruits" vocabulary and add the terms. Each loop increases both the response time and token usage. One of the key tools our agent had to use was list_bundles, simply to get a list of existing vocabularies.
What if we could give the agent this information upfront, as part of its initial instructions? This is exactly what the Default Information Tools section is for. It lets you pre-load information for the agent, making it more efficient.
Let's try it out:
- First, edit your agent and uncheck the List bundles tool from the main Tools section. We no longer need the agent to decide to call it on its own.
- Next, scroll down to the Default Information Tools section and add the following YAML configuration:
vocabularies:
  label: Vocabularies
  description: 'The existing Vocabularies on the system'
  tool: 'ai_agent:list_bundles'
  parameters:
    entity_type: taxonomy_term
Now, save the agent and test it again with the prompt: Create a fruits vocabulary and add 4 fruits.
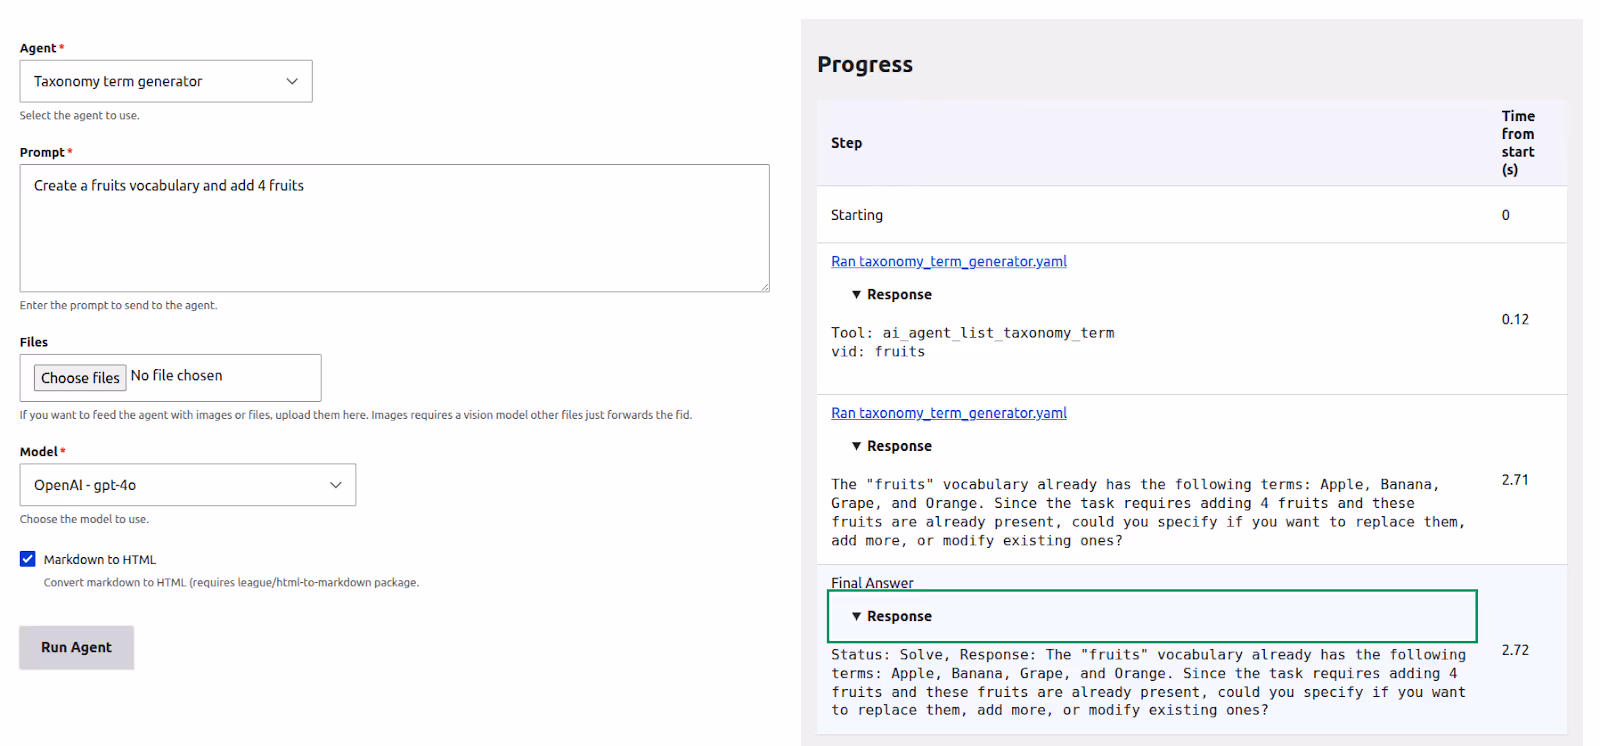
If you run this after the vocabulary has already been created, you'll see a much faster response. The agent will likely tell you that the "Fruits" vocabulary already exists without ever explicitly calling the list_bundles tool.
This happens because the tool was invoked automatically in the background, and its output (the list of vocabularies) was sent to the LLM as part of the agent's initial context. The agent had the information it needed from the very beginning.
Create a chatbot for our Agent
Now let's build a chatbot that allows users to interact with our new taxonomy agent. The first thing you'll need to do is enable the AI Chatbot module.
To use a chatbot, first, an AI Assistant has to be created.
Step 1: Create the AI Assistant
- Navigate to Configuration > AI > AI Assistants and click Add AI Assistant.
- Give it the name: Taxonomy assistant.
- For the Instructions, enter the following. This tells the assistant to simply pass the user's request directly to our agent.
Always delegate the task to the 'Taxonomy term generator' agent. Whatever response the agent provides, return it to the user. You are just a router — you do not perform any actions.
- Under the Agents enabled section, select our Taxonomy term generator agent.
- Click Save.
Step 2: Place the Chatbot Block
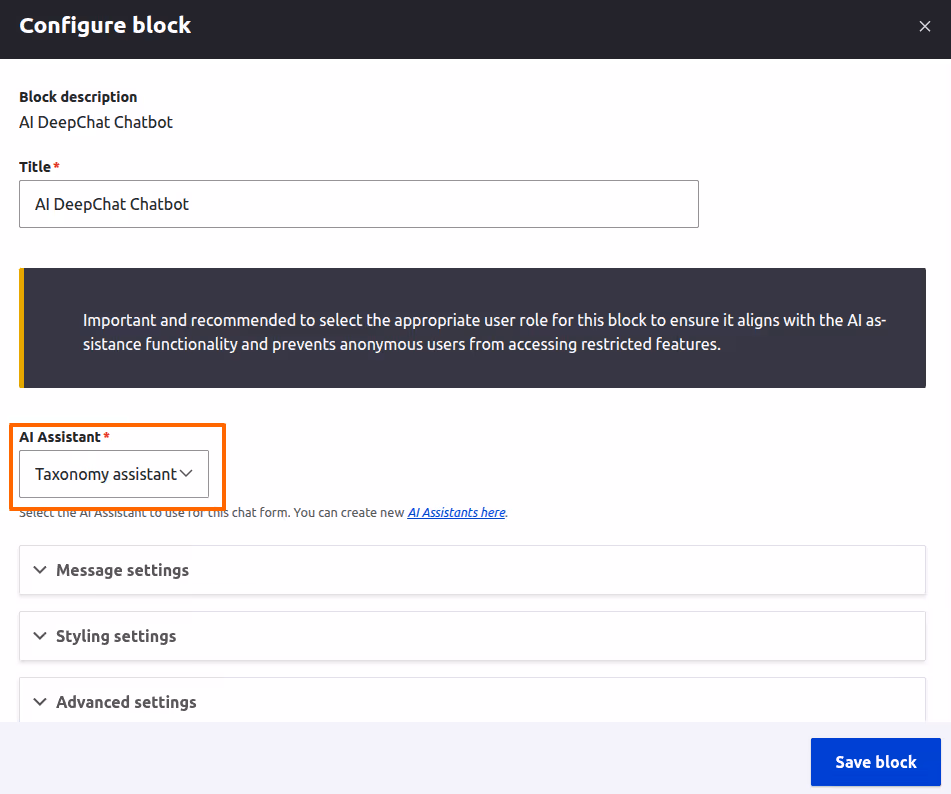
With our assistant ready, the final step is to place the chatbot block on the site.
- Go to Structure > Block layout.
- Select the Content region of the Olivero theme and click Place block.
- Search for and place the AI DeepChat Chatbot block.
- In the block configuration form, select your newly created Taxonomy assistant from the ‘AI Assistant’ dropdown.
- Click the save block, and you're all set! You can now visit any page to interact with your agent.

And there you have it! In just a few steps, we went from a simple idea to a fully functional AI agent that can understand a request, use multiple tools to interact with our site, and even power a user-facing chatbot. If you've followed along, you've already mastered the core concepts. I encourage you to dive in and start experimenting. Don't be afraid to try different prompts, combine new tools, and see what you can create. You might be surprised at how easy it is to build an AI assistant that makes your Drupal site smarter and your workflow easier.
Wrapping Up
By now, you've seen how powerful and flexible AI Agents in Drupal can be. Starting with a simple term suggestion agent, we gradually added more functionality, allowing it to create vocabularies, avoid duplicates, and even respond through a chatbot.
What's exciting about this setup is how easy it is to extend. If you want to automate more content tasks, just add another agent. If you need smarter results, tweak the prompts. You are not locked into one use case, and you don’t need deep AI or coding knowledge to start seeing real results.
Everything you need is already in place. The interface is ready, the features are powerful, and the possibilities are wide open. So go ahead, explore and experiment. You might be surprised by how quickly you can build something truly useful.
If you get stuck or want to learn more, the Drupal community is always there to help.