

Today testing has become a crucial part of the application development process. It should pass with all the verifications and validations on every step. Let’s take a look at how Unit Testing is performed on React applications.
What is Unit testing?
Unit testing essentially means that individual modules are tested in isolation. Testing every unit to make sure it works properly without having any dependency. Unit testing is performed to validate if each unit is working as expected and is often done by programmers.
Testing may seem a redundant and time-consuming task but once you start with a test-driven development you will know how important it is for any project to have an error-free and tested code with all possible test cases that it may fail at. We will discuss the importance of testing with some practical examples below.
Let's take a look at the tools widely used for testing React applications:
Jest
Jest is a test runner that will run all your test suite and test cases. Jest is introduced mainly for testing javascript and react applications. We need to call jest from the command line to run our tests cases. We can also have additional configurations to jest for custom setup.
Installation
Jest provides a configuration file to mention your additional configurations. We can provide the file path in our package, JSON file like:
For more details about jest please refer to the official documentation here https://jestjs.io/docs/en/getting-started.
Let us create a jest.config.json file in our root folder and add this script in your package.json file to run tests:
And you have set up a jest environment for your React application!
Enzyme
The enzyme is a library that is used in many full testing libraries along with jest. It is specifically used to render the components and traverse the DOM.
If you are building a React application then jest and enzyme is the best combination for testing React applications. Remember that jest is a test-runner for running our test cases with the assertions whereas the enzyme is a library used along with jest, that provides different rendering techniques like (shallow, mount etc.) for our React component and DOM traverses the rendered output.
Let’s look at the enzyme setup:
Installation
Enzymes provide adapters to work well with different React versions. So let’s install the adapter depending on our React version. Here we are installing React16.
Now we need to set up our enzyme with the adapter we have installed in our jest testing environment. So, let’s create jest.setup.js and add the following code in the file:
Now add this setup file path to our jest.config.json file:
And that’s it! You have set up an enzyme in your jest environment.
It's very important to decide what is necessary to test and what should be omitted from testing.
So, that a lot of unnecessary tests and snapshot files are not left behind, considering the next person who will manage those test cases after you.
For Unit testing each component I will suggest to always start with the smaller and stateless components and then move to complex components. So that if a complex React component involves another smaller already tested component, making the process easier.
However, in a test-driven development (TDD) process you should decide and write the test case first which will fail initially and then eventually develop your functionality considering which test cases to pass. This gives a more clear picture of what you want to achieve and all possible cases where this functionality may fail.
Consider a small example to understand:
1.
2.
- A DisplayName component which receives a name property as props and renders it.
- A User component having a text input as name property validates the user name for its type and sets the error if it finds any.
Note that we have exported the two components and the validation function which we are going to use in our further tests.
Unit Testing the above example
There can be two main approaches to test our React components which are:
- Snapshot testing
- Logical/functional testing
1. Snapshot Testing
Snapshot Test generates a snapshot of your component in the current state when you run the test and stores it in a folder named “__snapshots__”.
So, next time when we change the component or modify it and run the test again; if it fails, a new snapshot is taken which clearly shows the difference between both the snapshots rendered with the output of the same component. In the case, if a test fails you can either accept the change or deny and modify your component accordingly.
How Snapshot Testing is done?
First, we need to install react-test-renderer utility to render the component in our test.
Let’s implement our first snapshot test by writing the below test case in a file UserName.spec.js:
At first, we rendered the component DisplayName, transformed it into a JSON and checked if it matches with the previous snapshot taken. Let’s run the test by the command “npm run test” on cmd and see.
If you run the test for the first time, it will generate the snapshot of components output and store it in the folder “__snapshots__”. You can take a look at the kind of structure it stores.
Now, let's change our DisplayName component and run the test again:

You can see it shows the change in our component and the test fails as it does not match with our previous snapshot. It indicates that either it found a bug in the component to fix or there is an implementation change and you just need to update the snapshots. You can update snapshots using the “-u” option. Similarly, we can also add a snapshot test for our parent component as well.
2. Logical/Functional Testing
For testing, validation functionality lets add some more tests in our code.
Here we have added two test cases :
- Checks if an error message has been set if the user passes a number input for his name.
- Checks if it resets the error message to false if the input box is empty for the name property.
So this covers the possible outcomes where our application may crash in logic that we might have forgotten to handle at the time of development.
Now if we run the tests, should see the following output.
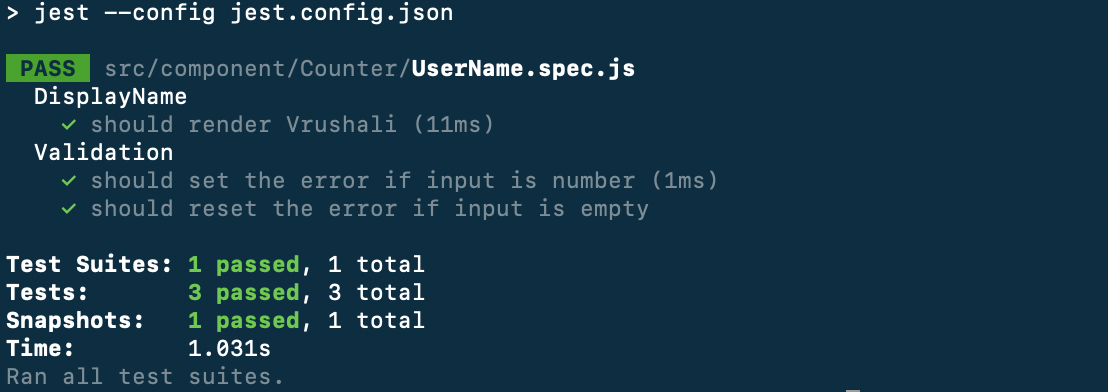
If the validation is incorrect, running tests will inform you, else all the tests will pass. Keeping your logic separate helps a lot in complex code so that it can be tested in all possible cases and also looks more clean way to understand the code.
What did we learn?
- To implement testing, code needs to be less dependent, leading to more modularized and reusable code.
- Having good tests help to verify the changes by failed test cases on every run
- Faster development - HOW?
1. Before moving to code, we first write the tests while considering all possibilities that code may fail at. Which helps us at writing more effective and error-free code.
2. Without tests, we do developer testing as having consoles, breakpoints, debuggers and having a GUI to see where code fails.
3. Unit tests are less costly than developer tests.
4. Before starting development we will be clear about our code requirements through tests which increase our speed while writing the logic rather than finding bugs one by one and then fixing them.