

CKEditor was added to Drupal back in 2011. While the latest version of Drupal, Drupal 9 comes with CKEditor 4’s stable version, its support will be terminated sometime in 2023, around the same time as Drupal 9’s end of life. Since replacing CKEditor 4 with the new and improved CKEditor 5 is one of the key initiatives identified for Drupal 10, let's look at CKEditor 5 for Drupal 9.
With June 2022 as the target release date of Drupal 10, it is important that contrib modules get updated much sooner as it will be a prerequisite for updating sites. The site owners will have until November 2023 to update to CKEditor5
CKEditor 5
CKEditor 5 has been rewritten in ES6, using the power of modules. Keeping user experience and modernisation a priority, enabling exciting possibilities such as real-time collaboration and commenting while creating content. This real-time collaboration feature requires the ‘CKEditor Cloud Services’ and thus will not be available as a core feature. Sites that wish to use it need to sign up with CKSource for the service.
Difference between CKEditor4 and CKEditor5
Every single aspect of CKEditor 5 is redesigned — from installation to integration, to features, to its data model and API. CKEditor5 is highly customizable, it provides all the necessary tools to easily integrate it with modern applications and technologies, like Angular, React, Node.js, npm, etc.
There is no view source button in CKEditor 5 because there is no editable source. There’s an abstract syntax tree in memory that generates clean semantic HTML when you save it. Find out more about the view source functionality here.
CKEditor 4 uses the DOM as a model. When loading data, the HTML is processed but it ends up in the DOM anyway. CKEditor 5 has a custom data model. When you load HTML into the editor, it's parsed and then features try to pick up from this HTML the pieces they understand. This is called ‘conversion’. As a result of a conversion, the content is being loaded into the custom data structure. The reverse process is executed when content needs to be rendered back to the DOM either for editing or data retrieval. This means that if you don't have a feature that handles a certain HTML tag/attribute/style/whatever then the editor will automatically drop it. But not only does it not get displayed, but it would also be lost. Thus in CKEditor 5 any HTML that does not have a CKE5 converter will result in data loss.
For more details visit - https://support.CKEditor.com/hc/en-us/articles/115005278429-What-is-different-about-CKEditor-5-compared-to-CKEditor-4-
Ways of integrating CKEditor5
Integrating existing builds
You select the plugin which you want to use and generate the bundle. Since you are using an already built editor you do not need any additional webpack configurations. In this case, CKEditor works as a ready-to-use library. Building from source.https://CKEditor.com/CKEditor-5/online-builder/
Building from source
This approach allows you to have full control over the building process of the CKEditor. In this method, you won’t be using the existing builds but you will generate the build in your project. As a result, you can control what features to be included.
DLL builds
Both of the above methods require you to recompile the CKEditor every time you add a new feature and in some scenarios, this is not the best way to integrate CKEditor5 into a project. Let’s consider Drupal as an example, where we have so many other contributed modules. With the above two approaches, it becomes difficult to add custom plugins to CKEditor. To avoid such scenarios CKEditor provides a ‘DLL builds solution’. CKEditor uses webpack DLLs to build the core and allow loading plugins by a simple JS concatenation. Webpack DLLs allow creating a global registry of modules so plugins could also import them, even if build separately. DLL build provides a way for adding new plugins to an editor build without having to rebuild (recompile) the build itself. In DLL builds the complete project is divided into multiple files.
You can find more detailed information about this at https://CKEditor.com/docs/CKEditor5/latest/builds/guides/integration/advancedsetup.html,
https://CKEditor.com/docs/CKEditor5/26.0.0/builds/guides/development/dll-builds.html
CKEditor 5 and Drupal 9
If we look at the Drupal CKEditor 4 module we have a lot of contributed modules that provide CKEditor plugin integration. To keep that option open in Drupal, the CKEditor 5 module opts for the 'DLL build solution'. So if anyone wants to add a contrib module for the CKEditor5 plugin they will have the feasibility to extend the features provided by the base module. Let’s take a look at how we can add the new CKEditor5 plugin into the module. CKEditor5 module implements a new plugin type and it uses two types of plugin discovery methods i.e YAML & annotation. Learn more about CKEditor 5 and Drupal here.
We will now walk you through the process of adding new plugins.
Adding plugin with YAML
If you are planning to add a new CKEditor plugin integration and you don’t want to provide any settings for this plugin then the YAML plugin is the best option for this. Let’s look at the example where we want to add select-all plugin integration.
Step 1
As already mentioned, Drupal uses a DLL build approach to integrate the plugin, this requires a DLL compatible js file. To generate the DLL compatible js file on the plugin follow the steps mentioned below:
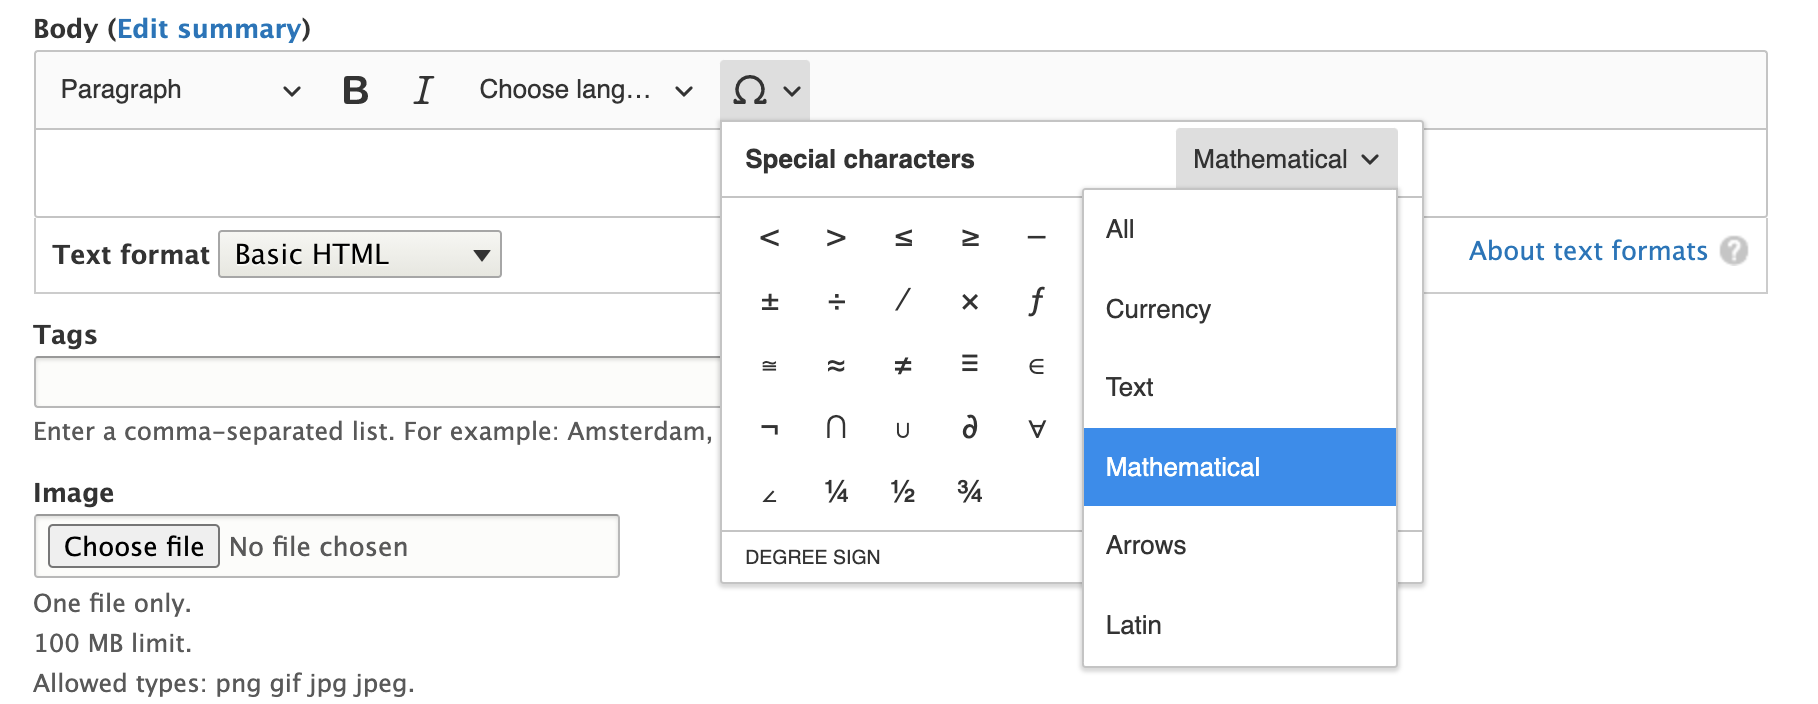
The above steps will be enough if the plugin is provided by the CKEditor as they will provide you with all the required setup to generate DLL compatible files. Let’s take a look at how we can add the special characters plugin through our custom module.
Step 2
Create a new custom module in our case we will name it - ‘ckeditor5_special_characters’
Step 3
The DLL compatible file will be generated at CKEditor5/packages/your-package/build. Copy this file and place it under the js/build folder. Here the path does not have to be the same, but the CKEditor5 module uses this directory structure. Also, copy the icon file from the CKEditor5/themes/icons folder and place it in the modules icon folder. This will be the icon that will be displayed in the toolbar.
Step 4
Now to make this plugin available in CKEditor, we will have to copy the file generated at ‘packages/your-package/build’ into the {custom_module_name} js/build file. In this step, we will be creating a library for adding JS/CSS to Drupal, and we will be using this library in our next steps.
Step 5
The module YML file should be named {module_name}.ckeditor5.yml. It will be discoverable if it ends with .ckeditor5.yml. Here’s how the plugin definition will look like:
Let’s go through each of the properties to understand them better:
- library: Thee library, this plugin requires
- admin_library: The admin library this plugin provides
- plugins: The CKEditor5 plugin classes provided
- toolbar_items: List of toolbar items the plugin provides
- elements: List of elements and attributes provided, compatible with filter_html
You can find the toolbar items name on the CKEditor plugin page - https://ckeditor.com/docs/ckeditor5/latest/features/special-characters.html
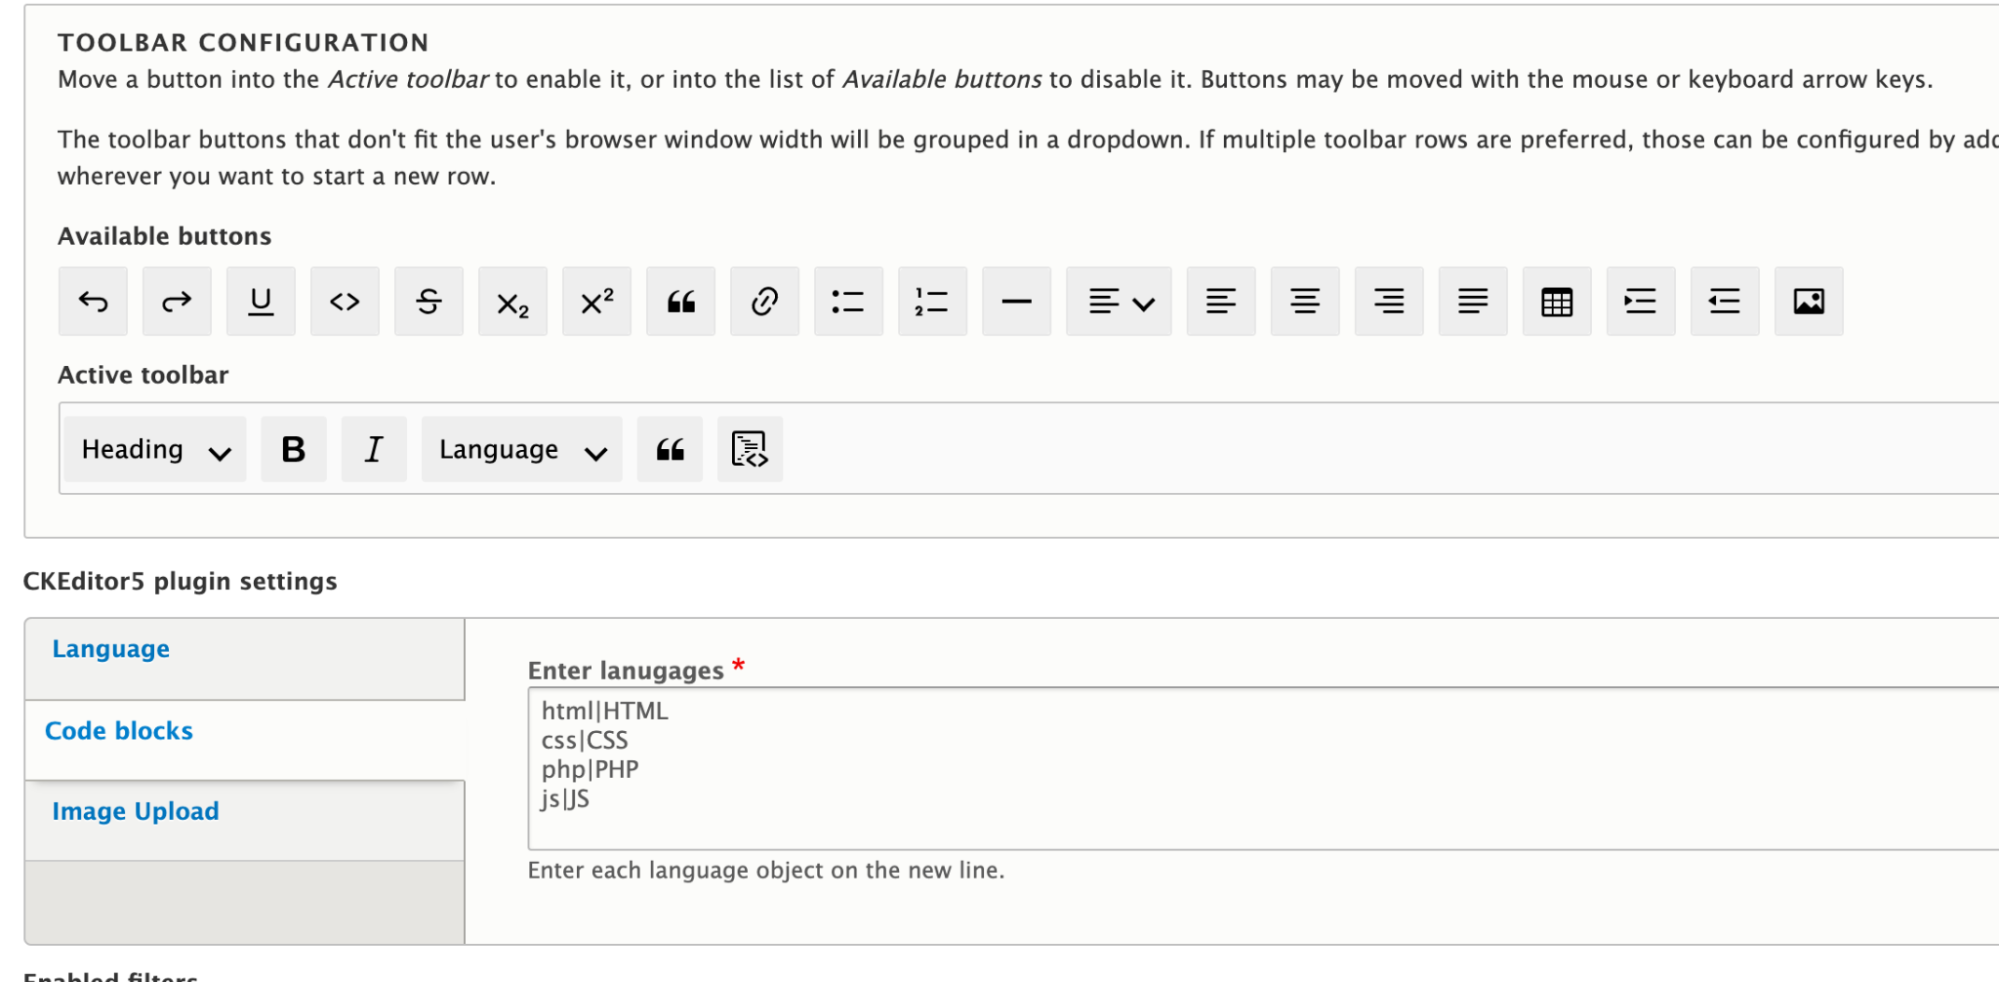
Once all the above steps are completed head over to configure the text filter page. Here you should see the plugin icon in the available plugins section; drag and drop it to the active toolbar.
Adding plugin with PHP Class
YAML plugin definition works when you don’t have any settings or dynamic values for the plugin, but what if the plugin requires some configuration? In such cases, we can use the PHP class approach. Consider an example where we want to integrate the code blocks plugin into CKEditor5, which provides a way of inserting and editing blocks of pre-formatted code into the WYSIWYG editor. If we take a look at this plugin it provides an option to configure the languages and label and those will be available in the editor while editing content.
Step 1
Follow the first 3 steps from the Adding plugin with YAML. The implementation of this plugin will create a new custom module named ckeditor5_code_block.
Step 2
Create a CKEditor5 Drupal plugin under ckeditor5_code_block/src/Plugin/CKEditor5Plugin\CodeBlock. You can use annotation or YAML plugin definition to make the plugin discoverable by the CKEditor5 module. In case if you want to use YAML for plugin definition then you can use the “class” key in YAML definition for plugin with class:
Plugin_config: A keyed array of additional values for the CKEditor5 constructor config.
Annotation-based plugin definition:
CKEditor5 plugins have interfaces that can be implemented so that plugins are aware of what's happening on the filter page. Following are the available interfaces:
- CKEditor5PluginConfigurableInterface
This interface provides you with a way to create a ‘settings form’ for your plugin. In our case, we want to provide a useful way to enter the language name and a label for it. So we will be implementing this interface to provide a form for our plugin to accept configuration values.
- CKEditor5PluginContextualValidationInterface
Ckeditor5 allows every plugin to validate the plugin based settings. By implementing this interface we can validate the plugin setting form. In our case we will be validating whether user-provided settings are in the required format or not, if not we can display an error message to the user.
- CKEditor5PluginInterface
Through the plugin settings form, we have received the user settings for the plugin but we want to make use of those settings while loading the CKEditor5 plugin. This method allows us to update the plugin configs. For example, in our case, we want to update the plugin configuration to languages provided by the user.
- CKEditor5PluginContextualInterface
This interface provides you with a method with which you can enable/disable the plugin based on the current editor settings.
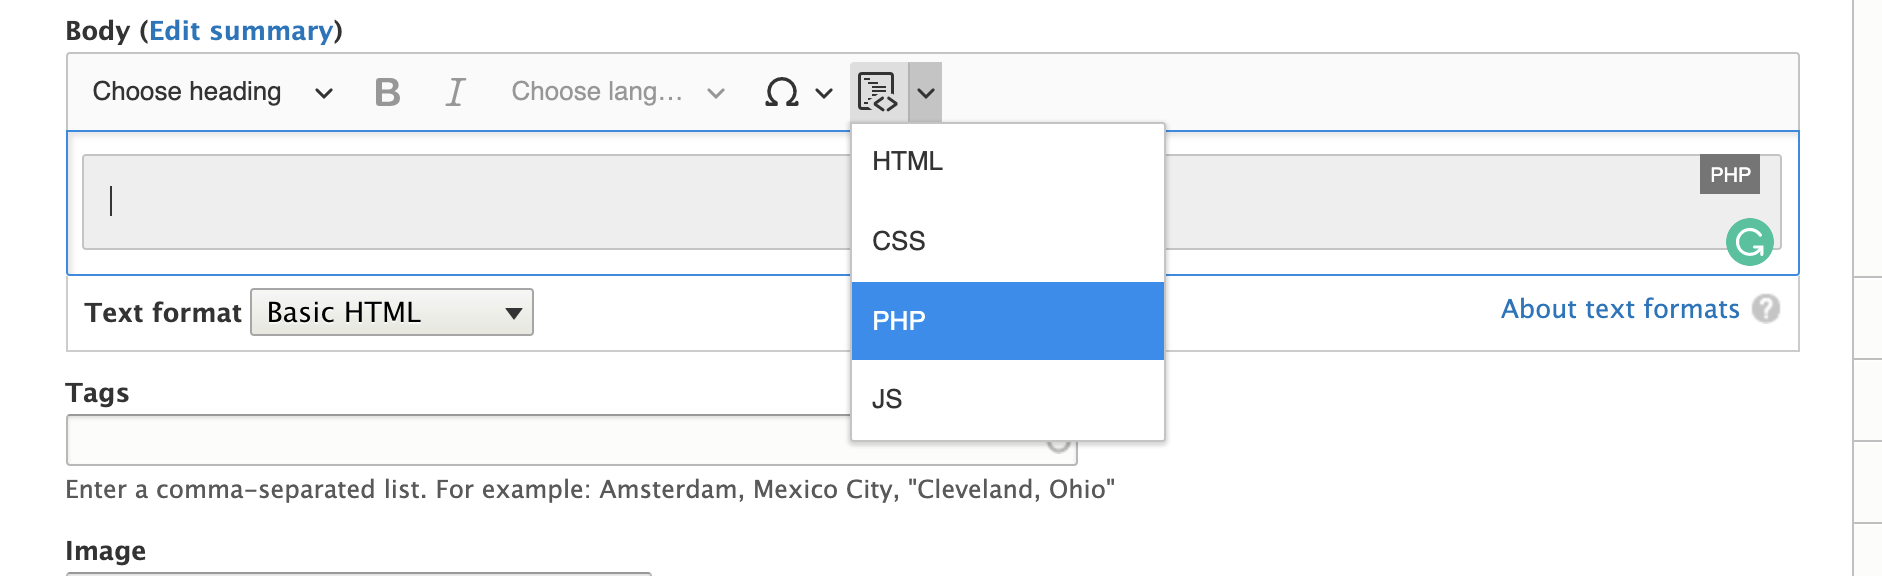
After completing all these steps we can drag the code block plugin to the active toolbar and content editors can make use of it to add the code snippets in the content. This is how the final result will look like:
You can check the complete code of Drupal CKEditor5 plugin for code blocks here - https://github.com/anandtoshniwal/ckeditor5_code_block
CKEditor 5 - feature availability
The CKEditor 5 features are constantly growing. Most of them are included by default in CKEditor 5 builds and are available out-of-the-box. Let’s take a look at what is currently available:
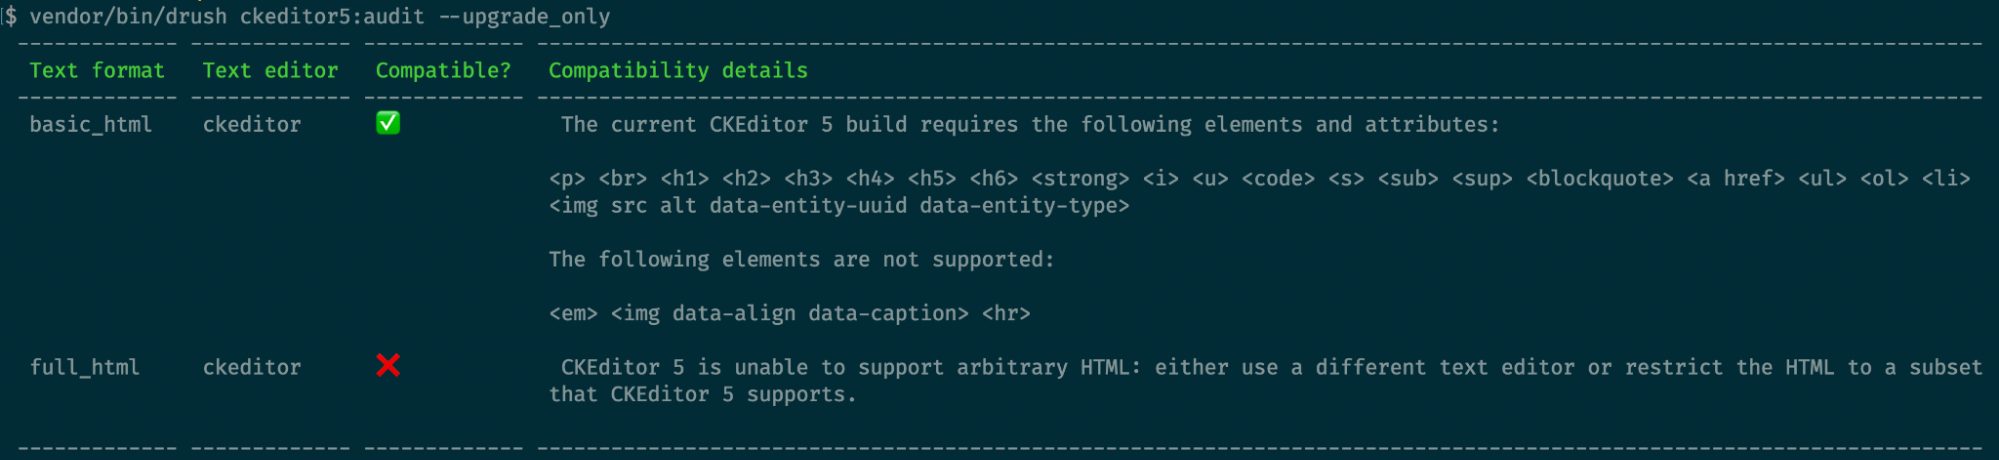
- In CKEditor 4 we used to allow any tags or we used to edit the source and add HTML structure as per our needs but this is not case with CKEDitor5 if you don’t have a converter for a particular element then it will simply remove it. To make sure that you are not losing any content CKEditor team came up with a solution where you can audit if all the tags are being supported or not. It provides a Drush command for you Drush ckeditor5:audit. Which provides output as below screenshot
- The audit feature only works for limited HTML formats. For unlimited HTML, the actual pieces of content would need to be audited and that does not happen with this command. If you want to check how this works in detail you check read about it in-depth on the issue
- General HTML support (GHS) CKEditor team is working on this. It will mostly consist of predefined data about what tags should be allowed by the CKEditor5. Once CKEditor includes this feature then Drupal. CKEditor 5 will be able to provide support for it. In case you want to know more about this check the links below: https://www.drupal.org/project/drupal/issues/3200413 (GHS related discussion under Arbitrary HTML update) https://www.drupal.org/project/ckeditor5/issues/3216021 - CKEditor5 issue.
- If you have custom CKEditor plugins written then you have to rewrite them as per the CKEditor5. There is another option than rewriting it.
Join the conversation
If you want to discuss anything related to CKEditor5 or participate in meetings join the #ckeditor5 channel on Drupal Slack. CKEditor 5 integration meetings are every other Thursday at 14:30 UTC in the same channel.